REPORTS - OFFSITE
Main Page > Application Development Team > System Manual > SPGC EPAYROLL > FOR OFFSITE
REPORTS
This module contains the compilation of reports. It holds all the past transaction and all the records of the company and its employees.
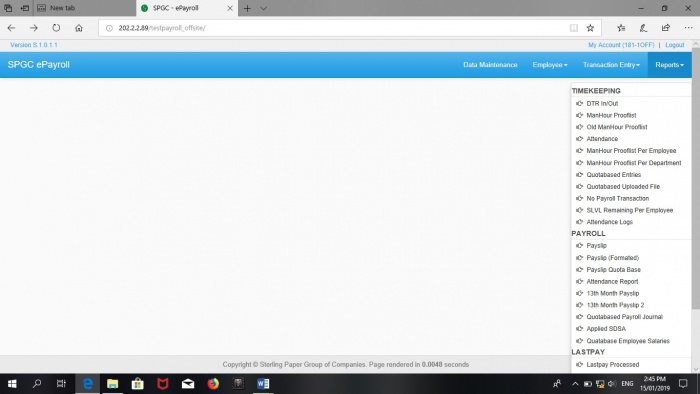
TIMEKEEPING
  • DTR in/out -
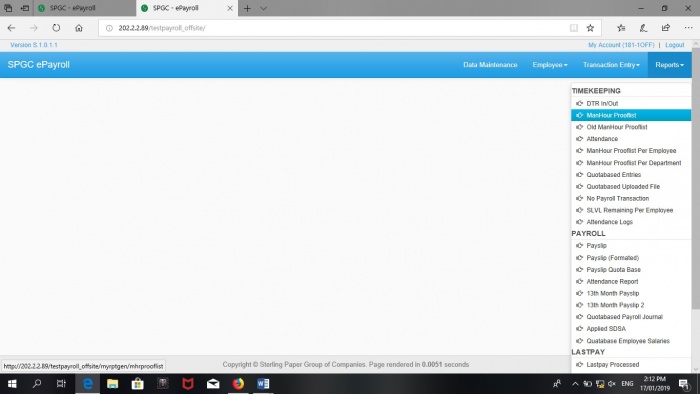
  • Manhour Proof list
  • Old Manhour proof list
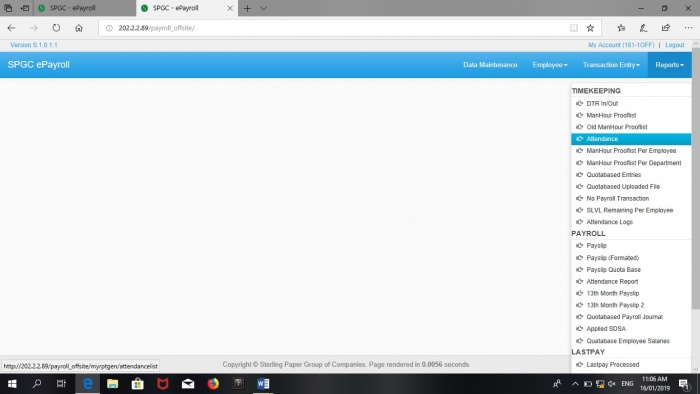
  • Attendance
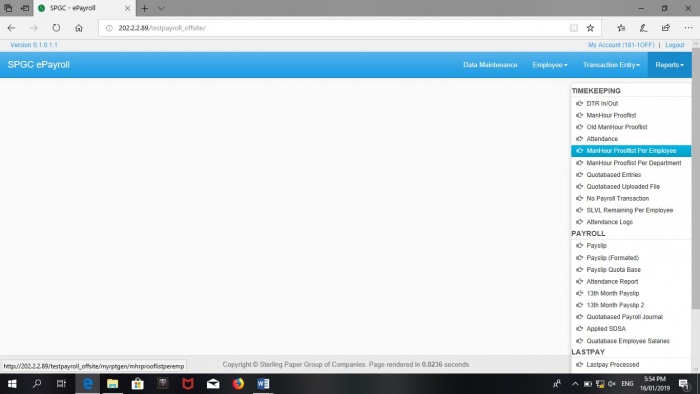
  • Manhour Proof List Per Employee
  • Manhour Proof List Per Department
  • Quota Based Entries
  • Quota Based Uploaded File
  • No payroll Transaction
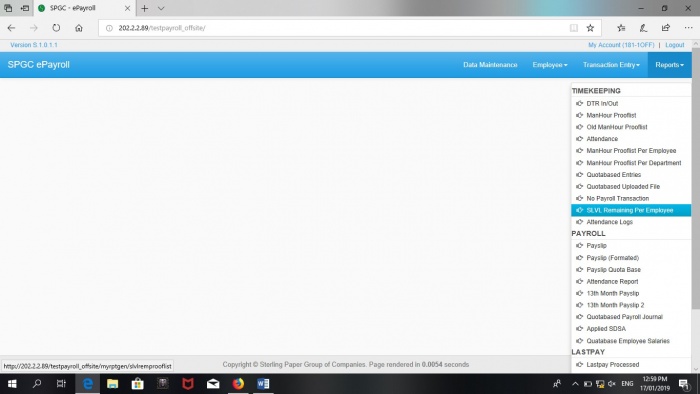
  • SLVL Remaining Per employee
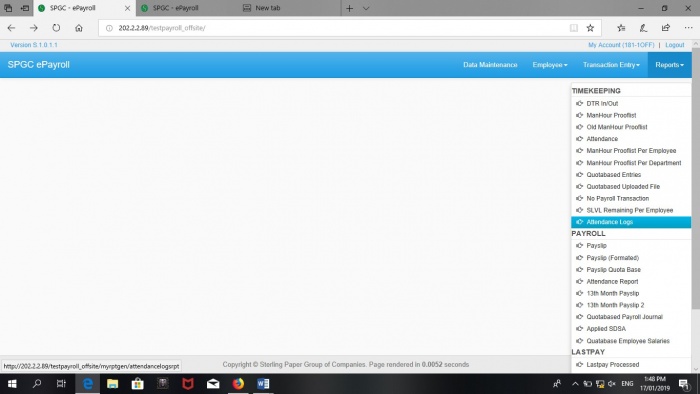
  • Attendance Logs
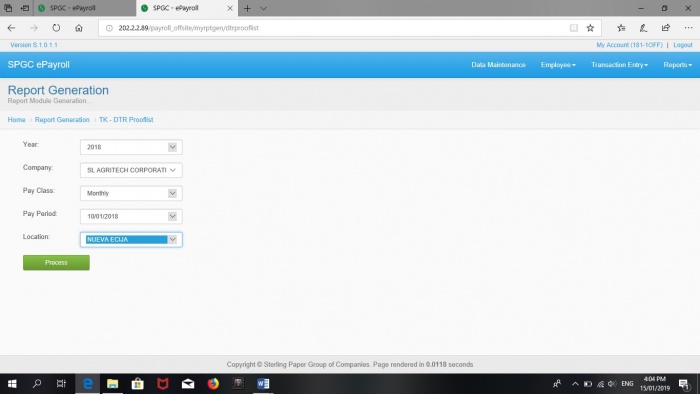
DTR
This module contains the daily time record of the employees.
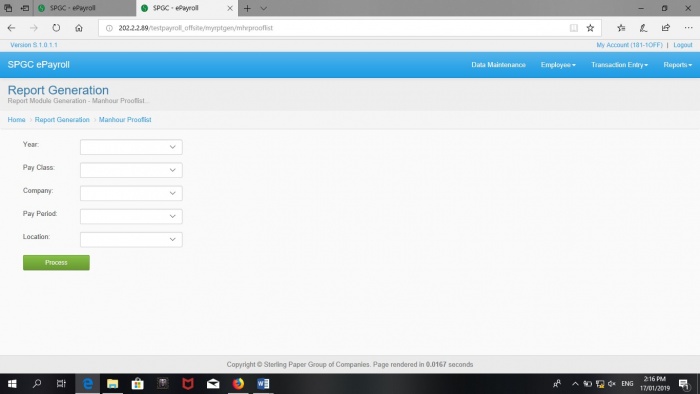
 • Year – In this module the user must select the year to complete the process.
 • Company – In this module the user must select the Company to complete the process.
 • Pay Class – In this module the user must select the Pay Class to complete the process.
 • Pay Period – In this module the user must select the Pay Period to complete the process.
 • Location – In this module the user must select the Location to complete the process.
 • Process -  Upon clicking this button the timekeeping entry proof list will appear.
TIMEKEEPING ENTRY PROOFLIST
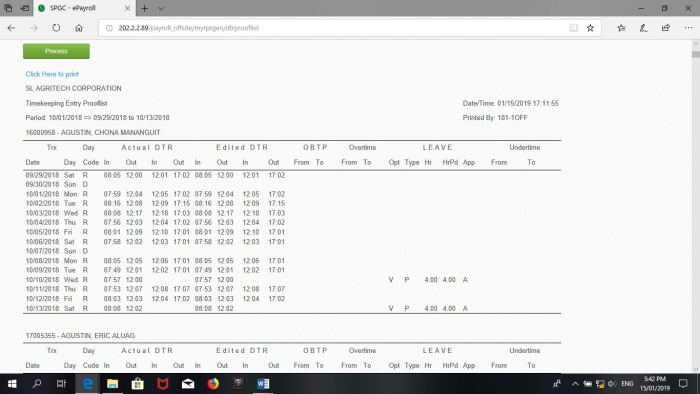
This page contains the timekeeping records of the employees.
  Transactions (Trx) - This column shows the date of transactions.
  Day - This column indicates weather it is Regular working day (R) or a Rest day (D).
  Actual DTR- This column shows the actual daily time record of the employee, It indicates the time when he/she logged in and
              out in the morning and afternoon.
  Edited DTR - This column shows the DTR of the employee which is already been edited by the HR.
  OBTP - This column shows the Official Business Trip (OBTP) of the employee. It indicates the time duration of the business
        trip.
  Overtime - This column shows the Over Time of the employee. It indicates the Time duration of the Overtime.
  Leave - This column shows the official leave of the employee.
  Undertime - This column shows the Under Time of the employee. It indicates the time duration of his/her under time.
MANHOUR PROOFLIST
This module contains the Manhour Proof List Per Company.
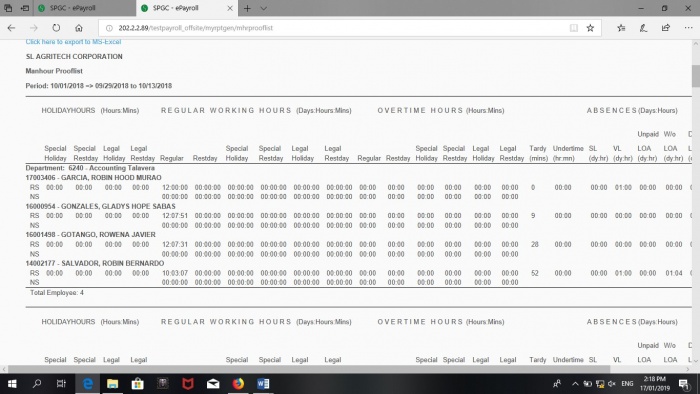
This form consists of primary column namely, employees Holiday Hours, Regular Working Hours, Overtime Hours, Absences and Total Hours Worked.
You may see figure 4.0 for your references.
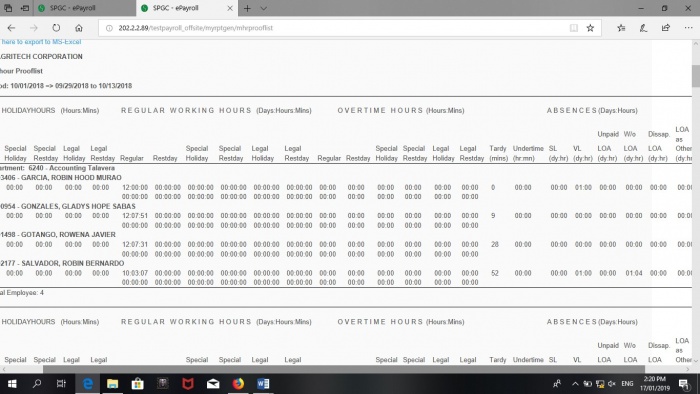
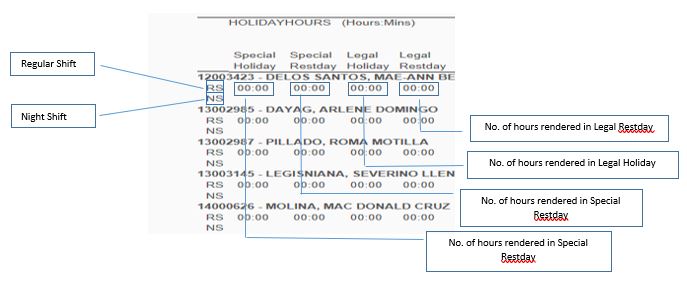
In the HOLIDAYHOURS column we can see the Special Holiday, Special Rest day, Legal Holiday and Legal Rest day.
You may see figure 5.0 for your references.
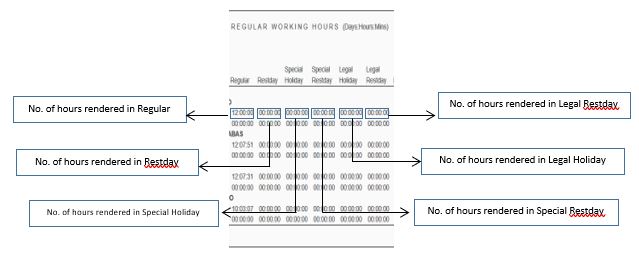
The Regular Working Hours (Days:Hours:Mins) consist of the following “Regular, Rest day, Special Holiday, Special Rest day, Legal Holiday, Legal Rest day”.
You may see figure 5.0 for your references
Overtime Hours (Hours:Mins) This column Is consist of the following “Regular, Restday, Special Holiday, Special Restday, Legal Holiday and Legal Restday”.
You may see figure 5.0 for your references.

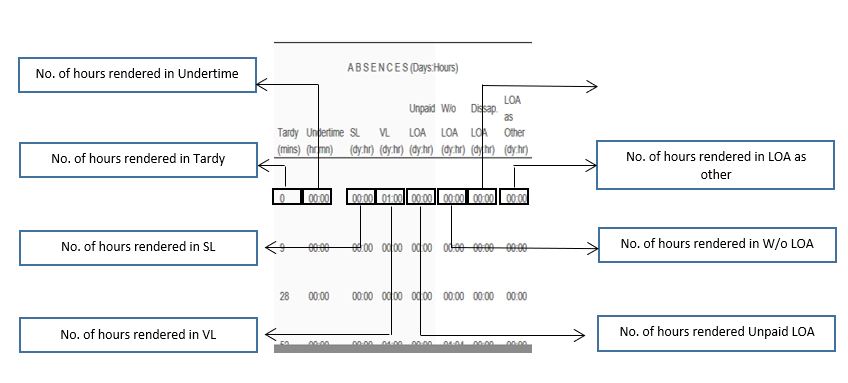
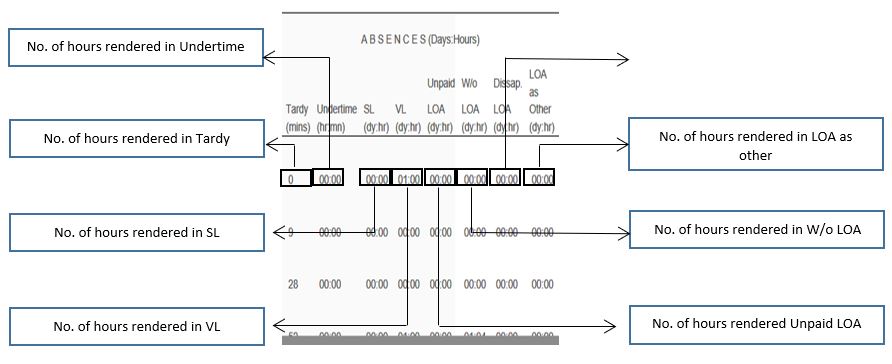
Absences (Days: Hours) this column consist of the following “Tardy and Under time, SL, VL, LOA (Unpaid), LOA (w/o), LOA (Dissap) and LOA as Other”.
You may see figure 5.0 for your references.
Old ManHour ProofList
This module contains the Past Manhour Proof List Per Company. It also contains the past manhour proof list.
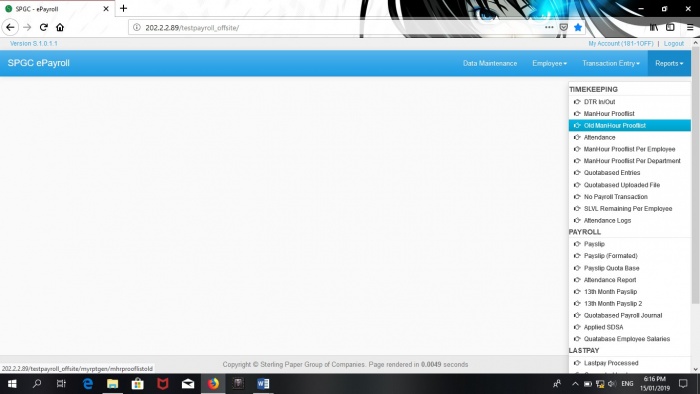
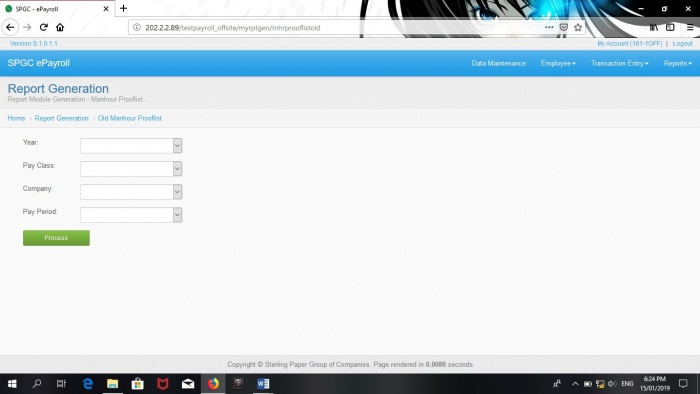
After clicking Process button, the manhour proof list will appear in the lower part of the page. To print the proof list just simply click the print button. To export to MS excel just simply click the export button.
You may see figure 3.0 for your references.
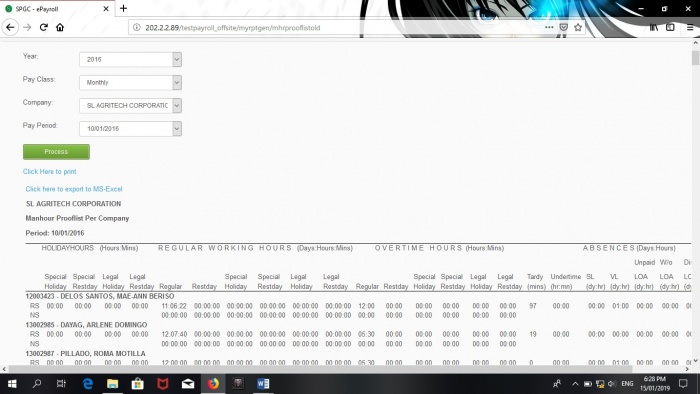
This form consists of primary column namely, employees Holiday Hours, Regular Working Hours, Overtime Hours and Absences.
You may see figure 4.0 for your references.
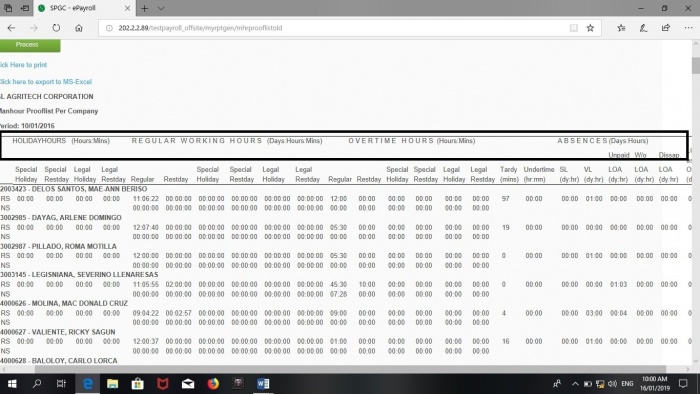
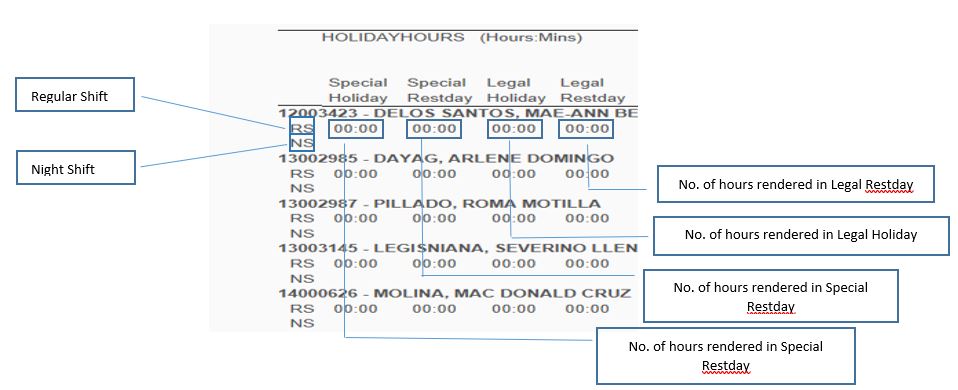
In the HOLIDAYHOURS column we can see the Special Holiday, Special Restday, Legal Holiday and Legal Restday.
You may see figure 5.0 for your references.
The Regular Working Hours (Days:Hours:Mins) consist of the following “Regular, Restday, Special Holiday, Special Restday, Legal Holiday, Legal Restday”.
You may see figure 5.0 for your references.
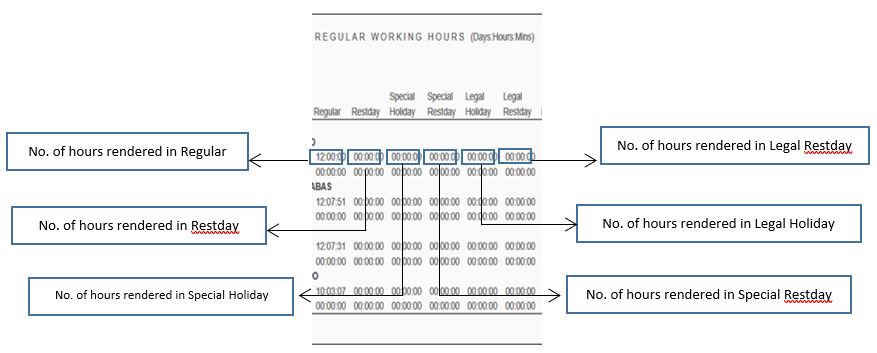
Overtime Hours (Hours:Mins) This column Is consist of the following “Regular, Restday, Special Holiday, Special Restday, Legal Holiday and Legal Restday”.
You may see figure 5.0 for your references.

Absences (Days: Hours) this column consist of the following “Tardy and Under time, SL, VL, LOA (Unpaid), LOA (w/o), LOA (Dissap) and LOA as Other”.
You may see figure 5.0 for your references
ATTENDANCE
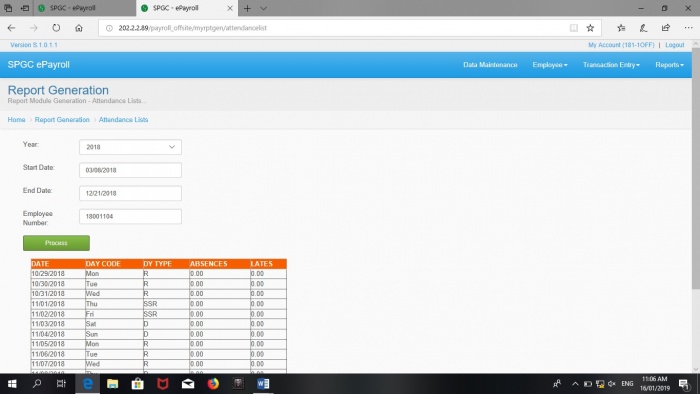
This module contains the attendance of the specific employee.
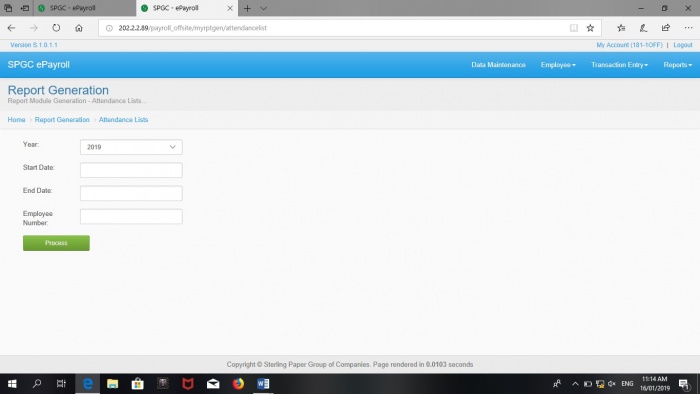
• Year – This module needs to be filled in order to proceed to the next ones.
• Start Date – This module indicates the start date of the attendance the user wanted to view.
• End Date - This module indicates the end date of the attendance the user wanted to view.
• Employee Number – This module needs to be filled with the employee number.
• Process -  Upon clicking Process button, the attendance will show.
You may see figure 5.0 for your references.
• Date – Module that holds the daily attendance of the employee.
• Day Code – This module helps the user to identify the day.
• DY Type – This module enables the user to know what type of day the employee is absent.
• Absences – This module helps the user to view the absences of employee during that day.
• Late – This module helps the user to view the latest of the employee.
You may see figure 5.0 for your references.
MANHOUR PROOFLIST PER EMPLOYEE
This module contains the manhour proof list of a specific employee.
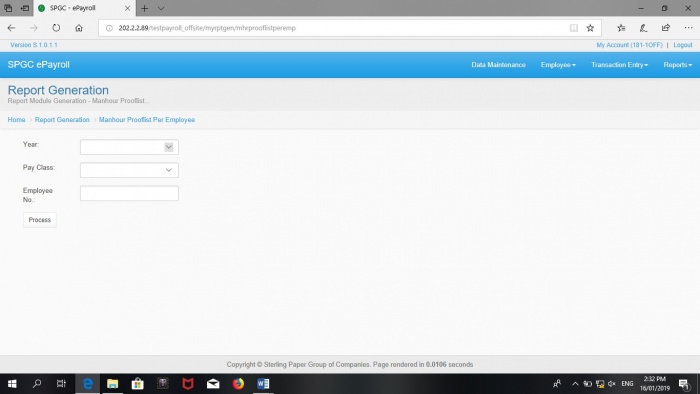
• Year – This module needs to be filled up by the year. The year can be selected from the list.
• Pay Class – In order to complete the process, the user needs to select the pay class of the employee from the list view.
• Employee number – This module needs the employee number in order to complete the process of viewing the manhour proof list
                  per employee.
• Process – This button helps the user to view the proof list.
You may see figure 2.0 for your references
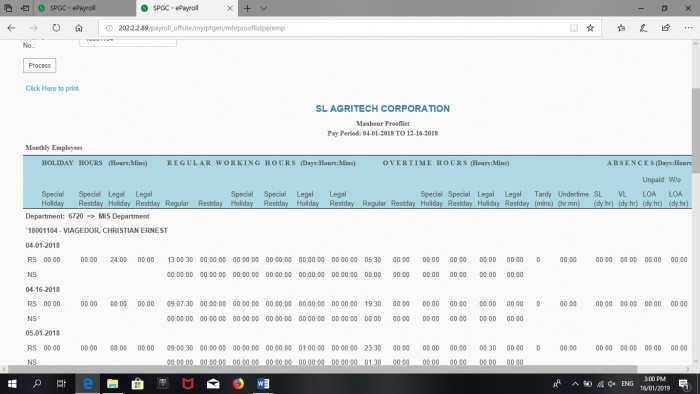
•It includes some important information about the employee.
•It indicates the pay period of the employee.
•Like DTR In/Out it also has the Holiday Hours, regular Working Hours, Overtime Hours and absences, because technically DTR In/Out
 is a Manhour proof list.
•The user must click the print button if he/she wants to print the manhour proof list.
You may see figure 3.0 for your references.
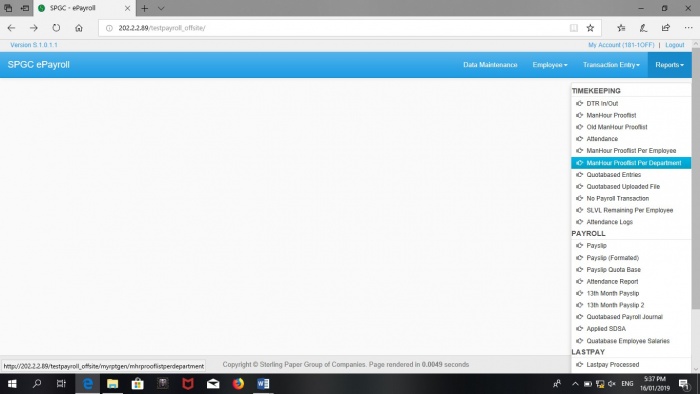
MANHOUR PROOFLIST PER DEPARTMENT
This module contains the manhour proof list of a department.
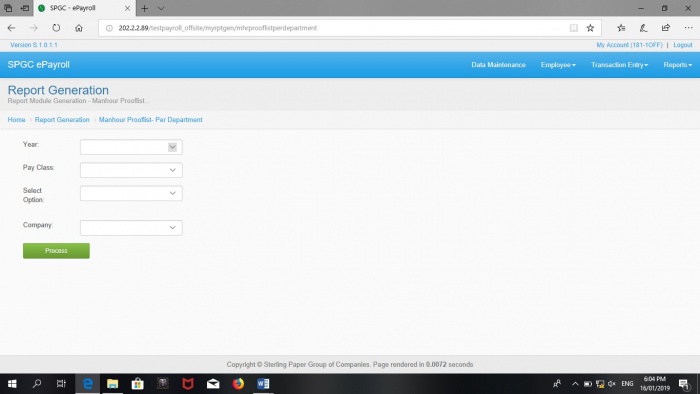
• Year – This module needs to be filled up by the year. The year can be selected from the list.
• Pay Class – In order to complete the process, the user needs to select the pay class of the employee from the list view.
• Select Option – This module enables the user to choose between By Monthly or pay period.
• Company – This module enables the user to choose a company from the list box.
• Process – This button helps the user to view the proof list.
You may see figure 2.0 for your references
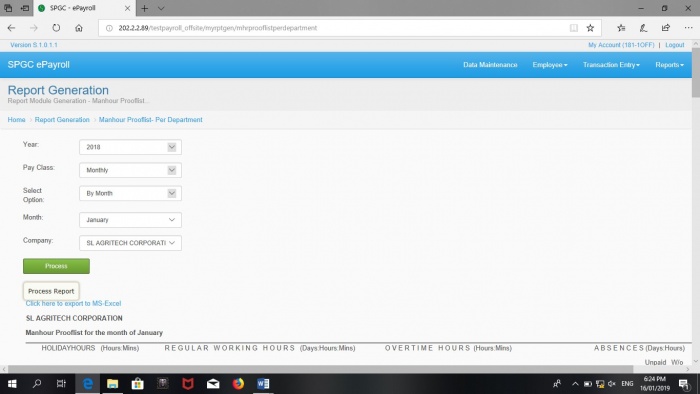
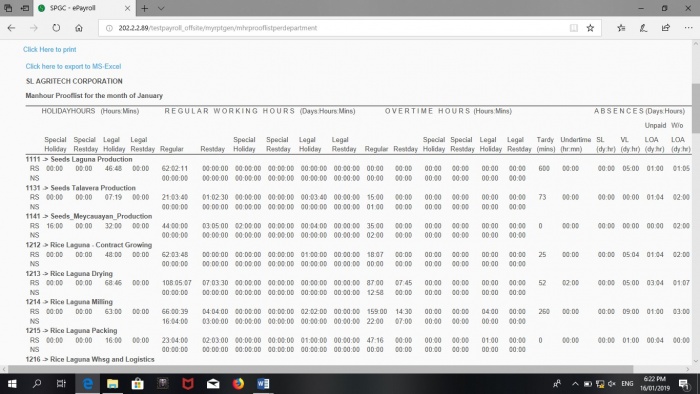
After clicking the process button, the manhour proof list department will be shown.
• It includes some important information about the department of the selected company.
• It displays the manhour proof list of the department according to the selected month.
• The user must click the print button if he/she wants to print the manhour proof list per department.
• The user must click the export to MS Excel button in-order-to store the data.
Quotabased Uploaded File
This module is for viewing the transferred file from the DOS system in to this system.
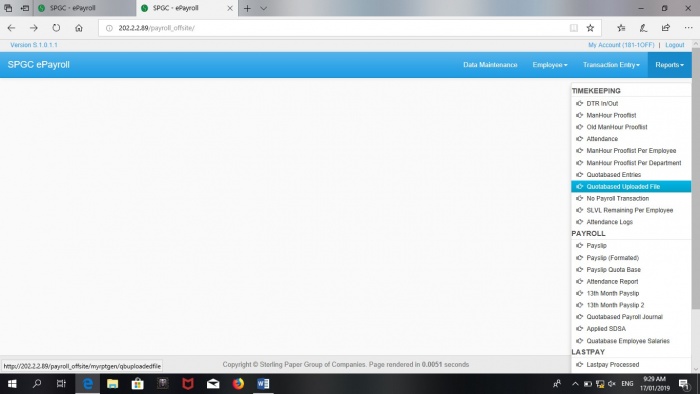
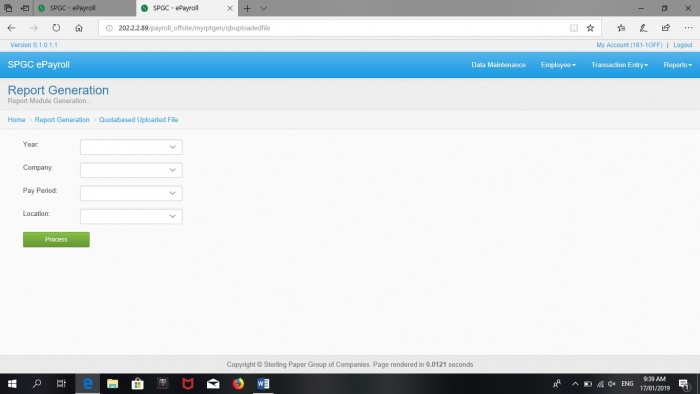
After clicking the Quota based Uploaded File, figure 2.0 will appear. It contains various modules such as Year, Company, Pay Period and Location.
• Year – This module enables the user to choose the year from the list box.
• Company – This module helps the user to choose a company from the list box.
• Pay Period – This module is auto generated by the system. It is also the only module from quota based uploaded file that can
              be uploaded.
• Location – This module provides the list of location that can be used by the user.
No Payroll Transaction
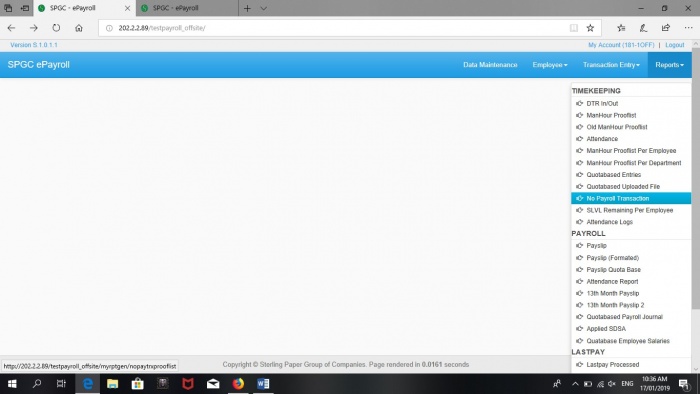
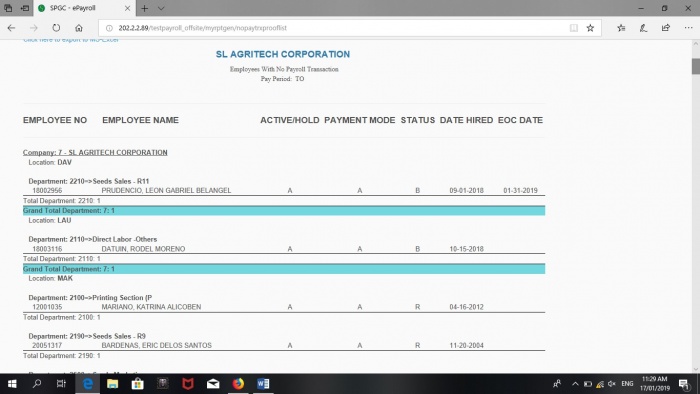
This module contains the list of employees that doesn’t have a payroll transaction. Those employees who doesn’t have a manhour record will not be able to get their salaries.
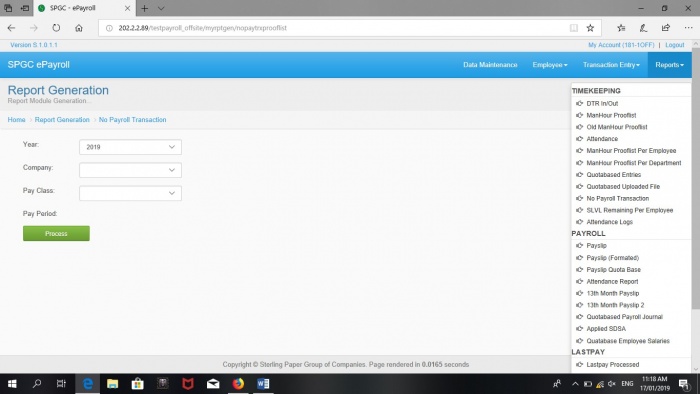
• Year – This module enables the user to choose the year from the list box.
• Company – This module helps the user to choose a company from the list box.
• Pay Class – In order to complete the process, the user needs to select the pay class of the employee from the list view. There are only 3 pay class, the Monthly, Weekly and the VIP
• Pay Period – In order to complete the process, the user needs to select the pay period of the employee from the list view. The pay period depends on what the user will choose from the Pay Class.
• Process – Click process button to start the process.
• Employee No. – This column consists of employee number of the employees.
• Employee Name – This column consists of names of the employees.
• Department –In the right side of this module the user can be able to identify the name of the department.
• Active/Hold – This module can define weather the employee is Active or hold. We can consider that the employee is hold if
               he/she is already resigned.
• Payment Mode – In this module the user can see the way of payment to the employee. Weather it is cash or ATM.
• Status – In this module we can be able to know the status of the employee. Weather he/she is Regular, Probational or Project
          base.
• Date Hired – This module lets the user know when the employee is hired.
• EOC Date – (End of contract date) this module enables the user to know the end of contract of the employee to the
            department.
SLVL Remaining Per Employee
This module contains the remaining Sick Leave and Vacation Leave per employee.
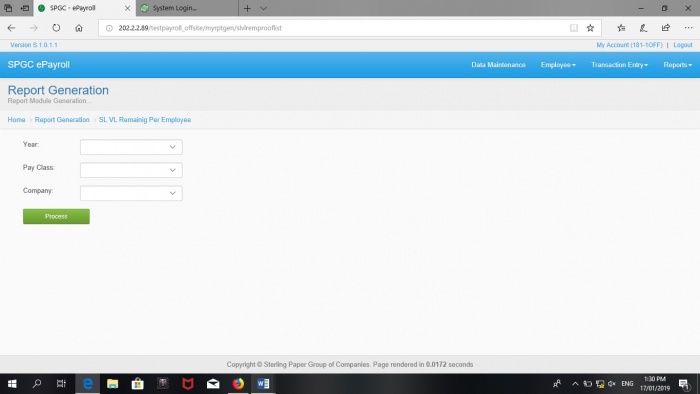
• Year – This module enables the user to choose the year from the listbox.
• Pay Class– In order to complete the process, the user needs to select the pay class of the employee from the list view.
            There are only 3 pay class, the Monthly and Weekly.
• Company – This module helps the user to choose a company from the listbox.
• Process – Click process button to start the process.
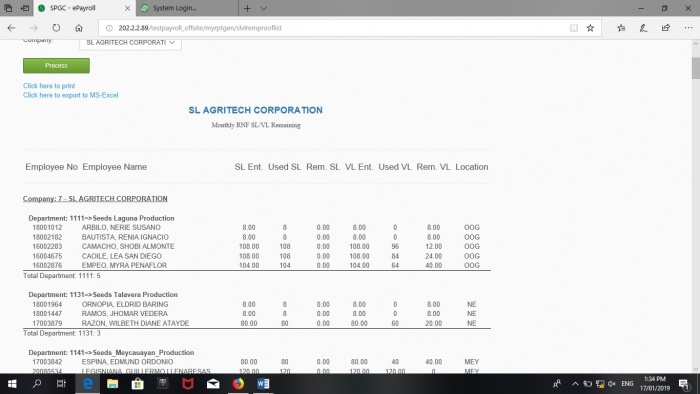
• Employee No. – This column consists of employee number of the employees.
• Employee Name – This column consists of names of the employees.
• Department –In the right side of this module the user can be able to identify the name of the department.
• Total Department – In this module the user can see the department number and the number of person in the department.
• SL Ent – (Sick Leave Entitlement) This column displays the SL of the employee. As we can see there are numbers in the SL ENT
  column. That number is the hours that can be used by the employee as his/her SL in the whole year.
• Used SL – This column displays the used SL of the employee.
• Rem SL – In this column the user can be able to see the remaining SL of the employee.
• VL Ent – (vacation Leave Entitlement) This column displays the VL of the employee. As we can see there are numbers in the
        VL ENT column. That number is the hours that can be used by the employee as his/her VL in the whole year.
• Used VL – This column displays the used VL of the employee.
• Rem VL – In this column the user can be able to see the remaining VL of the employee.
• Location – In this column the user can be able to see the location of the employee.
ATTENDANCE LOGS
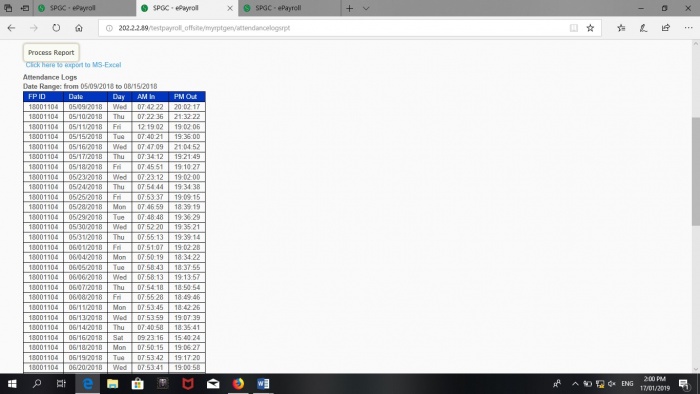
This module contains the attendance logs of the employee.
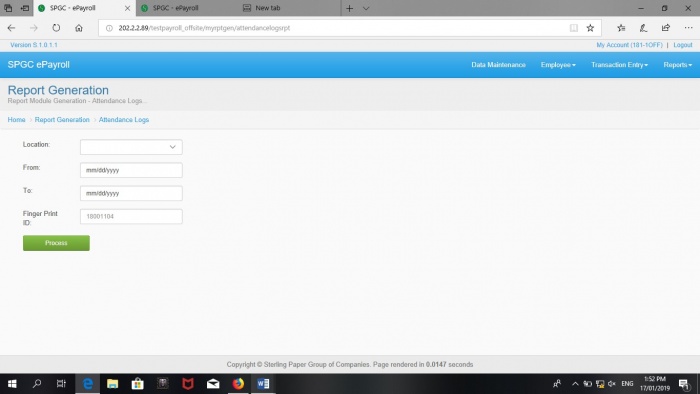
• Location – This module helps the user to easily choose a location.
• From – this module determines the start date of the attendance.
• To – this module determines the end date of the attendance.
• Finger print – this module helps the system more secure. It needs the Finger print of the employee or the employee number.
• Process – Click process button to start the process.
Attendance Logs
It contains all the recorded attendance of the employee.
• Fingerprint ID – This row contains the fingerprint ID of the specific employee.
• Date – This row contains the date that the employee is present.
• Day – This row contains the day where the employee is present.
• AM In – This row contains the time when the employee arrived at the company.
• PM Out – This row contains the time when the employee leaves the company.
You may see figure 2.0 for your references.
