TIMEKEEPING - OFFSITE
Main Page > Application Development Team > System Manual > SPGC EPAYROLL
II. Transaction Entry
 Monthly Timekeeping
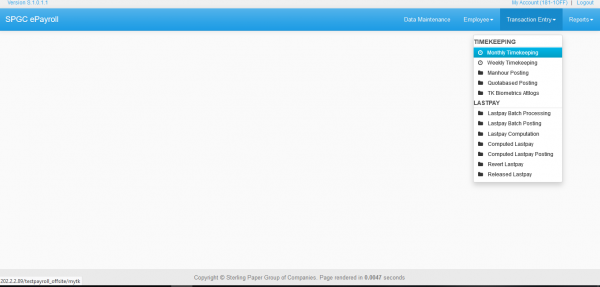
 Options
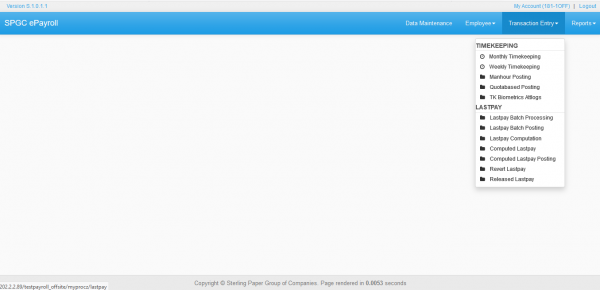
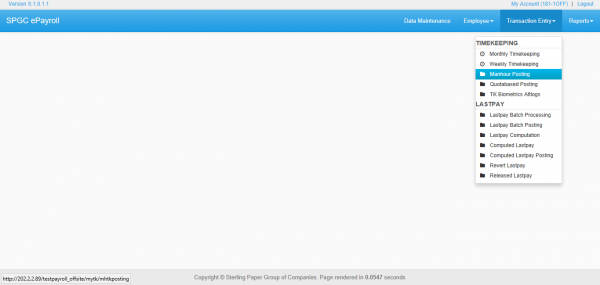
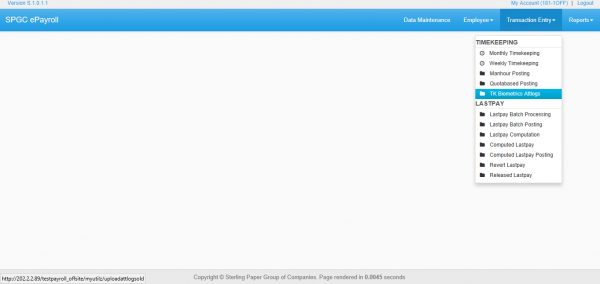
 •Monthly Timekeeping: Module that will display the Monthly Timekeeping records of the employees.
 •Weekly Time Keeping: Module that will display the Weekly Timekeeping records of the employees.
 •ManHour Posting: Module that allows the user to store the processed manhour into the database.
 •TK Biometrics Attlogs: Module that allows the user to upload the biometric logs of the employees in the form of log file.
Figure 2.0
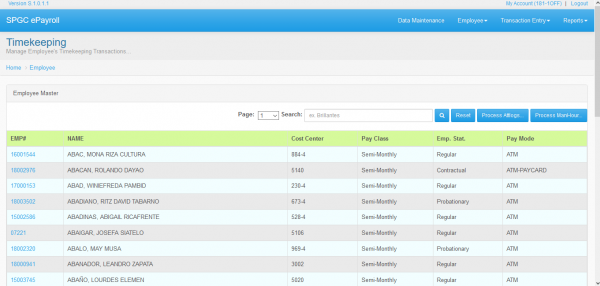
 Once you click Monthly Timekeeping, it will show table showing all the basic details of every employees. You may see figure 2.1 for your reference.
  1.Search Field: Through this field, users can search employees on the system using employee number or employee’s name.
  2.Employee Details: Table showing all the basic information of every employees. The employees displayed will based on user’s access.
If you want to search the information of employee, just type the employee number or name of an employee and click the Search button.
Figure 2.1
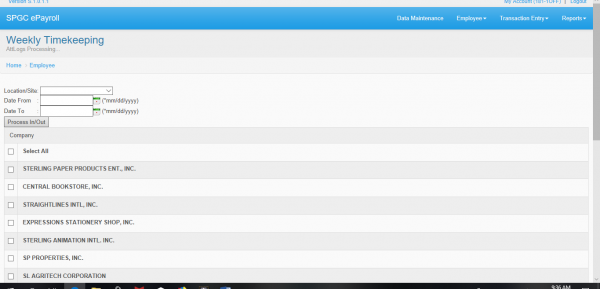
 Process Attlogs – Upon clicking Process Attlogs, this page will show up. I
  1.Choose location or site
  2.Select the duration of date
  3.Select the company
Figure 2.2
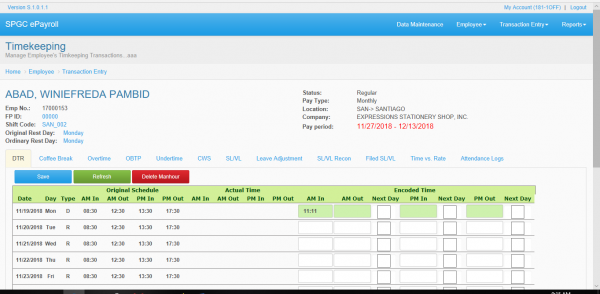
Once you click the Employee Number of the employee you will be redirected to another page. This page contains the some of the information of the employee and the Timekeeping record of the employee. You may see figure 2.3 for your reference.
Figure 2.3
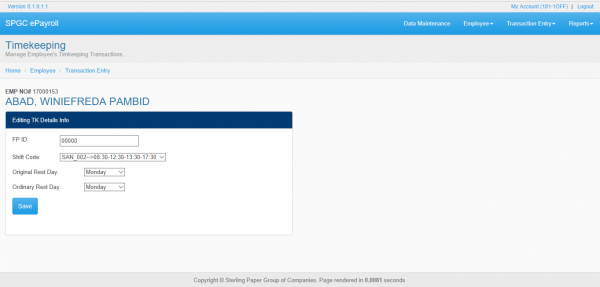
The user can edit the TK details info by clicking the boxed modules. You may see figure 3.0 for your reference.
                                                     Figure 2.4
 Upon clicking the TK details info, you will rediredted to another page. You can be able to edit the TK info of the employee. After clicking the save button the changes will be saved.
Figure 2.5
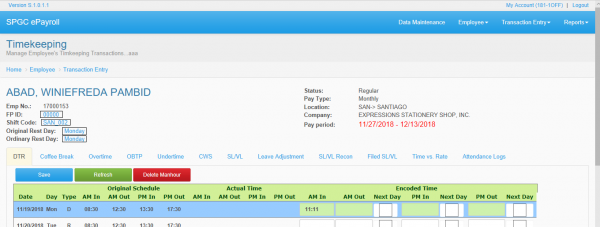
 DTR
 This form shows the DTR of the employee.
  1.Original Schedule - it is the original working schedule of the employee.
  2.Actual time - it is based on when he/she started and when he/she finished his/her job.
  3.Encoded Time - it can be edited by the HR for some reasons.
Note* the time in columns that has a green background can be edited by the HR.
After clicking the Save button the changes that you’ve made will be save. Clicking Refresh button will enable you to refresh the page. Upon clicking Delete Manhour button the manhour record of the employee will be deleted.
Figure 2.6
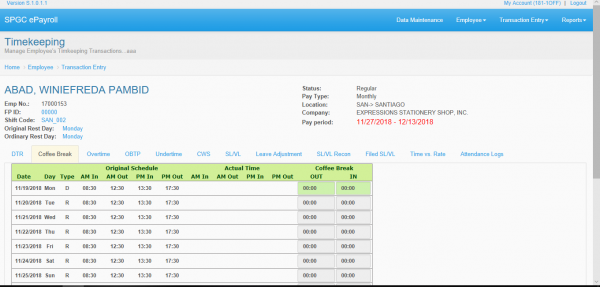
 COFFEE BREAK
  1.Original Schedule - it is the original working schedule of the employee.
  2.Actual time - it is based on when he/she started and when he/she finished his/her job.
  3.Coffee Break - The range of time used by the employee in his/her coffee break.
In this form the user can be able to know if the employee have a coffee break. Also in this page the user can monitor the time used by the employee in his/her coffee break.
Figure 2.7
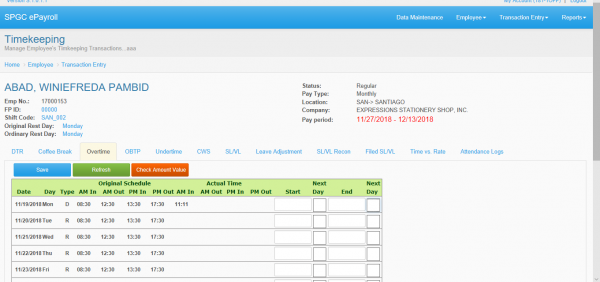
 OVERTIME
  1.Original Schedule - it is the original working schedule of the employee.
  2.Actual time - it is based on when he/she started and when he/she finished his/her job.
  3.Start - The user can indicate when the employee started his/her overtime.
  4.End - The user can indicate when the employee Ended his/her overtime.
The overtime of the employee will be inputted in the Start and End column that is placed within the right corner of the page. In start you have to indicate when the OT of the employee began and, in the End, you have to indicate the time when the OT has ended.
After clicking the Save button the changes that you’ve made will be save. Clicking Refresh button will enable you to refresh the page. Upon clicking Check Amount Value button the user can be able to see the overtime record of the employee.
Figure 2.8
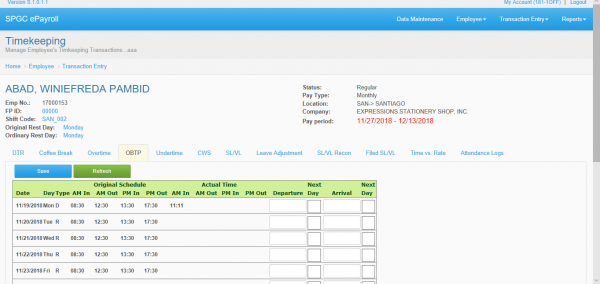
 OBTP (Official Business Trip Pass)
  1.	Original Schedule - it is the original working schedule of the employee.
  2.	Actual time - it is based on when he/she started and when he/she finished his/her job.
  3.	Departure – this module holds the departure time of the employee for his/her OBTP.
  4.	Arrival – This module holds the time when the employee returned from his/her OBTP.
You may see figure 2.9 for your reference. After clicking the Save button the changes that you’ve made will be save. Clicking Refresh button will enable you to refresh the page.
Figure 2.9
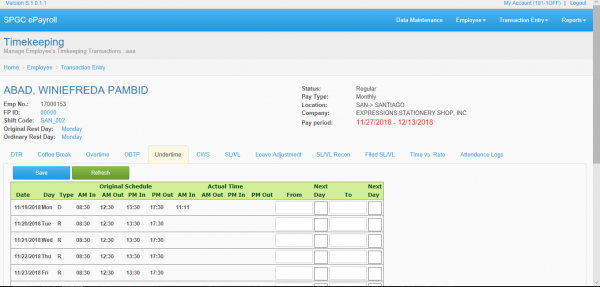
 UNDERTIME
  1.Original Schedule - it is the original working schedule of the employee.
  2.Actual time - it is based on when he/she started and when he/she finished his/her job.
  3.From - The user can indicate when the employee started his/her undertime.
  4.To - The user can indicate when the employee Ended his/her undertime.
After clicking the Save button the changes that you’ve made will be save.
Clicking Refresh button will enable you to refresh the page.
Figure 2.10
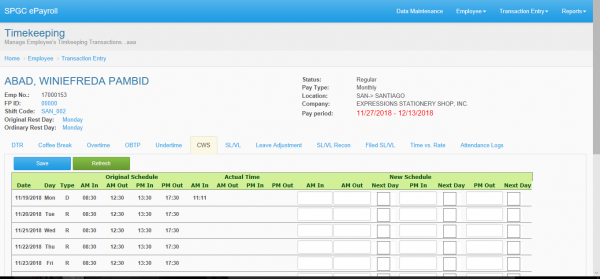
 CWS (Change Work Schedule)
  1.Original Schedule - it is the original working schedule of the employee.
  2.Actual time - it is based on when he/she started and when he/she finished his/her job.
  3.New Schedule – this module enables the user to create a new work schedule for the employee. The user can simply change the schedule by inputting a different time from the previous schedule.
After clicking the Save button the changes that you’ve made will be save. Clicking Refresh button will enable you to refresh the page.
Figure 2.11
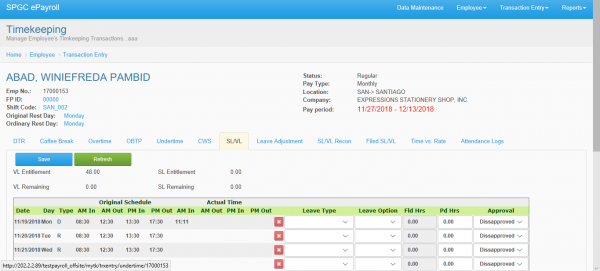
 SL/VL (SICK LEAVE/ VICATION LEAVE)
  1.Leave type - Select the kind of leave in the list box under the leave type column. The Leave type was categorized by selections, namely sick leave, vacation leave, solo parent leave, bereavement leave, paternity leave, suspension and others.
  2.Leave option - Choose from the list box weather leave is in AM, PM or Whole Day
  3.Fld Hrs - It is the filed Hour by the employee, the value of the hour depends on the leave option. If the leave option was set to AM or PM the value will be 4 hours and if the leave option was set to Whole Day, the value will be 8 hours.
  4.Approval – The user will choose weather he/she will approve the leave of the employee.
Figure 2.12
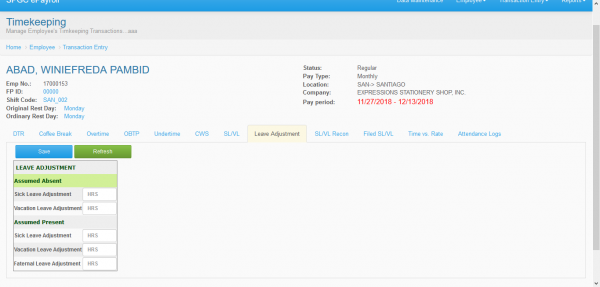
 LEAVE ADJUSTMENT
  1.Assumed Absent – In this module the user can be able to adjust the leave of the employee.
   •Sick Leave Adjustment
   •Vacation Leave Adjustment
  2.Assumed Present – In this module the user can be able to adjust the time in which the employee will be present.
  •Sick Leave Adjustment
  •Vacation Leave Adjustment
  •Faternal Leave Adjustment
Figure 2.13
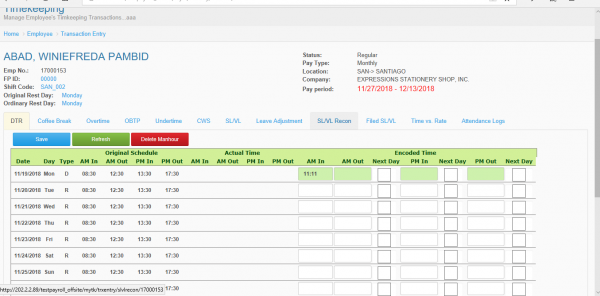
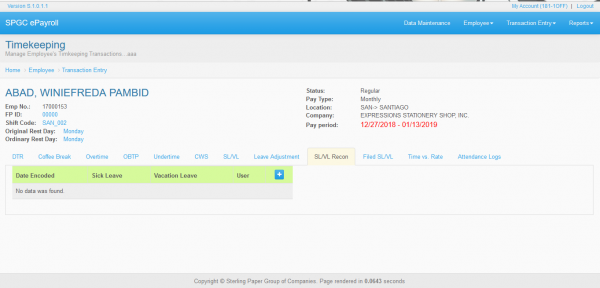
SL/VL Recon - In this module the user can be able to see some information of the employee. This module is used to add or to deduct the SL/VL of the employee.
Figure 2.14
 MONTHLY TIMEKEEPING FOR OFFSITE EMPLOYEES
  Monthly Timekeeping: Module that will display the Monthly Timekeeping records of the employees.
Figure 2.15
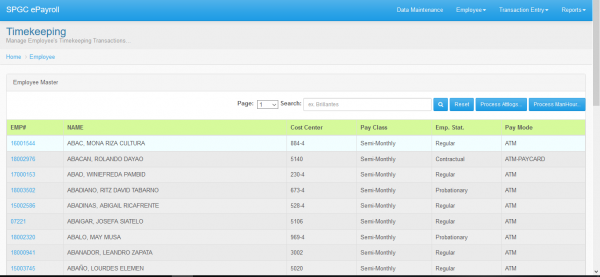
 Once you click Monthly Timekeeping, it will show table showing all the basic details of every employees.
  1.Search Field: Through this field, users can search employees on the system by employee number of employee’s name.
  2.Employee Details: Table showing all the basic information of every employees. The employees displayed will based on user’s access.
If you want to search the information of employee, just type the employee number or name of an employee and click the Search button.
Note: Since we are talking about offsite employees, the user must select an offsite employees so that he/she can be able to access the offsite employees timekeeping records.
Figure 2.16
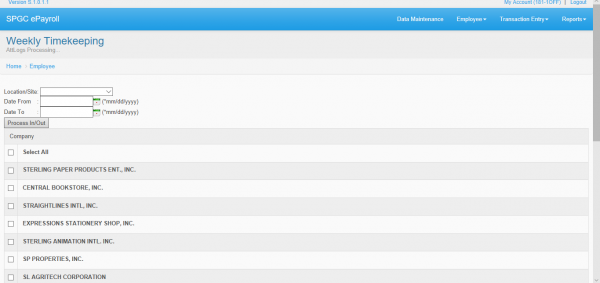
 Process Attlogs – Upon clicking Process Attlogs, this page will show up.
  1.Choose location or site
  2.Select the duration of date
  3.Select the company
Figure 2.17
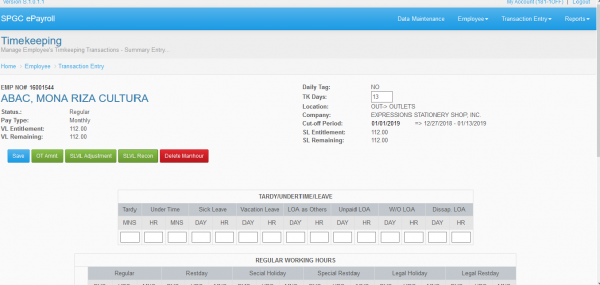
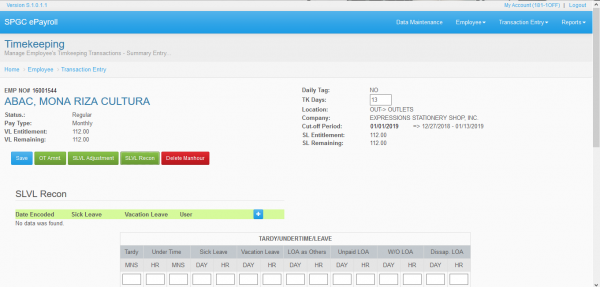
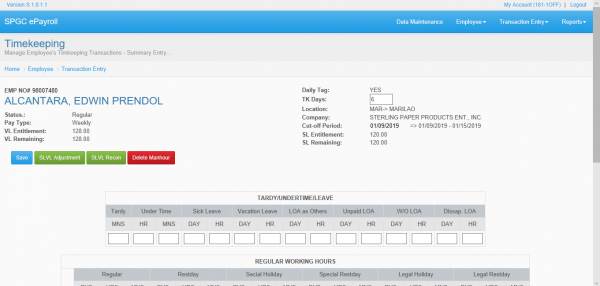
Once you click the Employee Number of the employee you will be redirected to another page. This page contains the some of the information of the employee and the Timekeeping record of the employee. You may see figure 3.0 for your reference.
As you can see there are some important information about the employee that is displayed in the top of the page. As we can see the there is a bit of differences between time keeping interface of employees and offsite employees.
 1.	SAVE – This button enables the user to save the inputted data.
 2.	OT Amnt – Upon clicking this button will enables you to view the Overtime record of the employee.
 3.	SLVL Adjustment – This button enables the user to change the SLVL schedule of the employee.
 4.	SLVL Recon – This module is used to add or to deduct the SL/VL of the employee.
 5.	Delete Manhour – This module is for deleting manhour.
Figure 2.18
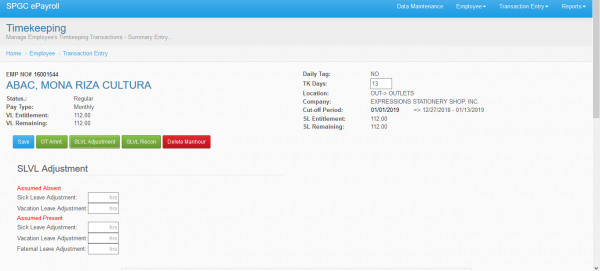
 SLVL ADJUSTMENT
  •Assumed Absent – In this module the user can be able to adjust the leave of the employee.
   1.	Sick Leave Adjustment
   2.	Vacation Leave Adjustment
  •Assumed Present – In this module the user can be able to adjust the time in which the employee will be present.
   1.	Sick Leave Adjustment
   2.	Vacation Leave Adjustment
   3.	Faternal Leave Adjustment
Figure 2.19
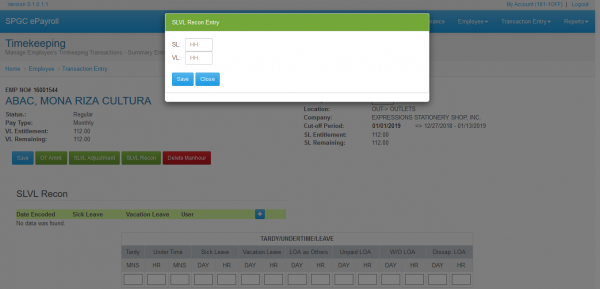
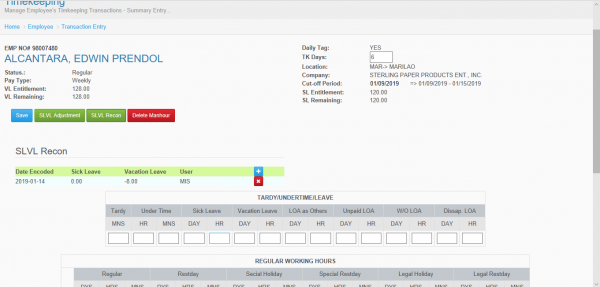
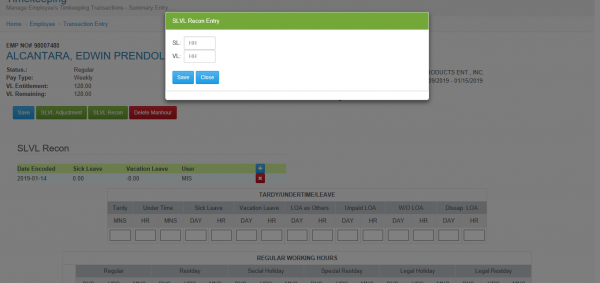
SLVL Recon - In this module the user can be able to see some information of the employee. This module is used to add or to deduct the SL/VL of the employee.
Figure 2.20
Figure 2.21
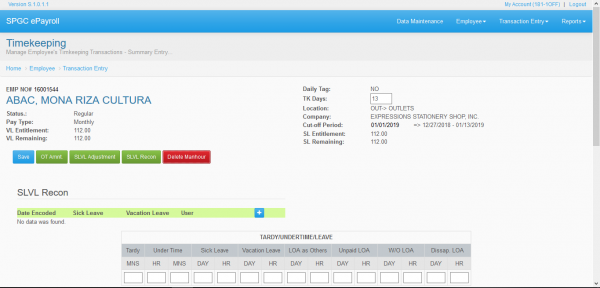
Delete ManHour – Upon clicking this button will enables you to delete the computed manhour of the employee.
Figure 2.22
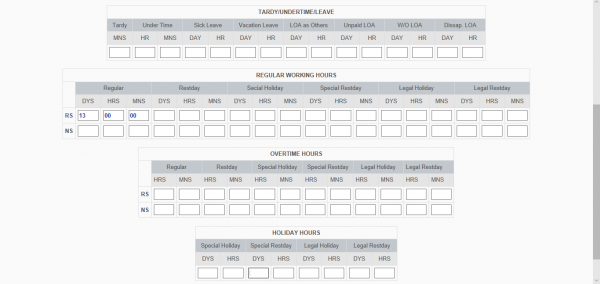
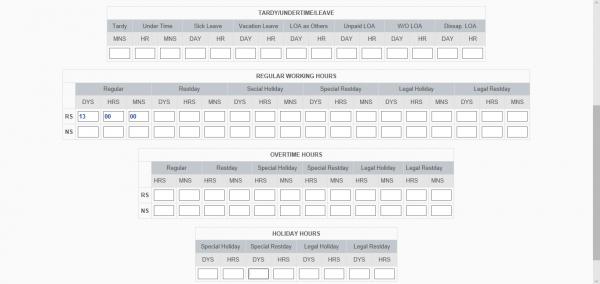
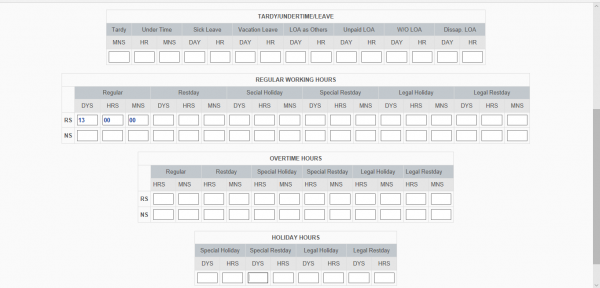
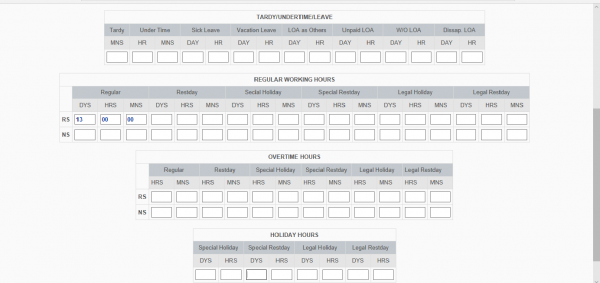
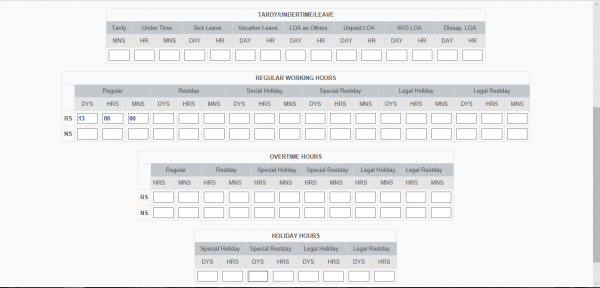
 Tardy/Undertime/Leave
  1.Tardy – in the tardy column there is only 1 textbox. It is for Minutes.
  2.Under Time – in the UnderTime column there is only 2 textboxes. It is for the Hours and Minutes.
  3.Sick Leave - in the Sick Leave column there is only 2 textboxes. It is for the Day and Hours.
  4.Vacation Leave - in the Vacation Leave column there is only 2 textboxes. It is for the Day and Hours.
  5.LOA as Others - in the LOA as Others column there is only 2 textboxes. It is for the Day and Hours.
  6.Unpaid LOA – (Unpaid Leave Of Absences) in the Unpaid LOA column there is only 2 textboxes. It is for the Day and Hours.
  7.W/O LOA – (W/O Leave of Absences) in the W/O LOA column there is only 2 textboxes. It is for the Day and Hours.
  8.Dissap LOA – (Disapproved Leave of Absences) in the Dissap LOA column there is only 2 textboxes. It is for the Day and Hours.
Note* in order to fill up the fields you have to type it inside the textboxes.
Figure 2.23
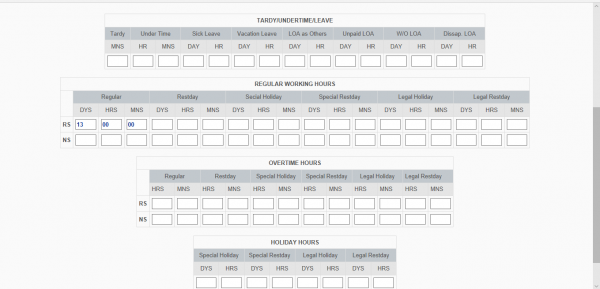
 Regular Working Hours – It records the time rendered by the Employee during his/herworking hours. Under the Regular Working Hours you can find (Regular, Restday, Special Holiday,Special  Restday, Legal Holiday and Legal  restday). In the left corner of the page we can see the (RS and NS) RS stands for Regular Shift while Night shift in NS.
  1.Regular –It is the regular working sched of the employee. Under this column you can find Days, Hours and Minutes. It records the time worked by the employee in his Regular working schedule.
  2.Restday – It is the Restday sched of the employee. Under this column you can find Days, Hours and Minutes. It records the time worked by the employee in his Restday.
  3.Special Holiday – Under this column you can find Days, Hours and Minutes. It records the time worked by the employee during a Special Holiday.
  4.Special Restday – Under this column you can find Days, Hours and Minutes. It records the time worked by the employee during a Special Restday.
  5.Legal Holiday – Under this column you can find Days, Hours and Minutes. It records the time worked by the employee during a Legal Holiday.
  6.Legal restday – Under this column you can find Days, Hours and Minutes. It records the time worked by the employee during a Legal restday.
Note* Special Holiday - In this kind of holiday the employee needs to work during this holiday so that he/she will be paid. (It applies the No work, No Pay principle). Note* Special Restday – It is a restday of the employee that happened during a Specia Holiday . Note* Legal Holiday – It is a holiday stablished by legal authority and marked by restrictions on work and transaction of official business. Note* Legal Restday – It is a restday of the employee that happened during a Legal Holiday.
Figure 2.24
 Overtime Hours- it records the Overtime rendered by the employee.  Under the Overtime Hours you can find (Regular, Restday, Special Holiday, Special Restday, Legal Holiday, Legal Restday )
  1.Regular –It is the regular working schedule of the employee. Under this column you can find Hours and Minutes. It records the Overtime worked by the employee in his Regular working schedule.
  2.Restday – It is the Restday schedule of the employee. Under this column you can find Hours and Minutes. It records the Overtime worked by the employee in his Restday.
  3.Special Holiday – Under this column you can find Hours and Minutes. It records the Overtime worked by the employee during a Special Holiday.
  4.Special Restday – Under this column you can find Hours and Minutes. It records the Overtime worked by the employee during a Special Restday.
  5.Legal Holiday – Under this column you can find Hours and Minutes. It records the Overtime worked by the employee during a Legal Holiday.
  6.Legal restday – Under this column you can find Hours and Minutes. It records the Overtime worked by the employee during a Legal restday.
Note* Special Holiday - In this kind of holiday the employee needs to work during this holiday so that he/she will be paid. (It applies the No work, No Pay principle). Note* Special Restday – It is a restday of the employee that happened during a Special Holiday . Note* Legal Holiday – It is a holiday stablished by legal authority and marked by restrictions on work and transaction of official business. Note* Legal Restday – It is a restday of the employee that happened during a Legal Holiday.
Figure 2.25
 Holiday Hours- It records the time rendered by the employee during a holiday. Under the Holiday Hours we can find the (Special Holiday, Special Restday, Legal Holiday, and Legal Restday).
  1.Special Holiday – Under this column you can find Days and Hours. It records the Overtime worked by the employee during a Special Holiday.
  2.Special Restday - Under this column you can find Days and Hours. It records the Overtime worked by the employee during a Special Restday.
  3.Legal Holiday - Under this column you can find Days and Hours. It records the Overtime worked by the employee during a Legal Holiday.
  4.Legal Restday - Under this column you can find Days and Hours. It records the Overtime worked by the employee during a Legal restday.
Note* Special Holiday - In this kind of holiday the employee needs to work during this holiday so that he/she will be paid. (It applies the No work, No Pay principle). Note* Special Restday – It is a restday of the employee that happened during a Special Holiday . Note* Legal Holiday – It is a holiday stablished by legal authority and marked by restrictions on work and transaction of official business. Note* Legal Restday – It is a restday of the employee that happened during a Legal Holiday.
Figure 2.26
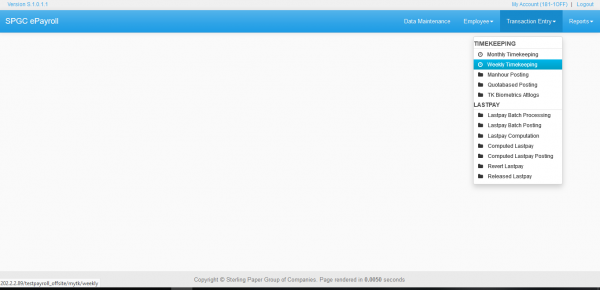
WEEKLY TIMEKEEPING
Weekly Timekeeping
Figure 2.27
 TIMEKEEPING
 Options
  •Monthly Timekeeping: Module that will display the Monthly Timekeeping records of the employees.
  •Weekly Time Keeping: Module that will display the Weekly Timekeeping records of the employees.
  •ManHour Posting: Module that allows the user to store the processed manhour into the database.
  •TK Biometrics Attlogs: Module that allows the user to upload the biometric logs of the employees in the form of log file.
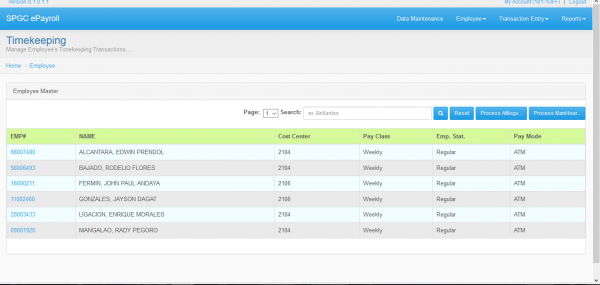
Once you click Monthly Timekeeping, it will show table showing all the basic details of every employees.
 •Search Field: Through this field, users can search employees on the system by the use of employee number of employee’s name.
 •Employee Details: Table showing all the basic information of every employees. The employees displayed will based on user’s access.
Figure 2.28
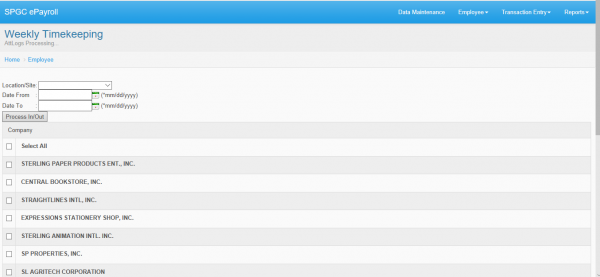
Process Attlogs – Upon clicking Process Attlogs, this page will show up.
  1.Choose location or site
  2.Select the duration of date
  3.Select the company
Figure 2.29
As we can see there is a bit of similarities between timekeeping for offsite employees and weekly timekeeping technically it is because all employees in weekly timekeeping are all offsite employees.
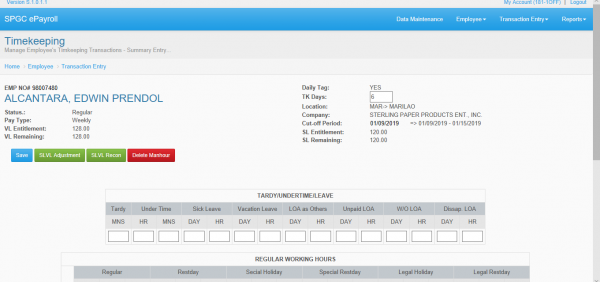
Once you click the Employee Number of the employee you will be redirected to another page. This page contains the some of the information of the employee and the Timekeeping record of the employee. You may see figure 4.0 for your reference. As you can see there are some important information about the employee that is displayed in the top of the page. As we can see the there is a bit of differences between time keeping interface of employees and offsite employees.
  1.SAVE – This button enables the user to save the inputted data.
  2.OT Amnt – Upon clicking this button will enables you to view the Overtime record of the employee.
  3.SLVL Adjustment – This button enables the user to change the SLVL schedule of the employee.
  4.SLVL Recon – In this m7odule the user can be able to see some information of the employee. This module is used to add or to deduct the SL/VL of the employee.
  5.Delete Manhour – This module is for deleting man hour.
Figure 2.30
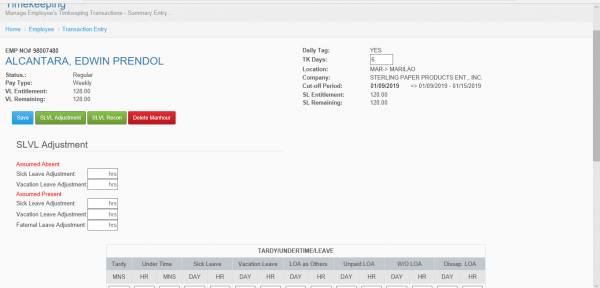
 SLVL ADJUSTMENT
 •Assumed Absent – In this module the user can be able to adjust the leave of the employee.
   1.Sick Leave Adjustment
   2.Vacation Leave Adjustment
 •Assumed Present – In this module the user can be able to adjust the time in which the employee will be present.
   4.Sick Leave Adjustment
   5.Vacation Leave Adjustment
   6.Faternal Leave Adjustment
Figure 2.31
SLVL Recon - It is a SLVL from the past that has not been paid off.
Figure 2.32
Figure 2.33
Delete ManHour – Upon clicking this button will enables you to delete the computed manhour of the employee.
Figure 2.34
 Tardy/Undertime/Leave
  1.Tardy – in the tardy column there is only 1 textbox. It is for Minutes.
  2.Under Time – in the UnderTime column there is only 2 textboxes. It is for the Hours and Minutes.
  3.Sick Leave - in the Sick Leave column there is only 2 textboxes. It is for the and Hours.
  4.Vacation Leave - in the Vacation Leave column there is only 2 textboxes. It is for the Day and Hours.
  5.LOA as Others - in the LOA as Others column there is only 2 textboxes. It is for the Day and Hours.
  6.Unpaid LOA – (Unpaid Leave Of Absences) in the Unpaid LOA column there is only 2 textboxes. It is for the Day and Hours.
  7.W/O LOA – (W/O Leave of Absences) in the W/O LOA column there is only 2 textboxes. It is for the Day and Hours.
  8.Dissap LOA – (Disapproved Leave of Absences) in the Dissap LOA column there is only 2 textboxes. It is for the Day and Hours.
Note* in order to fill up the fields you have to type it inside the textboxes.
Figure 2.35
 Regular Working Hours – It records the time rendered by the Employee during his/her working hours. Under the Regular Working Hours you can find (Regular, Rest day, Special Holiday, Special Rest day, Legal Holiday and Legal rest day). In the left corner of the page we can see the (RS and NS) RS stands for Regular Shift while Night shift in NS.
  1.Regular –It is the regular working schedule of the employee. Under this column you can find Days, Hours and Minutes. It records the time worked by the employee in his Regular working schedule.
  2.Rest day – It is the Rest day schedule of the employee. Under this column you can find Days, Hours and Minutes. It records the time worked by the employee in his Rest day.
  3.Special Holiday – Under this column you can find Days, Hours and Minutes. It records the time worked by the employee during a Special Holiday.
  4.Special Rest day – Under this column you can find Days, Hours and Minutes. It records the time worked by the employee during a Special Rest day.
  5.Legal Holiday – Under this column you can find Days, Hours and Minutes. It records the time worked by the employee during a Legal Holiday.
6.Legal rest day – Under this column you can find Days, Hours and Minutes. It records the time worked by the employee during a Legal rest day.
Note* Special Holiday - In this kind of holiday the employee needs to work during this holiday so that he/she will be paid. (It applies the No work, No Pay principle). Note* Special Rest day – It is a rest day of the employee that happened during a Special Holiday . Note* Legal Holiday – It is a holiday stablished by legal authority and marked by restrictions on work and transaction of official business. Note* Legal Rest day – It is a rest day of the employee that happened during a Legal Holiday.
Figure 2.36
 Overtime Hours- it records the Overtime rendered by the employee.  Under the Overtime Hours you can find (Regular, Restday, Special Holiday, Special Restday, Legal Holiday, Legal Restday )
  1.	*Regular –It is the regular working schedule of the employee. Under this column you can find Hours and Minutes. It records the Overtime worked by the employee in his Regular working schedule.
  2.	Restday – It is the Restday schedule of the employee. Under this column you can find Hours and Minutes. It records the Overtime worked by the employee in his Restday.
  3.	Special Holiday – Under this column you can find Hours and Minutes. It records the Overtime worked by the employee during a Special Holiday.
  4.	Special Restday – Under this column you can find Hours and Minutes. It records the Overtime worked by the employee during a Special Restday.
  5.	Legal Holiday – Under this column you can find Hours and Minutes. It records the Overtime worked by the employee during a Legal Holiday.
  6.	Legal restday – Under this column you can find Hours and Minutes. It records the Overtime worked by the employee during a Legal restday.
Note* Special Holiday - In this kind of holiday the employee needs to work during this holiday so that he/she will be paid. (It applies the No work, No Pay principle). Note* Special Restday – It is a restday of the employee that happened during a Special Holiday . Note* Legal Holiday – It is a holiday stablished by legal authority and marked by restrictions on work and transaction of official business. Note* Legal Restday – It is a restday of the employee that happened during a Legal Holiday.
Figure 2.37
 Holiday Hours- It records the time rendered by the employee during a holiday. Under the Holiday Hours we can find the (Special Holiday, Special Restday, Legal Holiday, and Legal Restday).
  1.Special Holiday – Under this column you can find Days and Hours. It records the Overtime worked by the employee during a Special Holiday.
  2.Special Restday - Under this column you can find Days and Hours. It records the Overtime worked by the employee during a Special Restday.
  3.Legal Holiday - Under this column you can find Days and Hours. It records the Overtime worked by the employee during a Legal Holiday.
  4.Legal Restday - Under this column you can find Days and Hours. It records the Overtime worked by the employee during a Legal restday.
Note* Special Holiday - In this kind of holiday the employee needs to work during this holiday so that he/she will be paid. (It applies the No work, No Pay principle). Note* Special Restday – It is a restday of the employee that happened during a Special Holiday . Note* Legal Holiday – It is a holiday stablished by legal authority and marked by restrictions on work and transaction of official business. Note* Legal Restday – It is a restday of the employee that happened during a Legal Holiday.
Figure 2.38
 MANHOUR POSTING
  ManHour Posting: Module that allows the user to store the processed manhour into the database.
Figure 2.39
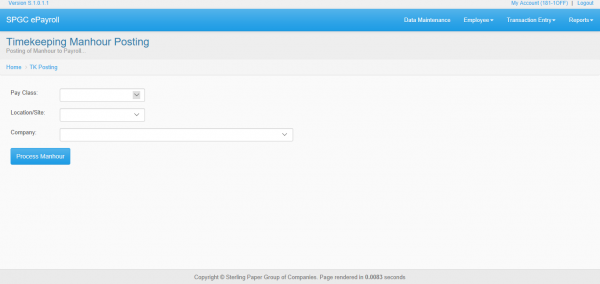
Upon selecting Manhour on the list you will be redirected into this page.
In-order-to process the manhour, the user must fill up all the fields below.
  •	Pay Class – Module that determines the kind of pay class. Weather it is (Monthly, Weekly or VIP).
  •	Location Site – Module that determines the location site.
  •	Company – Module that determines the company name.
Clicking Process Manhour will enable the user to store the processed data into the database.
Figure 2.40
 TK Biometrics Attlogs
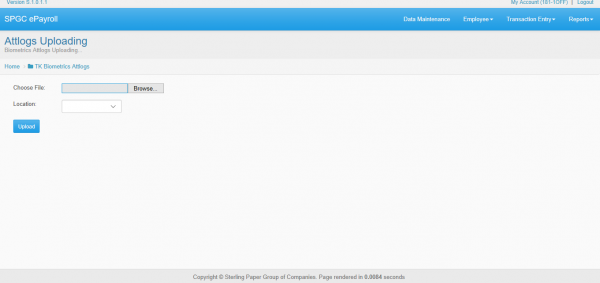
   Module that enables the user to upload the biometric logs of the employees.
Figure 2.41
 Browse your pc and select your log file.
  •Browse -  this module enables the user to choose the log file from his/her pc.
  •Location – This module helps the user to select the location.
  •Upload – this button enables the user to upload the file.
Figure 2.42
Main Page > Application Development Team > System Manual > SPGC EPAYROLL
