ROUNDCUBE USER'S GUIDE
Main Page > Application Development Team > System Manual > Roundcube Webmail
Contents
Roundcube User's Guide
Connect to the Interface
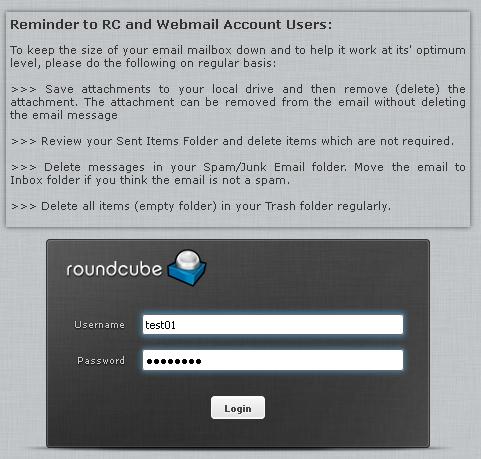
> Enter in your username and password and click on “Login”
Inbox
> Once connected to your account, you have access to your inbox and sent messages. In the left column you can find the main folder of your account: message sent and received
> In the same column under footer, are access to folder settings and Quota of your account
> In the right part, you can easily view all the emails and see the following information
- The subject
- The mark
- The read or unread message status
- The date and time
- The size of the email
- The flag
- The presence of attachments (column with paper clip far night)
| NOTE: By default, some columns do not appear. This is the case of the priorities assign to e-mails. To change this, you must change the display with the option shown below |
Display Option and Sorting
> To access this option, click on the gear icon on the top left side of the main frame of your e-mails, to the left of subject
> In this option, you’ll be able to :
- Add Columns to display (priority mails, etc.).
- Select the columns on which the sort will be done by default.
- Select the sort order (ascending or descending).
> Once you have made your selections, confirm by clicking “Save”
Email Options
> The number of unread emails appears in the left column to the right box of inbox
> An unread email appears bold on the right side
> For each message you can:
- Reply: allows you to reply directly to
- Reply all: allows you to directly response to all emails on the “To” and “Copy”
- Forward: allows you to transfer the selected corresponding emails of your choice.
- Delete: allows you to send the selected to the “Trash”
- Mark: for this option see the next paragraph
- … More: for this option see the next paragraph
Mark Message
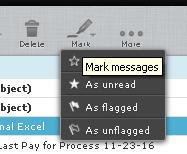
> When you click the "Mark", you get this pop-up menu. So you can mark a message, remove a mark as unread and declare a message has been read. This option also works (and especially) to select multiple emails.
> These options are useful to highlight some of your emails
... More
> When you click the “… More” you get this pop-up menu
> You can the:
- Print this message: open the message in a new window and offers printing.
- Download: allows you to download your computer e-mail format.eml
- Edit as new: allows you to edit an email preserving its original layout.
- Show source: displays the full source of the message. Very useful when you are asked for headers!
- Open in new window: allows you to open the message in a new window (useful for viewing/ open multiple message at time)
Settings
Access Settings
> You must be logged in to your account to access this feature.
> To access the settings of your email account, click the gear at the top right.
User Interface
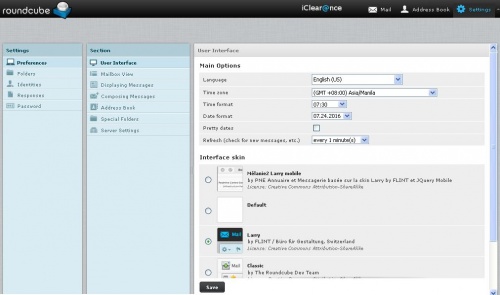
> After clicking on the gear you will land directly on the User Interface
> In this interface, you can change various elements such as language, date and time formats and the theme of the interface
Mailbox View
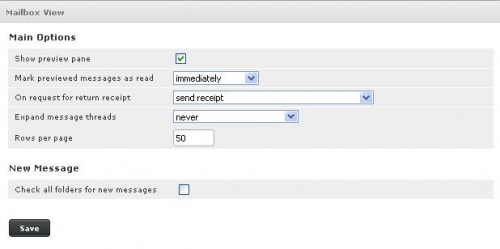
> In Mailbox View, you can change the number of emails displayed in the interface to generate fewer pages for example if you have a large number of e-mails. You can also choose not to display the preview email interface and display only when double click or in a new window.
Displaying Message
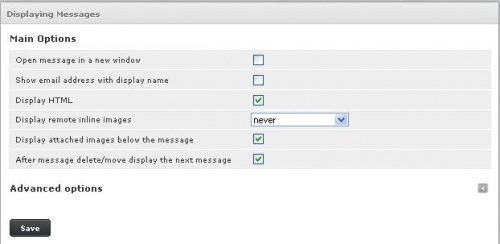
> In Displaying messages, you can choose to display (HTML or not, remote images, the character encoding) in your emails.
Composing Message
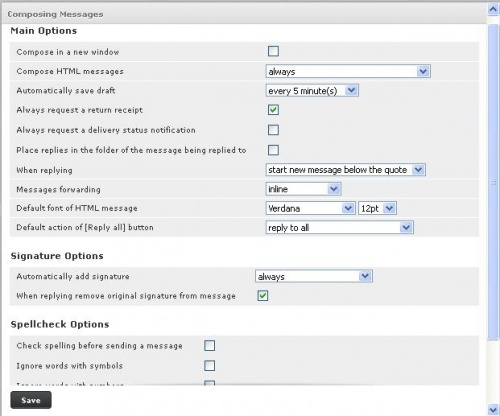
> In Composing messages, you can choose different items related to writing your e-mails, as the format of writing, receipt, distribution, the font, etc. .
Address Book
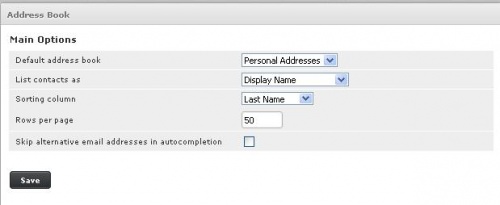
> In the Address Book, you can choose the address book to use by default (if several address books were created) as well as options sort and display the contacts.
Special Folders
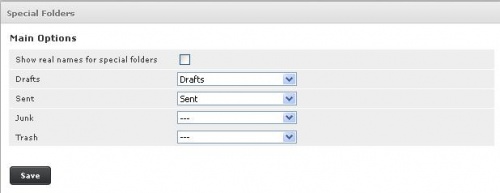
> In Special Folders, you can set where to place emails to be considered Drafts, Sent Items, Junk and emails that go to Trash.
Server Settings
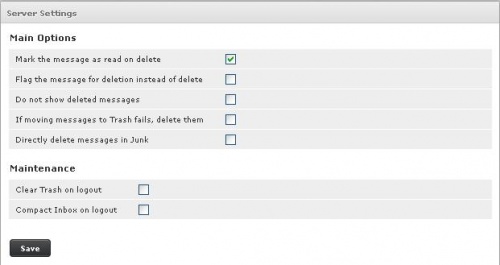
> In Server Settings, you can set the deletion of emails on the server (from the Webmail).
> For other options, see below.
- Example of deleting: You no longer receive e-mails. Your mail box is almost full or over quota. You want to delete emails to “do maintenance” and receive your emails again. However, you encounter an error message that prevents you from deleting the desired messages
- What’s going on? : When deleting an e-mail, it is first copied into the trash before being deleted from the inbox (invisibly to the user). However the box is already full, the copy is not possible, hence the error message!
- How to fix it? : In this interface Server Settings, select “When moving message to trash fails, delete them. “You can now delete emails without any problems.
Settings – Folders
Create Folder
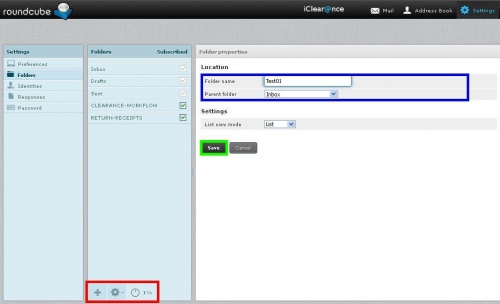
> To create a custom folder and keep messages separate, click the “+”
> It will be placed in the Inbox and viewing will be emails in list mode
> Click Save to validate the creation.
Edit – Delete Folder
> To proceed with the removal, select your folder and click the gear at the bottom of page. You can either: delete the folder or empty the folder. You can also see storage space usage (in percentage).
> To change the folder, simply click on the relevant folder. You can then change the folder name, the parent folder, the display type and can see the number of messages and the present size by the emails in the selected folder. Link "Click for file size" allows for the calculation of the size of these e-mails (when the number is greater than 0).
Settings – Identity
Create Folder
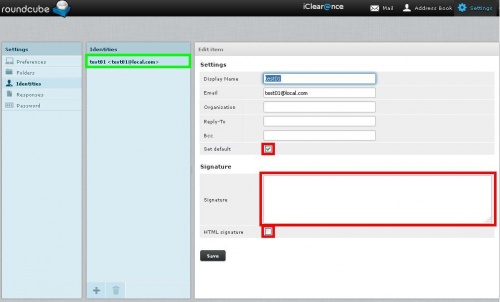
> To set up a signature that will appear systematically in each of your mails, go to Settings and Identities. E-mail Address From which you are connected to Webmail.
> Click it and then enter the items you consider essential to your signature. By default Display Name and Email are already filled
> Others can serve you if:
- Organization: you want to register your company, association, or other entity of your choice
- Reply-To: you want the caller to respond to another email address that you wrote with him
- BCC: you want to copy a hidden e-mail all your items
- Set Default: you have created one or more identities (signatures) and wish it the default for your emails
- Signature: you want to customize the footer of your emails (name, position held, phrases, images
- HTML signature: what has been specified in Signature contains HTML and / or you want it to be compatible with the mail client of your correspondent.
> Click Save to confirm the changes of the main identity
Develop a signature with a picture
> This step requires that the image is hosted on a server
> To Place an image on your test01, please follow the guide
- By checking Signature HTML
- Click on the square HTML to open window that allows you to insert HTML code.
- To add an image you can add the following code
- Click Update to accept the changes and different additions.
New Message
Going to create new message
> To write a new message, click Compose If you do not see this button (you are in the settings or address book), click the white envelope (email) on the top right. Then you will find this button.
Options
> You clicked on “Compose ...”
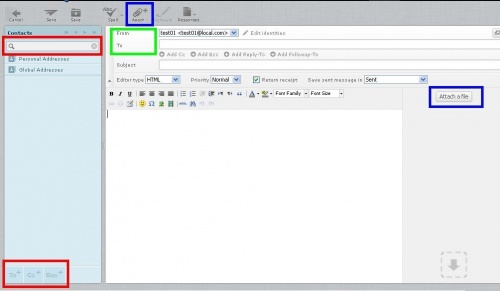
> You enter details to write your e-mail such as adding contacts from the Address Book, Attachments and Signature to the message.
> So you can find your saved contacts by clicking on the types of copies that you want to assign their address
- To +: add your contact as direct recipient;
- Cc +: add your contact as corresponding single copy
- Bcc +: add your contact as hidden corresponding copy. Other recipients of the e-mail will not see those in Bcc
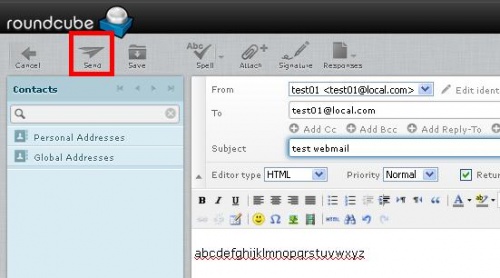
Send the message
> To send your message, Click the Send button (shape like paper plane)
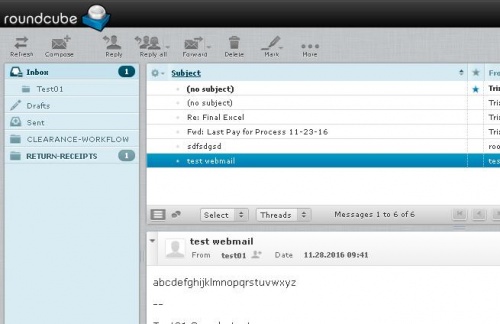
Receive the message
> Here is how the received email that it was therefore sent.
> If the email is not received automatically, you can click on “Refresh” at the top left (opposite horizontal arrows)
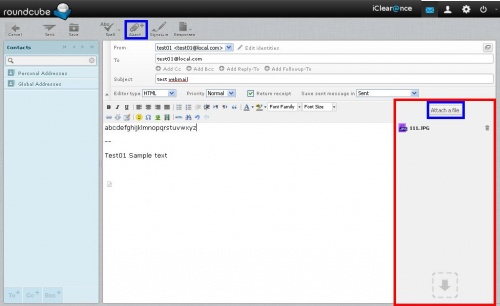
Add an attachment
> To attach/document(s) (PDF,Office,picture…) from writing your message, you simply click on “Attach” top in the banner (the button with clip)
| NOTE: That the button “Attach a file” is available to the right of writing your message. |
> The last possibility is to simply drag and drop from your file explorer on your computer the area provided this purpose at the “Attach a file”
Address Book
Organize your Address Book
> Depending on your needs, your company and your life, it can be very useful to organize their book with folders (group of contacts).
> To begin, click on the icon Roundcube Address Book (figure at top right)
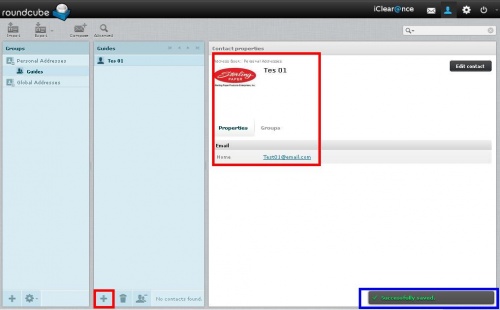
> To put all contacts , we decided to create a group called “Guides”
> To do this, click the “+” at the bottom left to create a group of contacts.
> The cursor automatically moves to name input area.
| NOTE: It is possible to create contacts in the “group” created by default (personal addresses) without having to create a new contact group. |
> To do this, simply click “+” at the bottom of the second column (Create a new contact).
Operation on contact groups
> Once your group is created, you have access to features related groups
> So you will find:
- Rename Group
- Delete Group
- Save Search (active when you do a search group)
- Clear Search (active when you do a search group)
Add a contact, Part 1 – Properties
> To add a contact the group “Guides” it is first necessary to click “+” the second column contacts (column contacts) ensuring you have selected the first group (must be highlighted compared to other groups). You can see at the same time we added a group “Support”
> Click Add to inform your contact information in four different areas:
- General Part: you will be able to add name, company, etc..
- Properties: where you will add different email addresses, phones, etc.. (a dropdown with "Add Field" is available under Address) .</span>
- Personal Information: where you will be able to enter the date of birth, Sex, Maiden name, etc..
- Notes: where you will be able to enter the information about your contact.
> For General Part, you can see below the possibilities
- Prefix
- Middle Name
- Suffix
- Display Name
- Nickname
- Organization
- Department
- Job Titled
> Once you have entered the information, click “Save”
.
Add a contact, Part 2 – Personal Information
> You can see below the few additions to General Information (Prefix, Middle Name, Suffix, Display Name, Nickname and Organization) using the drop down menu "Add a field...".
> Notice here the "Personal Information" section presented in the above paragraph, as well as the drop down menu allowing to add additional fields.
> If you have entered the information, click ""Save".
Add a contact, Part 3 – Notes
> The "Notes" section is a simple input box where you can add all kinds of annotations related to the contact.
> If you have entered the information, click "Save".
Add a contact, Part 4 – Avatar
> If you want to add/associate a picture/photo to your correspondent (avatar), know that you can very simply as follows and as shown in the screenshot below.
> Click "Add", then the window that opens, click "Choose a file". Load the file you want from your computer, confirm your choice.
> Once back on the interface below, click "Upload" to validate the adding of the image.
Add a contact, Part 5 – Finalization
> The Image is added, the email as well as the information needed to contact are also indicated. It is possible to save the addition of the contact by clicking "Save ".
> You change the image by clicking "Replace" button.
Add a contact, Part 6 – Verification
> When the contact is saved, the message "successful saved" will confirm this. You can then check the record of your contact by clicking on this name in the contact list (having selected the right group in advance or having searched). By default, the property tab is active and displays the information entered in this section (see Part 1).
> Once a contact is created in a group, it is possible to remove the clicking the icon at the bottom of the column of contacts (characters with "-").
Modify a Contact
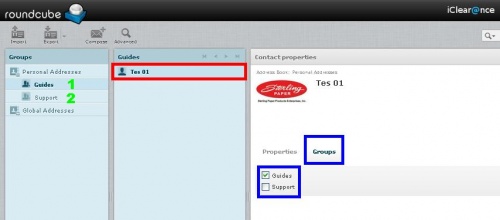
> You are of course possible to edit a contact. To do this, select contact concerned, and then click "Edit contact" at the top right. You will have access to all information into editable mode.
> In the capture below, we clicked on the "Groups" tab to display the groups to which the contact belongs.
> In this tab, you can add a contact to a group by checking the corresponding box.
> You can also drag and drop your contacts to move them into the right groups. The tab "Groups" will be updated.
Do Search
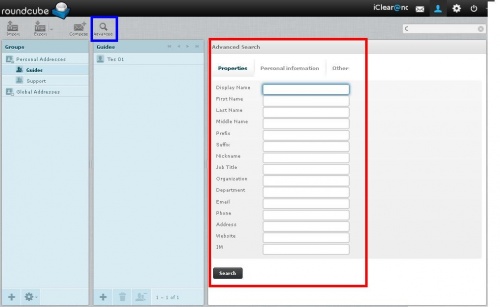
> You want to search through all your contacts. Click "Advance" in the banner above. Then all possible fields will appear to allow you to perform a search.
> Enter your search fields and click “Search”.
Export your address book
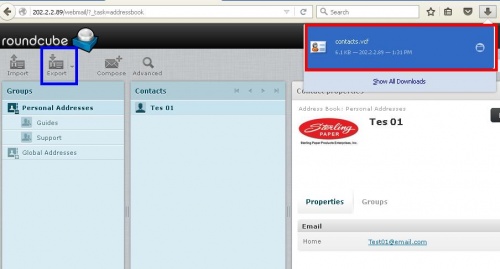
> You want to recover all your existing contacts from your RoundCube webmail through a file export your address book.
> To do this, click the "Export" in the upper part.
> Clicking on a contacts.vcf is generated and is available for download.
Import an existing address book
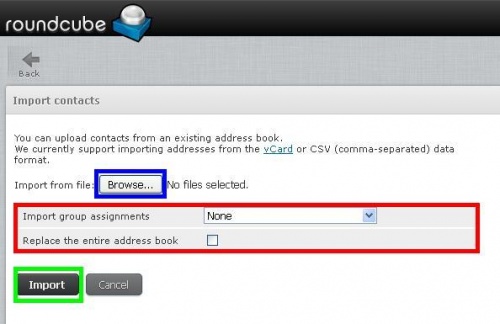
> You used to work, manage your contacts with another email program and have managed to export your contacts. It is possible, to import your contacts by clicking "Import" to the left of "Export".
> The only format allowed the extension is Vcf . However, the import addresses from data formats vCard or CSV (fields separated by a comma) is supported.
> The interface appears below. Click "Browse ..." to load the file vCard or CSV that contains your address book to import.
> You have the choice of replace the entire address or not book.
> Once this is entered, click "Import" and importing your book begins.
Reference
Roundcube Webmail User's Guide
Main Page > Application Development Team > System Manual > Roundcube Webmail
