Difference between revisions of "TIMEKEEPING MANUAL"
From SPGC Document Wiki
| Line 5: | Line 5: | ||
First, go to the '''SPGC–ePayroll'''. When you open it There is a button for '''Data Maintenance''','''Employee''','''Transaction Entry''','''Processing''','''Reports''' and '''Utilities'''. | First, go to the '''SPGC–ePayroll'''. When you open it There is a button for '''Data Maintenance''','''Employee''','''Transaction Entry''','''Processing''','''Reports''' and '''Utilities'''. | ||
[[File:A.JPG|750px|center|]] | [[File:A.JPG|750px|center|]] | ||
| − | |||
| − | |||
---- | ---- | ||
| Line 12: | Line 10: | ||
The uploading '''Bio-metrics''' ,First click on '''Utilities''' button.Then under it, is the '''TK Bio-metrics Attlogs'''. | The uploading '''Bio-metrics''' ,First click on '''Utilities''' button.Then under it, is the '''TK Bio-metrics Attlogs'''. | ||
| − | [[File:B.JPG| | + | [[File:B.JPG|500px|center]] |
To upload attendance of the Employee from the '''Bio-metrics''' to the system. | To upload attendance of the Employee from the '''Bio-metrics''' to the system. | ||
| Line 26: | Line 24: | ||
Under the '''TK Biometrics Attlogs''' is the '''TK Biometrics Attlogs Posting'''. There is a reminder indicated that you should select specified location to prevent the affection on the records. Then select on a file and click process. | Under the '''TK Biometrics Attlogs''' is the '''TK Biometrics Attlogs Posting'''. There is a reminder indicated that you should select specified location to prevent the affection on the records. Then select on a file and click process. | ||
| − | [[File:D1.JPG]] | + | [[File:D1.JPG|center]] |
=='''B. Accessing Timekeeping Module'''== | =='''B. Accessing Timekeeping Module'''== | ||
| Line 41: | Line 39: | ||
When you input an employee name in the '''Search''' box it will display the information. Then when you click the '''Reset''' button under the timekeeping it will go back to the first part of timekeeping and you will input another employee in the search box. | When you input an employee name in the '''Search''' box it will display the information. Then when you click the '''Reset''' button under the timekeeping it will go back to the first part of timekeeping and you will input another employee in the search box. | ||
| − | [[File:G.JPG|500px]] | + | [[File:G.JPG|500px|center]] |
| − | [[File:H.JPG|500px]] | + | [[File:H.JPG|500px|center]] |
=='''C. Processing the Attlogs'''== | =='''C. Processing the Attlogs'''== | ||
| Line 182: | Line 180: | ||
In the '''Leave Type''' button, You can select on '''Sick Leave''', '''Vacation Leave''','''Solo Parent Leave''','''Bereavement Leave''','''Paternity Leave''','''Suspension''' And '''Others'''. | In the '''Leave Type''' button, You can select on '''Sick Leave''', '''Vacation Leave''','''Solo Parent Leave''','''Bereavement Leave''','''Paternity Leave''','''Suspension''' And '''Others'''. | ||
| − | [[File:a1.JPG|400px|]] | + | [[File:a1.JPG|400px|center]] |
In the '''Leave Option''',You can Select on '''AM''', '''PM''' and '''Whole Day'''. | In the '''Leave Option''',You can Select on '''AM''', '''PM''' and '''Whole Day'''. | ||
| − | [[File:b2.JPG|400px|]] | + | [[File:b2.JPG|400px|center]] |
In the '''Approval''' button,You Can select on '''Approved''' or '''Disapproved''' | In the '''Approval''' button,You Can select on '''Approved''' or '''Disapproved''' | ||
| − | [[File:c3.JPG|400px|]] | + | [[File:c3.JPG|400px|center]] |
You may also delete the leave by pressing the (X) button on right side of PM out. | You may also delete the leave by pressing the (X) button on right side of PM out. | ||
| Line 196: | Line 194: | ||
'''Leave Adjustment''' | '''Leave Adjustment''' | ||
| + | Just Enter the Proper Hrs in the Assumed Absent and Present on the text boxes and then press '''Save''' If you have Finished, and you may Press Refresh to refresh the Leave adjustment Tab. | ||
| − | + | [[File:tkk10.png|400px|center]] | |
| − | + | ||
| − | + | ||
| − | [[File: | + | |
| − | + | =='''SL/VL RECON'''== | |
Indicates the '''Date Encoded''', '''Sick leave''', '''Vacation Leave''', and user. When you click the Plus('''+''') sign besides the user it will display the company Entry and there is a text box for '''SL''' and '''VL'''. | Indicates the '''Date Encoded''', '''Sick leave''', '''Vacation Leave''', and user. When you click the Plus('''+''') sign besides the user it will display the company Entry and there is a text box for '''SL''' and '''VL'''. | ||
| Line 213: | Line 209: | ||
It will display the data on the '''Date Encoded''', On '''SL'''/'''VL''' and the user. | It will display the data on the '''Date Encoded''', On '''SL'''/'''VL''' and the user. | ||
[[File:g7.JPG|600px|center]] | [[File:g7.JPG|600px|center]] | ||
| + | |||
| + | You may also Press the (X) Button if you want to delete a certain record on the list. | ||
| − | + | [[File:tkk12.png|600px|center]] | |
| − | |||
| − | |||
| − | |||
| − | + | =='''Filed SL/VL'''== | |
| + | |||
| + | In this Tab you will see the filed SL/VL of that Employee, Arranged in Pay Period. | ||
| + | |||
| + | [[File:tkk13.png|600px|center]] | ||
| + | |||
| + | |||
| + | =='''Time Vs. Rate'''== | ||
| + | |||
| + | In '''Time Vs. Rate''' Tab, There you will see '''Basic, Allowance, VL, SL, LHOL Premium, SHOL Premium, Regular OT, and its Corresponding Hours and Rate Amount. | ||
| + | |||
| + | The Rate amount of Basic, Allowance, VL, SL, LHOL Premium, SHOL Premium, Regular OT, will be added. | ||
| + | |||
| + | Now on the Other side you will see Tardy, Undertime, Absent and its corresponding Hrs, and Rate Amount | ||
| + | Tardy, Undertime, Absent will also be Added. | ||
| + | |||
| + | Now the sum of the two will be Subtracted, and the result will be seen in the Total Amount. | ||
| + | |||
| + | [[File:tkk14.png|600px|center]] | ||
| + | |||
| + | =='''Attendance Logs'''== | ||
At the right side is for '''Raw Attlogs Trx History''' shows the '''Trx Date''' which indicates the date on when the employee enter the company. Then the day that the employee enter. It also Includes the time they enter the company and the remarks for '''In/Out'''. | At the right side is for '''Raw Attlogs Trx History''' shows the '''Trx Date''' which indicates the date on when the employee enter the company. Then the day that the employee enter. It also Includes the time they enter the company and the remarks for '''In/Out'''. | ||
| Line 227: | Line 242: | ||
While at the left side is for '''Consolidate Attlogs In/Out''' which is the record that encoded depending on the '''Raw Attlogs Trx History''' shows also the '''Trx Date''' on When the employee enter the company, the day the employee Enter, then the time enter and time for the out. | While at the left side is for '''Consolidate Attlogs In/Out''' which is the record that encoded depending on the '''Raw Attlogs Trx History''' shows also the '''Trx Date''' on When the employee enter the company, the day the employee Enter, then the time enter and time for the out. | ||
| − | + | '''Consolidate Attlogs In/Out''' is just an Arranged version of '''Raw Attlogs Trx History'''. | |
| − | [[File: | + | |
| + | [[File:tkk1t.png|600px|center]] | ||
| + | |||
| + | |||
| + | |||
| + | |||
| + | |||
| + | |||
| + | |||
| + | |||
'''E. Computation Of Manhour''' | '''E. Computation Of Manhour''' | ||
| Line 240: | Line 264: | ||
You need to select a '''Company''' Before you click on the '''Manhour'''. | You need to select a '''Company''' Before you click on the '''Manhour'''. | ||
| − | [[File:l12.JPG|400px]] | + | [[File:l12.JPG|400px|center]] |
'''F. Printing of Timekeeping Reports''' | '''F. Printing of Timekeeping Reports''' | ||
| Line 250: | Line 274: | ||
First, the report is the '''DTR Prooflist'''. Under it is the '''Year''', '''Company''', '''Pay Class''', '''Cut-off''' and The location. | First, the report is the '''DTR Prooflist'''. Under it is the '''Year''', '''Company''', '''Pay Class''', '''Cut-off''' and The location. | ||
| − | [[File:Z26.JPG|300px]] | + | [[File:Z26.JPG|300px|center]] |
You can select on the year 2015 and 2016.Then the company name, The '''Pay Class'''Weekly or RNF, cut-off is depends on the company name and then you can select on the location of the company. | You can select on the year 2015 and 2016.Then the company name, The '''Pay Class'''Weekly or RNF, cut-off is depends on the company name and then you can select on the location of the company. | ||
| − | [[File:n14.JPG|300px]] | + | [[File:n14.JPG|300px|center]] |
Next, the report is the '''Manhour Prooflist.''' It's the same in the '''DTR Prooflist'''. | Next, the report is the '''Manhour Prooflist.''' It's the same in the '''DTR Prooflist'''. | ||
| − | [[File:Y25.JPG|300px]] | + | [[File:Y25.JPG|300px|center]] |
'''Dialog box''' will appear when there is vacant In the input button, or there is no value on it. | '''Dialog box''' will appear when there is vacant In the input button, or there is no value on it. | ||
| − | [[File:P16.JPG|300px]] | + | [[File:P16.JPG|300px|center]] |
The difference is in the '''Pay Class''',It has a '''Monthly''' and the '''VIP'''. And There is no location indicated. | The difference is in the '''Pay Class''',It has a '''Monthly''' and the '''VIP'''. And There is no location indicated. | ||
Then, the report is the '''Manhour Prooflist Per Company''' It's the same in the '''DTR Prooflist'''. | Then, the report is the '''Manhour Prooflist Per Company''' It's the same in the '''DTR Prooflist'''. | ||
| − | [[File:R18.JPG|300px]] | + | [[File:R18.JPG|300px|center]] |
Then, the report is the '''Manhour Prooflist Per Employee'''. Under it, Indicates the '''Year''', '''Pay Class''', and '''Employee No'''. | Then, the report is the '''Manhour Prooflist Per Employee'''. Under it, Indicates the '''Year''', '''Pay Class''', and '''Employee No'''. | ||
Under the Year, you can select year 1999 up to 2016. The type of '''Pay Class''' which indicated the '''Weekly''', '''Monthly''' and '''VIP'''. | Under the Year, you can select year 1999 up to 2016. The type of '''Pay Class''' which indicated the '''Weekly''', '''Monthly''' and '''VIP'''. | ||
| − | [[File:S19.JPG|300px]] | + | [[File:S19.JPG|300px|center]] |
Revision as of 15:35, 5 July 2017
Main Page > Application Development Team > System Manual > SPGC EPAYROLL > TIMEKEEPING SYSTEM
Process of (Uploading a Bio-metrics,Accessing Timekeeping Module,Processing the Attlogs,Computation of Manhour,Creation of Timekeeping and Printing of Timekeeping Reports)
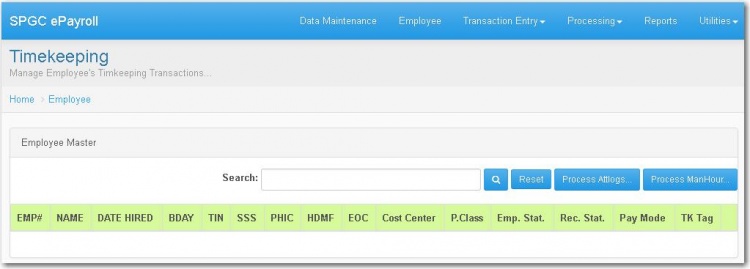
First, go to the SPGC–ePayroll. When you open it There is a button for Data Maintenance,Employee,Transaction Entry,Processing,Reports and Utilities.
Contents
A. Uploading of Bio-metrics
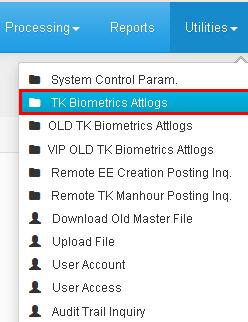
The uploading Bio-metrics ,First click on Utilities button.Then under it, is the TK Bio-metrics Attlogs.
To upload attendance of the Employee from the Bio-metrics to the system.
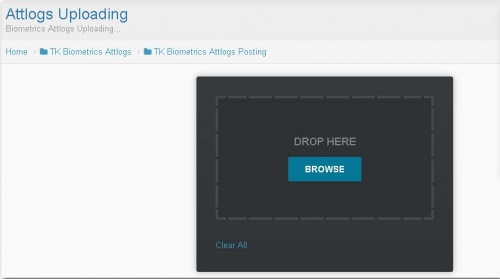
Then the Attlogs Uploading Module wilL display, next click on BROWSE to drop a file.
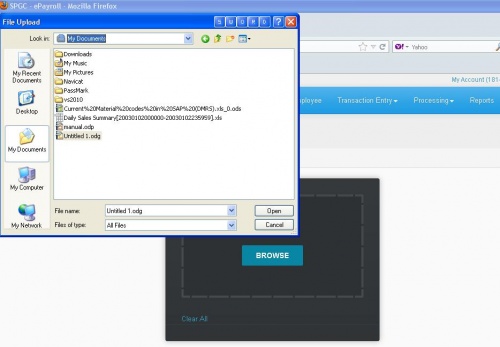
After clicking on the Browse,next Select Attlog File you want to drop then be sure that the filename formatted as (1_attlogs.txt). Then click Open and it will drop on the Attlogs Uploading Module.
Open to Drop the file
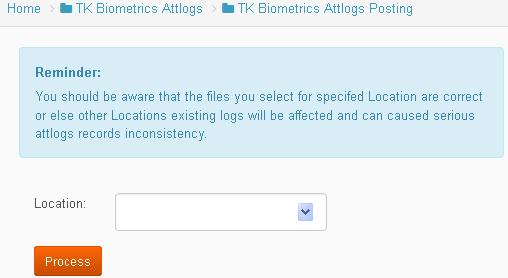
Under the TK Biometrics Attlogs is the TK Biometrics Attlogs Posting. There is a reminder indicated that you should select specified location to prevent the affection on the records. Then select on a file and click process.
B. Accessing Timekeeping Module
Next is the Accessing Timekeeping Module, Click on the Transaction Entry. Under it you will find Timekeeping.
Timekeeping – Encoding the information about the employee and manage employee's timekeeping transaction.
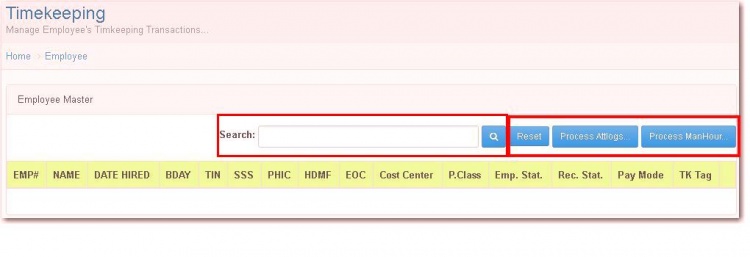
Under the timekeeping button, there is another button for Search, Reset, Process Attlogs and the Process Manhour.
When you input an employee name in the Search box it will display the information. Then when you click the Reset button under the timekeeping it will go back to the first part of timekeeping and you will input another employee in the search box.
C. Processing the Attlogs
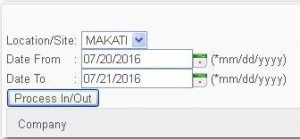
Then the Processing Attlogs it will display the Timekeeping Attlogs Processing. Which indicates the Location/Site, Date From and Date to. and you can now input data.
You can input the value for Location, for Date From and Date to.
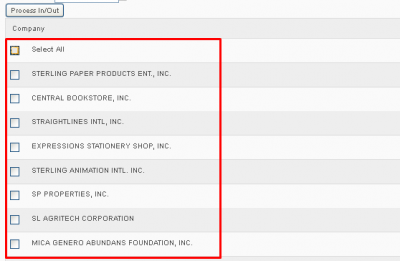
You may now select the Company of your choice or you may also Select all. Then press Process In/Out
D. Searching of Timekeeping
In the Timekeeping button, you can find the Search Box.Then you will now search for the employee you want to search and to check their employment information.
Employee name that you Want to search.Then click The search button.
At the right side is the Employee#,then when you Click it,the information Of the employee will display.
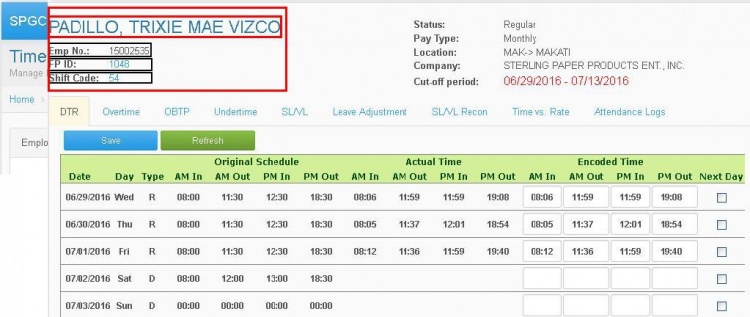
   After clicking on the Emp#. The name in the red box is the Employee you have search. Under it, in the black box is the Emp No. or the Employee number(each of the employee has

   Their emp# followed by the FD ID  or the finger print ID of the employee which is 1048 and the Shift code which is the list of schedule of employee they choose.
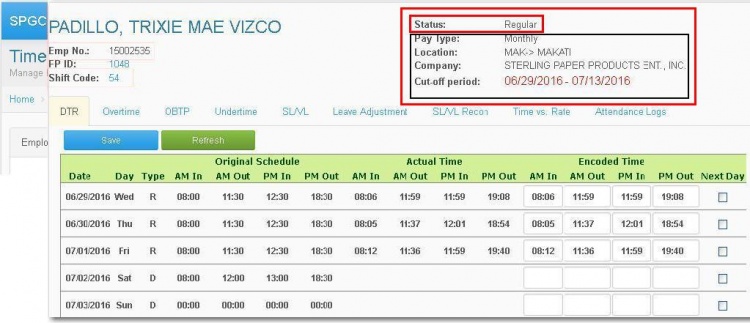
At the left side is the Status means if the employee is regular or Not. Then followed by the Pay Type which is the type of pay of the Employee. Next is the Location or where the company located.Then the company which is the name of the company. Lastly Is the cut-off period which is the date,when the employee have Their payroll.
DTR
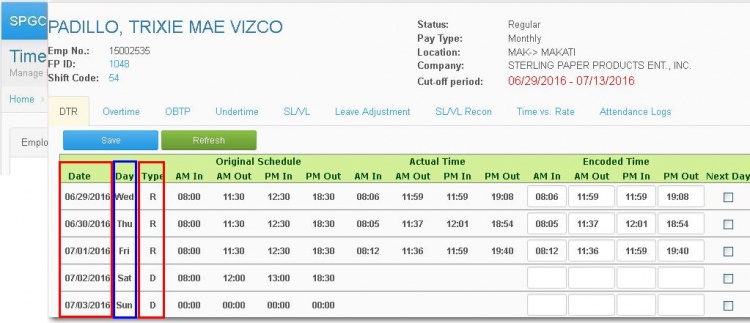
Date is under the cut-off period. Which is the starting date of the period up to the last date of cut-off.
   Day which the day of each date in cut-off period.

   Type which indicates R(regular day) and D(rest day) And it change depends on the date if it is holiday.
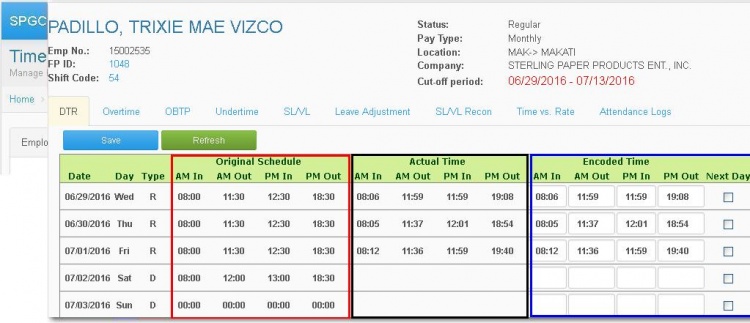
Under the DTR, is the Original Schedule in the red box which means the Original time that the Employee will come to the company.
The black box is for Actual Time which means the exact time that the Employee enter the company.
Last, the blue box is for Encoded Time which is the time to be encode at the same time in actual time,you can edit the date if there is wrong in encoded time unless you save it.
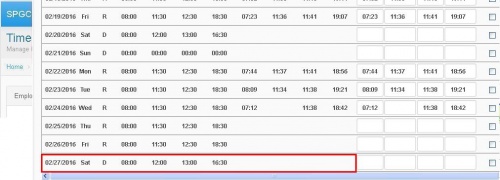
In the whole part of the record, The date was ended on 02/27/16 because it was written in the cut-off period that 02/14/2016 – 02/27/2016 only.
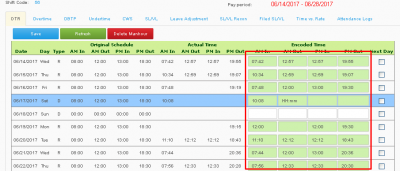
Now Below you will see the schedule, and the in and out's of that certain employee. You may also edit the In/Out of the Employee on the right side. All the four boxes needs to be filled, or else it might result to an absent of an employee.
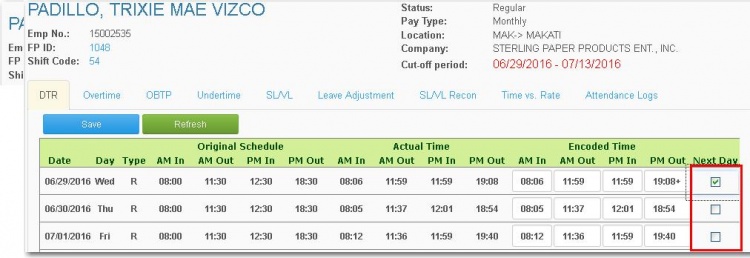
In the Red Box indicated below is the Next day Column. You should press the Next Day Check Box if the PM out of that Employee is the next day. (Ex. Am In:8 am (Jun 5) - PM Out:1 am (Jun 6))
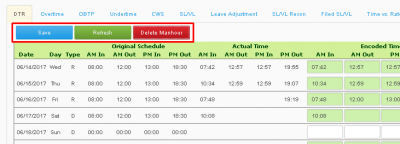
Now that you have finished, You may now press Save. Press Refresh to refresh the schedule and in/outs of the Employee, or Press Delete Manhour To delete the whole Manhour.
Overtime
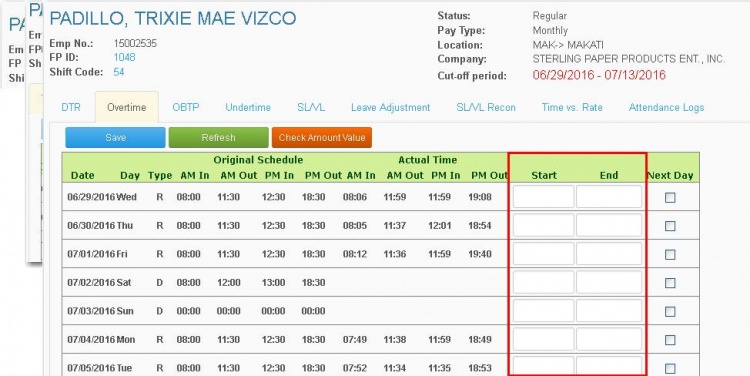
The next button is the Overtime. You can also find their Original Schedule and their Actual Time.
Under it, there is text box for start and end. Then you can encode time here and click on Save then the record will be saved.
It is considered an overtime,starting from the original time Pm out then when it exceed. It is now the time for overtime
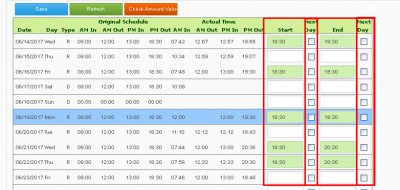
You may now enter the Employees Overtime in Start and End. As you can see on the right side of both Start and End there is a Next Day Column and Check boxes.
In the example below the date is 06/14/2017 now if the Employee Started or Ended its Overtime at 1 am in the date '06/15/2017 then You may press the Next day Check box.
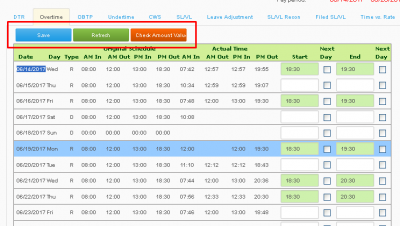
Now you may now press Save to ofcourse save the Changes. You can also press Refresh to refresh the Overtime tab.
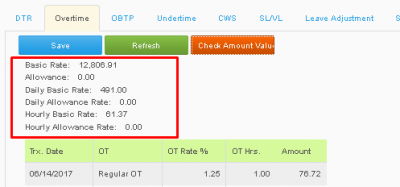
Now if you pressed Check Amount Value button. You will see this.
OBTP
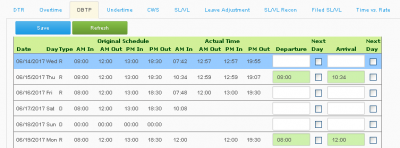
Then, the OBTP, It display also the Original Schedule and the Actual Time.In this button you will see a time box for Departure And Arrival. You can encode time in this time box then save it then the record will display.
In the example below the date is 06/14/2017 now if the Employee Departure or Arrival at 1 am in the date '06/15/2017 then You may press the Next day Check box on the side.
UNDERTIME
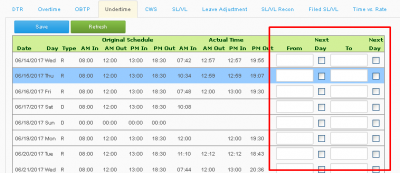
Next is the Undertime. The Original Schedule and Actual Time are also included. In this button, there is a time box for From and To. It can be inputted a time for from and to, then it will display that the record is saved.
You may also press Next Day Checkbox if the Undertime of the Employee; From and To is in the next day, Meaning if the date is 06/14/2017, and From or To started/ended in 06/15/2017.
CWS
In CWS tab, You may Edit the Employees Schedule. Just enter the proper Data on the textboxes: AM In, Am Out, PM In, PM Out. in the Right side of PM Out There is Next Day Check box, just press it if the PM out of the Employee is the Next day of that certain day.
SL/VL
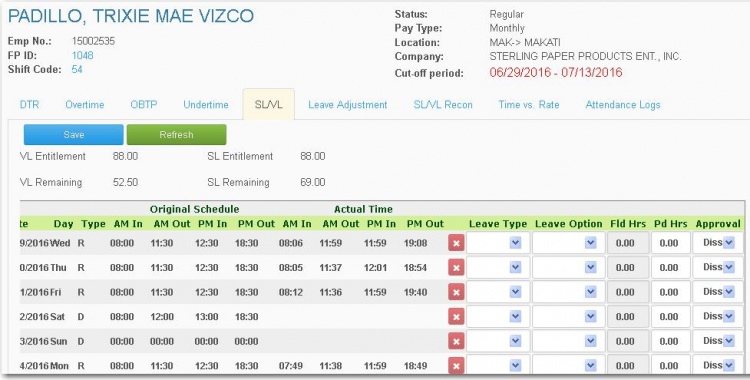
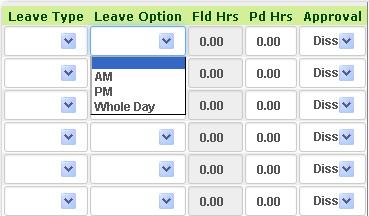
Then the SL/VL tab which display their Original Schedule and Actual Time. It has a text box for Leave Type, Leave Option and the Approval. And has a time box for Fld Hrs which is the (Filed Hours) and Pd Hrs which is the (Paid Hours).
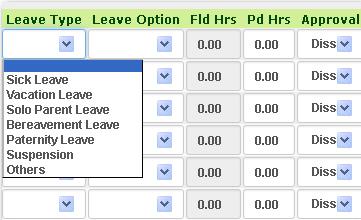
In the Leave Type button, You can select on Sick Leave, Vacation Leave,Solo Parent Leave,Bereavement Leave,Paternity Leave,Suspension And Others.
In the Leave Option,You can Select on AM, PM and Whole Day.
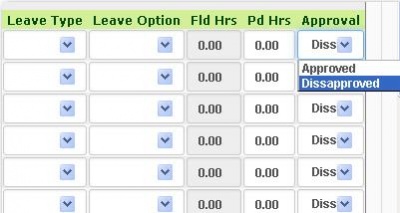
In the Approval button,You Can select on Approved or Disapproved
You may also delete the leave by pressing the (X) button on right side of PM out.
   Leave Adjustment
Just Enter the Proper Hrs in the Assumed Absent and Present on the text boxes and then press Save If you have Finished, and you may Press Refresh to refresh the Leave adjustment Tab.
SL/VL RECON
Indicates the Date Encoded, Sick leave, Vacation Leave, and user. When you click the Plus(+) sign besides the user it will display the company Entry and there is a text box for SL and VL.
When you Encode the data here and click save to display the information for Sl and Vl.
It will display the data on the Date Encoded, On SL/VL and the user.
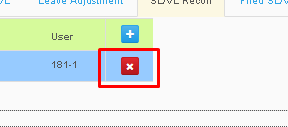
You may also Press the (X) Button if you want to delete a certain record on the list.
Filed SL/VL
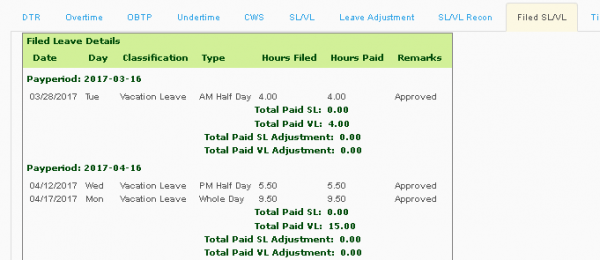
In this Tab you will see the filed SL/VL of that Employee, Arranged in Pay Period.
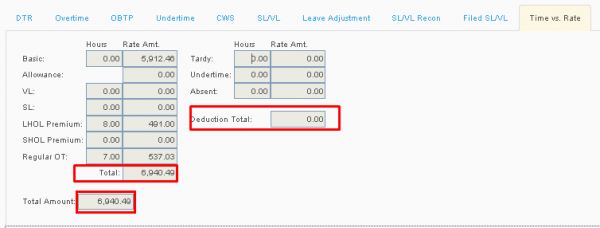
Time Vs. Rate
In Time Vs. Rate Tab, There you will see Basic, Allowance, VL, SL, LHOL Premium, SHOL Premium, Regular OT, and its Corresponding Hours and Rate Amount.
 The Rate amount of  Basic, Allowance, VL, SL, LHOL Premium, SHOL Premium, Regular OT, will be added.

 Now on the Other side you will see Tardy, Undertime, Absent and its corresponding Hrs, and Rate Amount
 Tardy, Undertime, Absent will also be Added.
Now the sum of the two will be Subtracted, and the result will be seen in the Total Amount.
Attendance Logs
At the right side is for Raw Attlogs Trx History shows the Trx Date which indicates the date on when the employee enter the company. Then the day that the employee enter. It also Includes the time they enter the company and the remarks for In/Out.
While at the left side is for Consolidate Attlogs In/Out which is the record that encoded depending on the Raw Attlogs Trx History shows also the Trx Date on When the employee enter the company, the day the employee Enter, then the time enter and time for the out.
Consolidate Attlogs In/Out is just an Arranged version of Raw Attlogs Trx History.
E. Computation Of Manhour
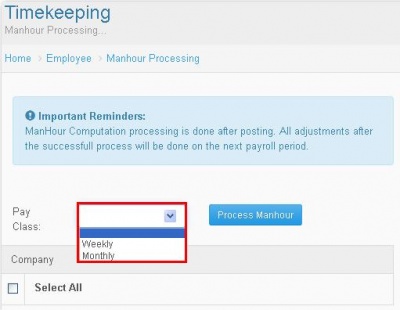
   Next, When you click on Process Manhour button in the timekeeping it will display
   The important reminders.The Pay Class is indicated, you need to Select whether Weekly or Monthly.
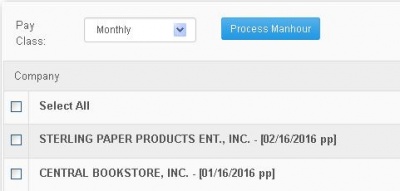
If you select Weekly the Select all only appear. While If you select on Monthly it will appear some of the Company.
You need to select a Company Before you click on the Manhour.
F. Printing of Timekeeping Reports
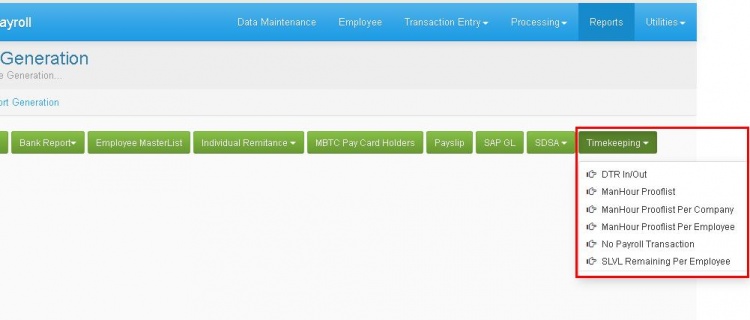
Then lastly the Printing of Timekeepng Reports, Click on the Reports. Then Under it is the DTR In/Out,ManHour Prooflist, ManHour Prooflist Per Company,ManHour Prooflist Per Employee, No Payroll Transaction, SLVL Remaining Per Employee.
* Reports
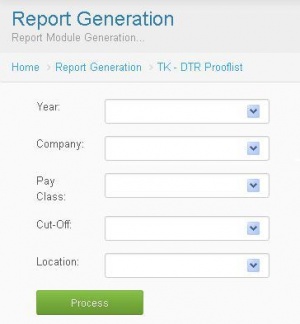
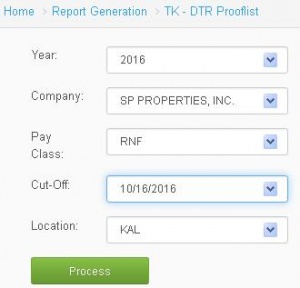
First, the report is the DTR Prooflist. Under it is the Year, Company, Pay Class, Cut-off and The location.
You can select on the year 2015 and 2016.Then the company name, The Pay ClassWeekly or RNF, cut-off is depends on the company name and then you can select on the location of the company.
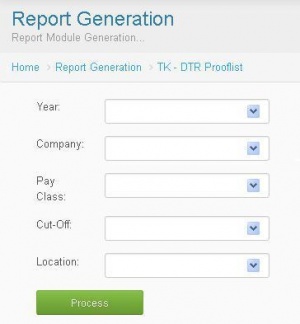
Next, the report is the Manhour Prooflist. It's the same in the DTR Prooflist.
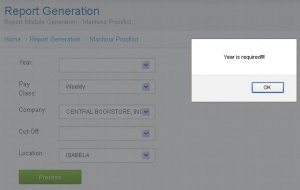
Dialog box will appear when there is vacant In the input button, or there is no value on it.
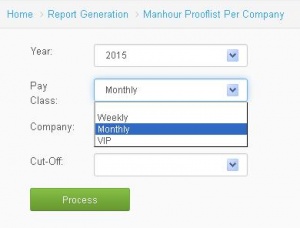
The difference is in the Pay Class,It has a Monthly and the VIP. And There is no location indicated.
Then, the report is the Manhour Prooflist Per Company It's the same in the DTR Prooflist.
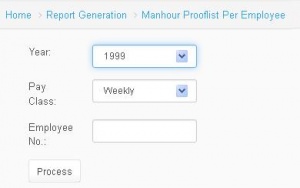
Then, the report is the Manhour Prooflist Per Employee. Under it, Indicates the Year, Pay Class, and Employee No.
Under the Year, you can select year 1999 up to 2016. The type of Pay Class which indicated the Weekly, Monthly and VIP.
Reference
Main Page > Application Development Team > System Manual > SPGC EPAYROLL > TIMEKEEPING SYSTEM

