Difference between revisions of "HR MANUAL"
From SPGC Document Wiki
| Line 6: | Line 6: | ||
[[File:1CM.png|500px|thumb|center|Company Maintenance]] | [[File:1CM.png|500px|thumb|center|Company Maintenance]] | ||
| − | + | * Click '''Data Maintenance Bar''' then, Click Company | |
[[File:2CF.png|500px|thumb|center|Company Function]] | [[File:2CF.png|500px|thumb|center|Company Function]] | ||
| − | + | * [[File:2.1Search.PNG|400px]] You can find a company that you want to update for example you type “sterling” all similar company name for sterling will be appeared. | |
| − | + | * [[File:2.2Reset.PNG|60px]] Clicking this icon it will reset your search and it will bring you the first page of the company bar. | |
[[File:3CE.PNG|500px|thumb|center|Company Entry]] | [[File:3CE.PNG|500px|thumb|center|Company Entry]] | ||
| − | + | * [[File:2.4Add.PNG|30px]] Clicking this icon it will appear the company entry that can add a new company for your new update. | |
| − | + | ||
| − | + | * [[File:2.5ViewCE.PNG|30px]] Clicking this icon can view the company entry | |
| − | + | * [[File:2.3Print.PNG|30px]] Clicking this you can print the data. | |
'''Pay Period Maintenance Process''' | '''Pay Period Maintenance Process''' | ||
| Line 26: | Line 26: | ||
[[File:4PPM.PNG|500px|thumb|center|Pay Period Maintenance]] | [[File:4PPM.PNG|500px|thumb|center|Pay Period Maintenance]] | ||
| − | + | * Click '''Data Maintenance''' Bar then, Click Pay Period | |
[[File:5PPS.PNG|500px|thumb|center|Pay Period Setup]] | [[File:5PPS.PNG|500px|thumb|center|Pay Period Setup]] | ||
| − | + | * [[File:5.1PayClass.PNG|200px]] In pay class you can choose either weekly , monthly or VIP | |
| − | + | * [[File:5.2Company.PNG|200px]] In company you can choose any company you want to setup | |
| − | + | * [[File:5.3Add.PNG|30px]] In this icon you can add another data | |
| − | + | * [[File:5.4Edit.PNG|27px]] In this icon you can edit the existing data | |
'''NOTE: In editing you cannot modified if the pay period already posted.''' | '''NOTE: In editing you cannot modified if the pay period already posted.''' | ||
| Line 44: | Line 44: | ||
[[File:6DM.PNG|500px|thumb|center|Department Maintenance]] | [[File:6DM.PNG|500px|thumb|center|Department Maintenance]] | ||
| − | + | * Click '''Data Maintenance''' Bar then, Click Department | |
| − | + | * [[File:2.4Add.PNG|30px]] Adding Department then, [[File:2.5ViewCE.PNG|30px]] editing department master entry. | |
'''Work Schedule Maintenance Process''' | '''Work Schedule Maintenance Process''' | ||
| − | + | * Click '''Data Maintenance''' Bar then, Click Work Schedule | |
[[File:7WSM.PNG|500px|thumb|center|Work Schedule Maintenance]] | [[File:7WSM.PNG|500px|thumb|center|Work Schedule Maintenance]] | ||
| − | + | * [[File:2.4Add.PNG|30px]] Adding working schedule in master entry | |
| − | + | * [[File:2.5ViewCE.PNG|30px]] Editing working schedule in master entry | |
Revision as of 18:28, 22 November 2016
Main Page > Application Development Team > System Manual > SPGC EPAYROLL > PAYROLL MAINTENANCE
HR USER'S MANUAL
Company Maintenance Process
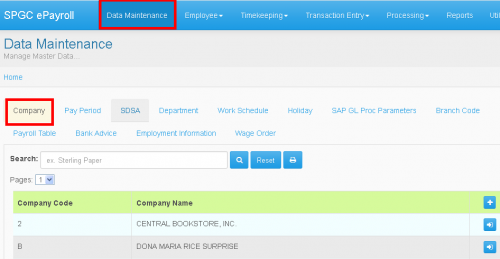
* Click Data Maintenance Bar then, Click Company
*You can find a company that you want to update for example you type “sterling” all similar company name for sterling will be appeared. *
Clicking this icon it will reset your search and it will bring you the first page of the company bar.
*Clicking this icon it will appear the company entry that can add a new company for your new update. *
Clicking this icon can view the company entry *
Clicking this you can print the data.
Pay Period Maintenance Process
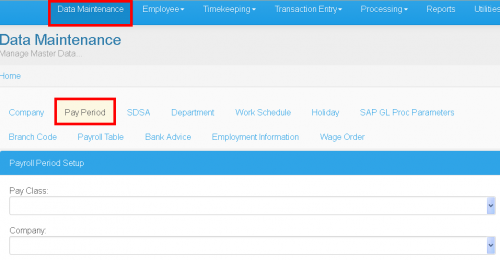
* Click Data Maintenance Bar then, Click Pay Period
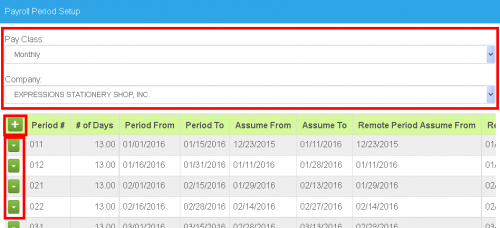
*In pay class you can choose either weekly , monthly or VIP *
In company you can choose any company you want to setup *
In this icon you can add another data *
In this icon you can edit the existing data
NOTE: In editing you cannot modified if the pay period already posted.
Department Maintenance Process
    * Click Data Maintenance Bar then, Click Department

    *  Adding Department then,  editing department master entry.
Work Schedule Maintenance Process
* Click Data Maintenance Bar then, Click Work Schedule
*Adding working schedule in master entry *
Editing working schedule in master entry


