Difference between revisions of "UTILITIES SYSTEM"
| Line 15: | Line 15: | ||
[[File:27aaa.jpg]] | [[File:27aaa.jpg]] | ||
| − | Under the Utilities is the OLD TK Biometrics Attlogs. The user can click on the Browse Button to upload a file. | + | Under the '''Utilities''' is the '''OLD TK Biometrics Attlogs'''. The user can click on the '''Browse''' Button to upload a file. |
[[File:28aaa.jpg|center|250px]] | [[File:28aaa.jpg|center|250px]] | ||
| − | When you click on the Browse, you can select a file then click open and the file will upload. | + | When you click on the '''Browse''', you can select a file then click '''open''' and the file will upload. |
[[File:29aaa.jpg|center|250px]] | [[File:29aaa.jpg|center|250px]] | ||
| − | When you click on OLD TK Biometrics Attlogs Posting, the reminder will display and you must select location before you click on the process button. Then the file will uploaded. | + | When you click on '''OLD TK Biometrics Attlogs Posting''', the '''reminder''' will display and you must select location before you click on the '''process''' button. Then the file will uploaded. |
[[File:30aaa.jpg|center|250px]] | [[File:30aaa.jpg|center|250px]] | ||
| Line 30: | Line 30: | ||
[[File:23aaa.jpg|center|250px]] | [[File:23aaa.jpg|center|250px]] | ||
| − | Under the Utilities Section is the VIP OLD TK Biometircs Attlogs which is the VIP Biometrics Attlogs Uploading. The user can click on the Browse button to upload a file. | + | Under the '''Utilities''' Section is the '''VIP OLD TK Biometircs Attlogs''' which is the '''VIP Biometrics Attlogs Uploading'''. The user can click on the '''Browse''' button to upload a file. |
[[File:24aaa.jpg|cente|250px]] | [[File:24aaa.jpg|cente|250px]] | ||
| − | When you click on the Browse, you can select a file then click open and the file will upload. | + | When you click on the '''Browse''', you can select a file then click '''open''' and the file will upload. |
[[File:25aaa.jpg|center|250px]] | [[File:25aaa.jpg|center|250px]] | ||
| − | When you click on VIP OLD TK Biometrics Attlogs Posting, the reminder will display and you must select location before you click on the process button. Then the file will uploaded. | + | When you click on '''VIP OLD TK Biometrics Attlogs Posting''', the '''reminder''' will display and you must select location before you click on the '''process''' button. Then the file will uploaded. |
[[File:26aaa.jpg|center|250px]] | [[File:26aaa.jpg|center|250px]] | ||
| Line 45: | Line 45: | ||
[[File:21aaa.jpg|center|250px]] | [[File:21aaa.jpg|center|250px]] | ||
| − | The Remote EE Creation Posting Inq. is under the Utilities Section. The user can search employee's name in the search box. Then the reset button is used to go back to main page of remote EE creation inquiry and record posting. | + | The '''Remote EE Creation Posting Inq'''. is under the '''Utilities''' Section. The user can search employee's name in the '''search box.''' Then the '''reset''' button is used to go back to main page of '''remote EE creation inquiry and record posting'''. |
[[File:22aaa.jpg|center|250px]] | [[File:22aaa.jpg|center|250px]] | ||
| − | When you selected employee, the information will display. Then the user can use Select all and the De-Select all. After that the user can now click on the Process button to process the record. | + | When you selected '''employee''', the information will display. Then the user can use '''Select all''' and '''the De-Select all'''. After that the user can now click on the '''Process''' button to process the record. |
'''Remote TK Manhour Posting Inq.''' | '''Remote TK Manhour Posting Inq.''' | ||
| Line 55: | Line 55: | ||
[[File:18aaa.jpg|250px]] | [[File:18aaa.jpg|250px]] | ||
| − | In the Utilities section, The Remote TK Manhour Posting Inq is included. When you click on it the remote site manhour posting inquiry will display which is the inquiry module for remote site manhour computation.. | + | In the '''Utilities''' section, The '''Remote TK Manhour Posting Inq''' is included. When you click on it the '''remote site manhour posting inquiry''' will display which is the '''inquiry module''' for remote site manhour computation.. |
[[File:19aaa.jpg|center|250px]] | [[File:19aaa.jpg|center|250px]] | ||
| − | The user must input a Year, Company, Pay Class, and the Pay period. After you input the data click on the process button to process the data you entered. | + | The user must input a '''Year''', '''Company''', '''Pay Class''', and the '''Pay period'''. After you input the data click on the '''process''' button to process the data you entered. |
[[File:20aaa.jpg|center|300px]] | [[File:20aaa.jpg|center|300px]] | ||
| Line 67: | Line 67: | ||
[[File:13aaa.jpg|center|250px]] | [[File:13aaa.jpg|center|250px]] | ||
| − | The Upload File is also under the Utilities section. When the user click it, The Upload File will display which means the uploading of files. | + | The '''Upload File''' is also under the '''Utilities''' section. When the user click it, The Upload File will display which means the uploading of files. |
[[File:14aaa.jpg|center|300px]] | [[File:14aaa.jpg|center|300px]] | ||
| − | Before uploading a file, the user must select whether Reformatted Swiper Data 510 series, Upload Monthly Man Hour File formatted as (.DBF), Upload Weekly Man Hour File which also formatted as (.DBF), Quotabase Payroll and Mey Quotabase Payroll. | + | Before uploading a file, the user must select whether '''Reformatted Swiper Data 510 series''', '''Upload Monthly Man Hour File formatted as (.DBF)''', '''Upload Weekly Man Hour File''' which also formatted as (.DBF), '''Quotabase Payroll''' and '''Mey Quotabase Payroll. |
| − | + | ''' | |
[[File:15aaa.jpg|center|300px]] | [[File:15aaa.jpg|center|300px]] | ||
| − | When the user select reformatted Swiper, Then the user can now upload a file by clicking on the Choose | + | When the user select '''reformatted Swiper''', Then the user can now upload a file by clicking on the '''Choose Fil'''e. After that click on '''open''' then click '''process''' button and the file will be uploaded. |
[[File:16aaa.jpg|center|300px]] | [[File:16aaa.jpg|center|300px]] | ||
| Line 86: | Line 86: | ||
[[File:5aaa.jpg|center|250px]] | [[File:5aaa.jpg|center|250px]] | ||
| − | Under the Utilities, is the User account. When you click the user account the manage user account creation will display, then you can now search the user's name in the search box. | + | Under the '''Utilities''', is the '''User account'''. When you click, the user account the manage user account creation will display, then you can now search the user's name in the '''search box'''. |
This button is the pages no, Which indicates the number of user. | This button is the pages no, Which indicates the number of user. | ||
| Line 92: | Line 92: | ||
[[File:9aaa.jpg|300px]] | [[File:9aaa.jpg|300px]] | ||
| − | When the user click this (+) button, the User Account Updates will display. This is the | + | When the user click this '''(+)''' button, the User Account Updates will display. This is the |
| − | creation for new user.. The user must input User Name, Full Name, New Password, | + | creation for new user.. The user must input '''User Name''', '''Full Name''', '''New Password''', '''Re-Type Password''', '''Valid From'''Bold text''' and '''Valid to'''. |
| − | Re-Type Password, Valid From and Valid to. | + | |
[[File:7aaa.jpg|center|300px]] | [[File:7aaa.jpg|center|300px]] | ||
| − | The user can select the company to the company selection, location in the location selection. | + | The user can select the company to the '''company selection''', location in the '''location selection.''' |
| − | After that click save then the new user will be saved in the user account section. | + | After that click '''save''' then the new user will be saved in the '''user account''' section. |
[[File:10aaa.jpg|center|300px]] | [[File:10aaa.jpg|center|300px]] | ||
| Line 106: | Line 105: | ||
[[File:11aaa.jpg|center|300px]] | [[File:11aaa.jpg|center|300px]] | ||
| − | When the user click this (=>]) button, The User Account Updates will display. This | + | When the user click this '''(=>])''' button, The User Account Updates will display. This |
button allows the user to view the information of the user. It display the information | button allows the user to view the information of the user. It display the information | ||
| − | of the User Name, Dull Name, the Valid From, Valid To and the Password are hidden. | + | of the '''User Name''', '''Dull Name''', the '''Valid From''', '''Valid To''' and the '''Password''' are hidden. |
[[File:8bbb.jpg|center|300px]] | [[File:8bbb.jpg|center|300px]] | ||
| Line 118: | Line 117: | ||
'''User Access''' | '''User Access''' | ||
| − | In utility button, The User Access is included. You can select a user in the combo box , then you will see the selected section are in checked, after selecting click on the save button, then the user access will be saved. | + | In utility button, The '''User Access''' is included. You can select a user in the '''combo box''' , then you will see the selected section are in checked, after selecting click on the save button, then the user access will be saved. |
[[File:3aaa.jpg|center|250px]] | [[File:3aaa.jpg|center|250px]] | ||
| Line 125: | Line 124: | ||
'''Audit Trail Inquiry''' | '''Audit Trail Inquiry''' | ||
| − | Under the Utility is the Audit Trail Inquiry. When the user click this button the PMS Audit Trail Inquiry will Display. | + | Under the '''Utility''' is the '''Audit Trail Inquiry'''. When the user click this button the '''PMS Audit Trail Inquiry''' will Display. |
[[File:1aaa.jpg|center|250px]] | [[File:1aaa.jpg|center|250px]] | ||
| − | The users name will appear and you should select the user, You must input the date from and date to before clicking the process button. After you input the information it will display below which classified as user, employee, code, time, field, old value, new value, changer type, module and IP-address | + | The '''users name''' will appear and you should select the user, You must input the '''date from''' and '''date to''' before clicking the '''process''' button. After you input the information it will display below which classified as user, employee, code, time, field, old value, new value, changer type, module and IP-address |
[[File:2aaa.jpg|center|300px]] | [[File:2aaa.jpg|center|300px]] | ||
Revision as of 10:12, 22 August 2016
**Utilities**
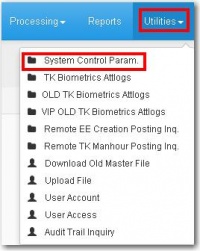
System Control Parameter
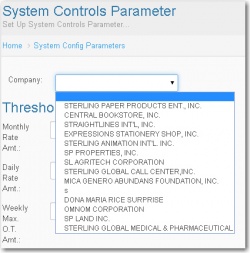
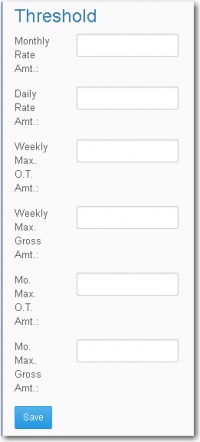
- Under the Utilities, The System Control Parameter is included. After clicking, you can select company in the combo box. Then the user must input value for Monthly Rate Amt, Daily Rate Amt, Weekly Max. O.T Amt, Mo Max. O.T Amt and the Mo Max Gross Amt. After you input value you can now click on Save button then the records will be saved.
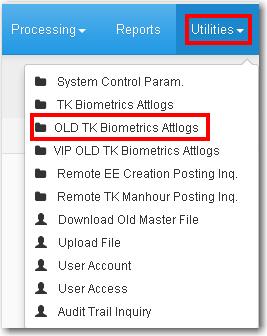
OLD TK Biometrics Attlogs
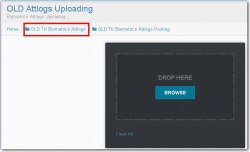
Under the Utilities is the OLD TK Biometrics Attlogs. The user can click on the Browse Button to upload a file.
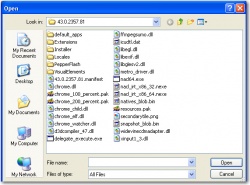
When you click on the Browse, you can select a file then click open and the file will upload.
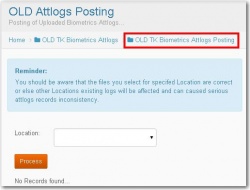
When you click on OLD TK Biometrics Attlogs Posting, the reminder will display and you must select location before you click on the process button. Then the file will uploaded.
VIP OLD TK Biometrics Attlogs
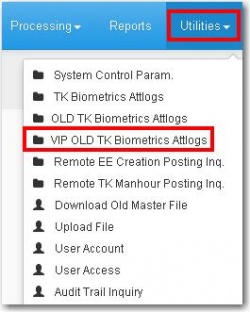
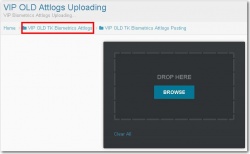
Under the Utilities Section is the VIP OLD TK Biometircs Attlogs which is the VIP Biometrics Attlogs Uploading. The user can click on the Browse button to upload a file.
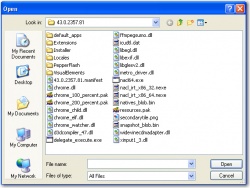
When you click on the Browse, you can select a file then click open and the file will upload.
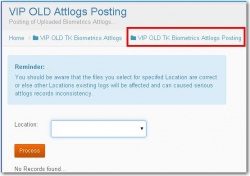
When you click on VIP OLD TK Biometrics Attlogs Posting, the reminder will display and you must select location before you click on the process button. Then the file will uploaded.
Remote EE Creation Posting Inq.
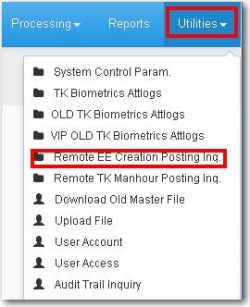
The Remote EE Creation Posting Inq. is under the Utilities Section. The user can search employee's name in the search box. Then the reset button is used to go back to main page of remote EE creation inquiry and record posting.
When you selected employee, the information will display. Then the user can use Select all and the De-Select all. After that the user can now click on the Process button to process the record.
Remote TK Manhour Posting Inq.
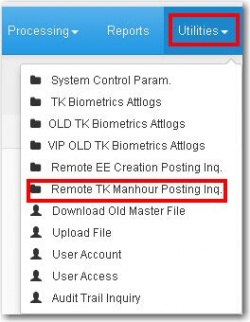
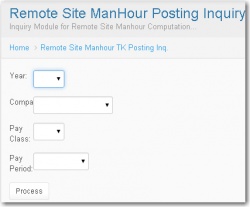
In the Utilities section, The Remote TK Manhour Posting Inq is included. When you click on it the remote site manhour posting inquiry will display which is the inquiry module for remote site manhour computation..
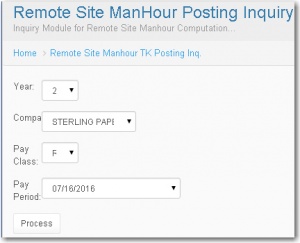
The user must input a Year, Company, Pay Class, and the Pay period. After you input the data click on the process button to process the data you entered.
Upload User
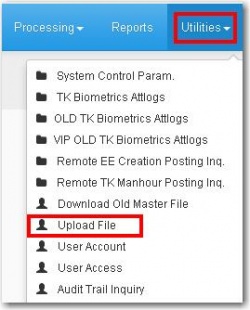
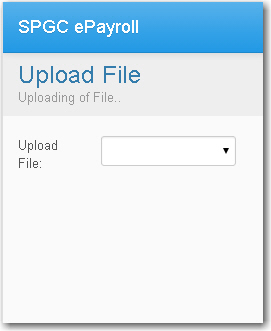
The Upload File is also under the Utilities section. When the user click it, The Upload File will display which means the uploading of files.
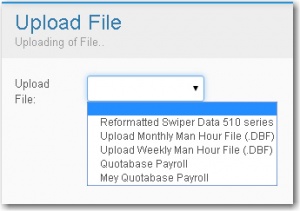
Before uploading a file, the user must select whether Reformatted Swiper Data 510 series, Upload Monthly Man Hour File formatted as (.DBF), Upload Weekly Man Hour File which also formatted as (.DBF), Quotabase Payroll and Mey Quotabase Payroll.
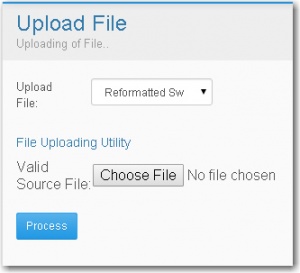
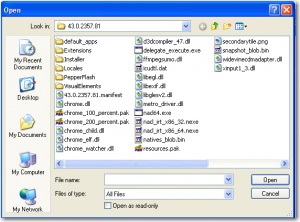
When the user select reformatted Swiper, Then the user can now upload a file by clicking on the Choose File. After that click on open then click process button and the file will be uploaded.
User Account
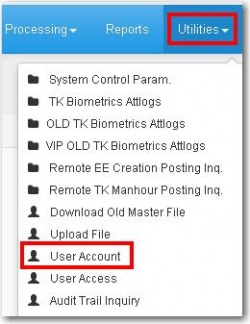
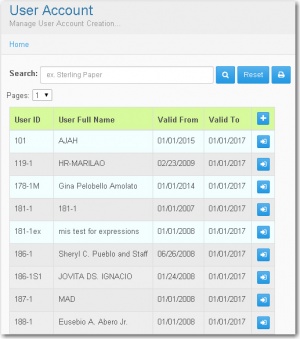
Under the Utilities, is the User account. When you click, the user account the manage user account creation will display, then you can now search the user's name in the search box. This button is the pages no, Which indicates the number of user.
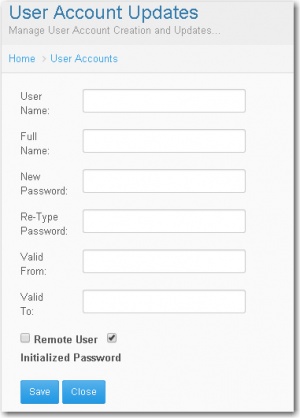
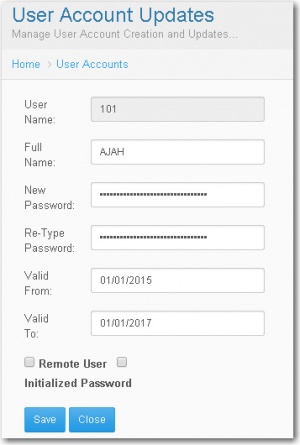
![]() When the user click this (+) button, the User Account Updates will display. This is the
creation for new user.. The user must input User Name, Full Name, New Password, Re-Type Password, Valid FromBold text and Valid to.
When the user click this (+) button, the User Account Updates will display. This is the
creation for new user.. The user must input User Name, Full Name, New Password, Re-Type Password, Valid FromBold text and Valid to.
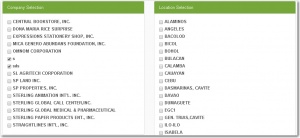
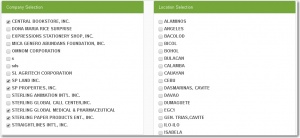
The user can select the company to the company selection, location in the location selection.
After that click save then the new user will be saved in the user account section.
When the user click this (=>]) button, The User Account Updates will display. This button allows the user to view the information of the user. It display the information of the User Name, Dull Name, the Valid From, Valid To and the Password are hidden.
It shows also the company selected by the user in the company selection and in location selection.
User Access
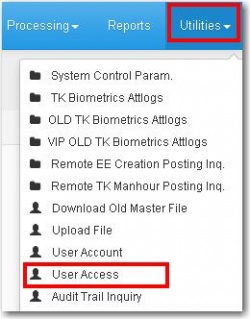
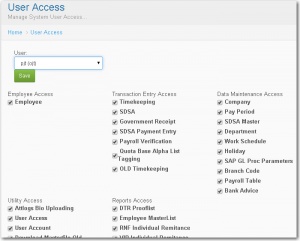
In utility button, The User Access is included. You can select a user in the combo box , then you will see the selected section are in checked, after selecting click on the save button, then the user access will be saved.
Audit Trail Inquiry
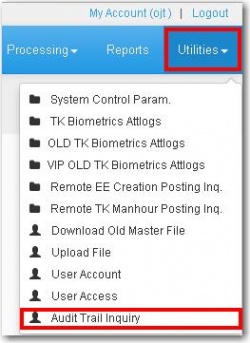
Under the Utility is the Audit Trail Inquiry. When the user click this button the PMS Audit Trail Inquiry will Display.
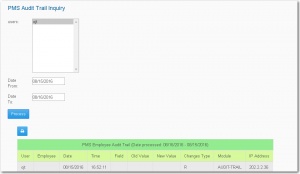
The users name will appear and you should select the user, You must input the date from and date to before clicking the process button. After you input the information it will display below which classified as user, employee, code, time, field, old value, new value, changer type, module and IP-address
