Difference between revisions of "WEB - BASED"
| Line 23: | Line 23: | ||
'''3.Process Attlogs: This module is responsible for the process of attlogs. | '''3.Process Attlogs: This module is responsible for the process of attlogs. | ||
'''4.Process manhour: This module is responsible for the process of manhour. | '''4.Process manhour: This module is responsible for the process of manhour. | ||
| − | If you want to search the information of employee, just type the employee number or name of an employee and click the Search button. | + | If you want to search the information of employee, just type the employee number or name of an employee and click the Search button. |
'''5.Employee Number - Button that will show the SALARY ADJUSTMENT – Active page. | '''5.Employee Number - Button that will show the SALARY ADJUSTMENT – Active page. | ||
[[File:K2.png|600px|center]] | [[File:K2.png|600px|center]] | ||
'''''Figure 5.1''''' | '''''Figure 5.1''''' | ||
| + | |||
| + | |||
| + | This form shows the timekeeping record of the employee. | ||
| + | |||
| + | [[File:K3.png|600px|center]] | ||
| + | '''''Figure 5.2''''' | ||
| + | |||
| + | |||
| + | The user can edit the TK details info by clicking the boxed modules. You may see figure 3.0 for your reference. | ||
| + | Upon clicking the TK details info, you will rediredted to another page. You can be able to edit the TK info of the employee. After clicking the save button the changes will be saved. | ||
| + | You may see figure 5.3 for your reference. | ||
| + | |||
| + | [[File:K4.png|600px|center]] | ||
| + | '''''Figure 5.3''''' | ||
| + | |||
| + | |||
| + | '''DTR''' | ||
| + | |||
| + | '''1.Original Schedule -''' it is the original working schedule of the employee. | ||
| + | '''2.Actual time -''' it is based on when he/she started and when he/she finished his/her job. | ||
| + | '''3.Encoded Time -''' it can be edited by the HR for some reasons. | ||
| + | '''Note* the time in columns that has a green background can be edited by the HR. | ||
| + | |||
| + | You may see figure 5.4 for your reference. | ||
| + | |||
| + | After clicking the '''Save''' button the changes that you’ve made will be save. | ||
| + | Clicking '''Refresh''' button will enable you to refresh the page. | ||
| + | Upon clicking '''Delete''' Manhour button the manhour record of the employee will be deleted. | ||
| + | |||
| + | [[File:K5.png|600px|center]] | ||
| + | '''''Figure 5.4''''' | ||
| + | |||
| + | |||
| + | '''OVERTIME''' | ||
| + | |||
| + | '''1.Original Schedule -''' it is the original working schedule of the employee. | ||
| + | '''2.Actual time -''' it is based on when he/she started and when he/she finished his/her job. | ||
| + | '''3.Start -''' The user can indicate when the employee started his/her overtime. | ||
| + | '''4.End -''' The user can indicate when the employee Ended his/her overtime. | ||
| + | |||
| + | The overtime of the employee will be inputted in the Start and End column that is placed within the right corner of the page. In start you must indicate when the OT of the employee began, and, in the End, you must indicate the time when the OT has ended. | ||
| + | |||
| + | After clicking the '''Save''' button the changes that you’ve made will be save. | ||
| + | Clicking '''Refresh''' button will enable you to refresh the page. | ||
| + | Upon clicking '''Check Amount Value''' button the user can be able to see the overtime record of the employee. | ||
| + | |||
| + | [[File:K6.png|600px|center]] | ||
| + | '''''Figure 5.5''''' | ||
| + | |||
| + | |||
| + | '''OBTP (Official Business Trip Pass) | ||
| + | '''1.Original Schedule - it is the original working schedule of the employee. | ||
| + | '''2.Actual time - it is based on when he/she started and when he/she finished his/her job. | ||
| + | '''3.Departure – this module holds the departure time of the employee for his/her OBTP. | ||
| + | '''4.Arrival – This module holds the time when the employee returned from his/her OBTP. | ||
| + | |||
| + | |||
| + | You may see figure 5.6 for your reference. | ||
| + | After clicking the '''Save''' button the changes that you’ve made will be save. | ||
| + | Clicking '''Refresh''' button will enable you to refresh the page. | ||
| + | |||
| + | [[File:K7.png|600px|center]] | ||
| + | '''''Figure 5.6''''' | ||
| + | |||
| + | |||
| + | '''UNDERTIME''' | ||
| + | '''1.Original Schedule -''' it is the original working schedule of the employee. | ||
| + | '''2.Actual time -''' it is based on when he/she started and when he/she finished his/her job. | ||
| + | '''3.From -''' The user can indicate when the employee started his/her undertime. | ||
| + | '''4.To -''' The user can indicate when the employee Ended his/her undertime. | ||
| + | |||
| + | After clicking the '''Save''' button the changes that you’ve made will be save. | ||
| + | Clicking '''Refresh''' button will enable you to refresh the page. | ||
| + | |||
| + | You may see figure 5.7 for your reference. | ||
| + | |||
| + | [[File:K8.png|600px|center]] | ||
| + | '''''Figure 5.7''''' | ||
| + | |||
| + | |||
| + | '''CWS (Change Work Schedule)''' | ||
| + | '''1.Original Schedule -''' it is the original working schedule of the employee. | ||
| + | '''2.Actual time -''' it is based on when he/she started and when he/she finished his/her job. | ||
| + | '''3.New Schedule –''' this module enables the user to create a new work schedule for the employee. The user can simply change the schedule by inputting a different time from the previous schedule. | ||
| + | |||
| + | After clicking the '''Save''' button the changes that you’ve made will be save. | ||
| + | Clicking '''Refresh''' button will enable you to refresh the page. | ||
| + | |||
| + | You may see figure 5.8 for your reference. | ||
| + | |||
| + | [[File:K9.png|600px|center]] | ||
| + | '''''Figure 5.8''''' | ||
Revision as of 11:28, 12 February 2019
Main Page > Application Development Team > System Manual > SPGC EPAYROLL
V. TIMEKEEPING
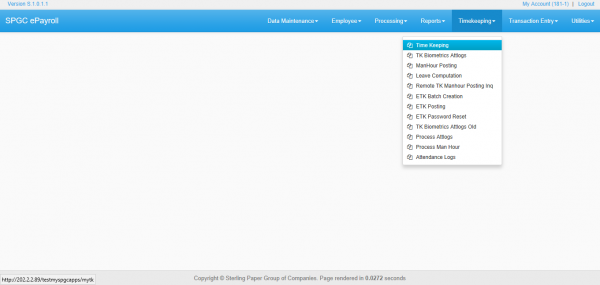
- This tab contains some various modules that is related to timekeeping.
  •Time Keeping – this module contains the timekeeping records of the employees
  •TK BIOMETRICS ATTLOGS – this module is used to be able to upload an attlog file.
  •MANHOUR POSTING - This module enables the user to post the manhour records of each company.
  •LEAVE COMPUTATION – This module computes the remaining and rendered leave of the employee in each company.
  •TK Biometrics Attlogs Old–  this module is used to be able to upload an old attlog file.
  •Process Attlogs – This module is responsible for the process of attlogs.
Figure 5.0
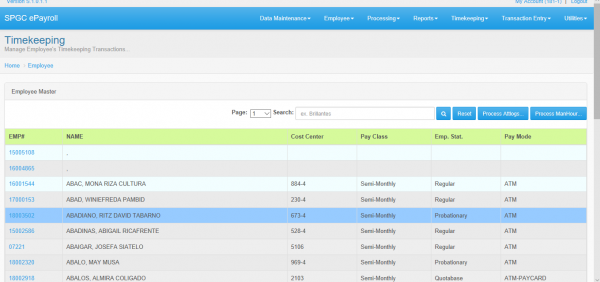
 Once you click Timekeeping, it will show table showing all the basic details of every employees. You may see figure 1.1 for your reference.
  1.Search Field: Through this field, users can search employees on the system using employee number or employee’s name.
  2.Employee Details: Table showing all the basic information of every employees. The employees displayed will based on user’s access.
  3.Process Attlogs: This module is responsible for the process of attlogs.
  4.Process manhour: This module is responsible for the process of manhour.
     If you want to search the information of employee, just type the employee number or name of an employee and click the Search button.
  5.Employee Number -  Button that will show the SALARY ADJUSTMENT – Active page.
Figure 5.1
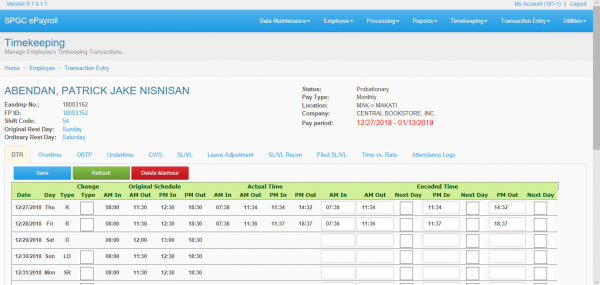
This form shows the timekeeping record of the employee.
Figure 5.2
The user can edit the TK details info by clicking the boxed modules. You may see figure 3.0 for your reference.
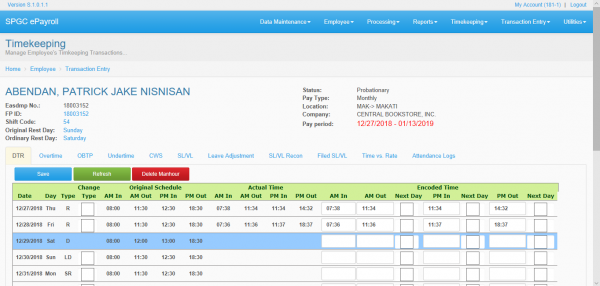
Upon clicking the TK details info, you will rediredted to another page. You can be able to edit the TK info of the employee. After clicking the save button the changes will be saved. You may see figure 5.3 for your reference.
Figure 5.3
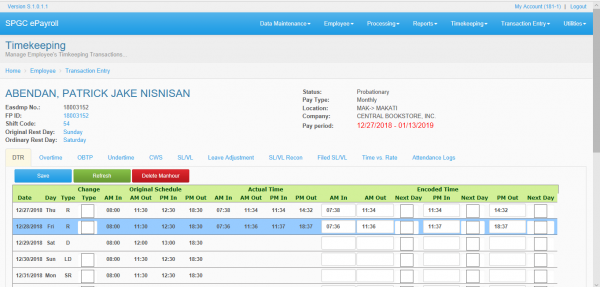
DTR
  1.Original Schedule - it is the original working schedule of the employee.
  2.Actual time - it is based on when he/she started and when he/she finished his/her job.
  3.Encoded Time - it can be edited by the HR for some reasons.
  Note* the time in columns that has a green background can be edited by the HR.
You may see figure 5.4 for your reference.
 After clicking the Save button the changes that you’ve made will be save.
 Clicking Refresh button will enable you to refresh the page.
 Upon clicking Delete Manhour button the manhour record of the employee will be deleted.
Figure 5.4
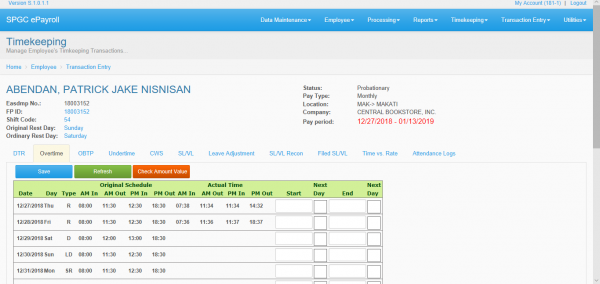
OVERTIME
  1.Original Schedule - it is the original working schedule of the employee.
  2.Actual time - it is based on when he/she started and when he/she finished his/her job.
  3.Start - The user can indicate when the employee started his/her overtime.
  4.End - The user can indicate when the employee Ended his/her overtime.
The overtime of the employee will be inputted in the Start and End column that is placed within the right corner of the page. In start you must indicate when the OT of the employee began, and, in the End, you must indicate the time when the OT has ended.
After clicking the Save button the changes that you’ve made will be save. Clicking Refresh button will enable you to refresh the page. Upon clicking Check Amount Value button the user can be able to see the overtime record of the employee.
Figure 5.5
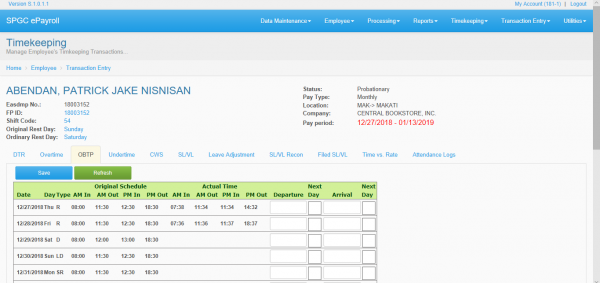
 OBTP (Official Business Trip Pass)
  1.Original Schedule - it is the original working schedule of the employee.
  2.Actual time - it is based on when he/she started and when he/she finished his/her job.
  3.Departure – this module holds the departure time of the employee for his/her OBTP.
  4.Arrival – This module holds the time when the employee returned from his/her OBTP.
You may see figure 5.6 for your reference.
After clicking the Save button the changes that you’ve made will be save. Clicking Refresh button will enable you to refresh the page.
Figure 5.6
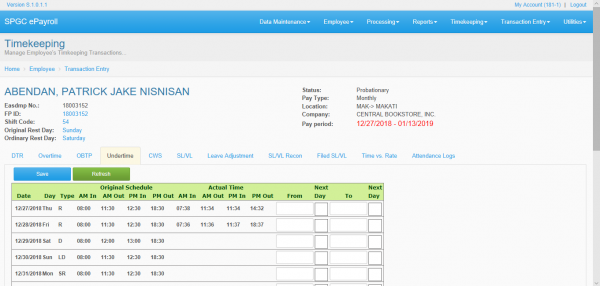
 UNDERTIME
  1.Original Schedule - it is the original working schedule of the employee.
  2.Actual time - it is based on when he/she started and when he/she finished his/her job.
  3.From - The user can indicate when the employee started his/her undertime.
  4.To - The user can indicate when the employee Ended his/her undertime.
After clicking the Save button the changes that you’ve made will be save. Clicking Refresh button will enable you to refresh the page.
You may see figure 5.7 for your reference.
Figure 5.7
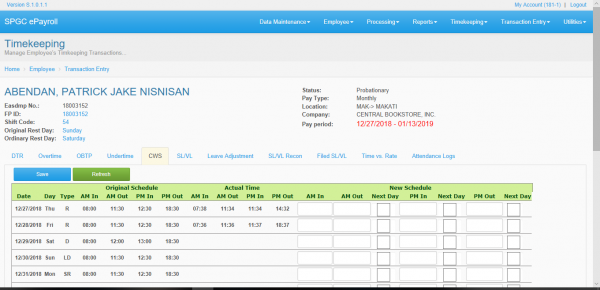
 CWS (Change Work Schedule)
  1.Original Schedule - it is the original working schedule of the employee.
  2.Actual time - it is based on when he/she started and when he/she finished his/her job.
  3.New Schedule – this module enables the user to create a new work schedule for the employee. The user can simply change the schedule by inputting a different time from the previous schedule.
After clicking the Save button the changes that you’ve made will be save. Clicking Refresh button will enable you to refresh the page.
You may see figure 5.8 for your reference.
Figure 5.8
