Difference between revisions of "DATA MAINTENANCE"
From SPGC Document Wiki
| (100 intermediate revisions by the same user not shown) | |||
| Line 1: | Line 1: | ||
| + | |||
| + | == Headline text == | ||
[[Main_Page | Main Page]] > [[Application_Development_Team | Application Development Team]] > [[System_Manual | System Manual]] > [[SPGC_EPAYROLL | SPGC EPAYROLL]] | [[Main_Page | Main Page]] > [[Application_Development_Team | Application Development Team]] > [[System_Manual | System Manual]] > [[SPGC_EPAYROLL | SPGC EPAYROLL]] | ||
'''Navigating to Data Maintenance''' | '''Navigating to Data Maintenance''' | ||
| − | + | I.'''COMPANY''' | |
| − | + | ||
| − | + | ||
| − | + | ||
| − | + | ||
| − | + | ||
| − | + | ||
| − | + | ||
| − | + | ||
| − | + | ||
| − | + | ||
| − | + | ||
| − | + | ||
| − | + | ||
| − | + | ||
| − | + | ||
| − | + | ||
| − | + | ||
| − | + | ||
| − | + | ||
| − | + | ||
| − | + | ||
| − | + | ||
| − | + | ||
| − | + | ||
| − | + | ||
| − | + | ||
| − | + | ||
| − | + | ||
| − | + | ||
| − | + | ||
| − | + | ||
| − | + | ||
| − | + | ||
| − | + | ||
| − | + | ||
| − | + | ||
| − | + | ||
| − | + | ||
| − | + | ||
| − | + | ||
| − | + | ||
| − | + | ||
| − | + | ||
| − | + | ||
| − | + | ||
| − | + | ||
| − | + | ||
| − | + | ||
| − | + | ||
| − | + | ||
| − | + | ||
| − | + | ||
| − | + | ||
| − | + | ||
| − | + | ||
| − | + | ||
| − | + | ||
| − | + | ||
| − | + | ||
| − | + | ||
| − | + | ||
| − | + | ||
| − | + | ||
| − | + | ||
| − | + | ||
| − | + | ||
| − | + | ||
| − | + | ||
| − | + | ||
| − | + | ||
| − | + | ||
| − | + | ||
| − | + | ||
| − | + | ||
| − | + | ||
| − | + | ||
| − | + | ||
| − | + | ||
| − | + | ||
| − | + | ||
| − | + | ||
| − | + | ||
| − | + | ||
| − | + | ||
| − | + | ||
| − | + | ||
| − | + | ||
| − | + | ||
| − | + | ||
| − | + | ||
| − | + | ||
| − | + | ||
| − | + | ||
| − | + | ||
| − | + | ||
| − | + | ||
| − | + | ||
| − | + | ||
| − | + | ||
| − | + | ||
| − | + | ||
| − | + | ||
| − | + | ||
| − | + | ||
| − | + | ||
| − | + | ||
| − | + | ||
| − | + | ||
| − | + | ||
| − | + | ||
| − | + | ||
| − | + | ||
| − | + | ||
| − | + | ||
| − | + | ||
| − | + | ||
| − | + | ||
| − | + | ||
| − | + | ||
| − | + | ||
| − | + | ||
| − | + | ||
| − | + | ||
| − | + | ||
| − | + | ||
| − | + | ||
| − | + | ||
| − | + | ||
| − | + | ||
| − | + | ||
| − | + | ||
| − | + | ||
| − | + | ||
| − | + | ||
| − | + | ||
| − | + | ||
| − | + | ||
| − | + | ||
| − | + | ||
| − | + | ||
| − | + | ||
| − | + | ||
| − | + | ||
| − | + | ||
| − | + | ||
| − | + | ||
| − | + | ||
| − | + | ||
| − | + | ||
| − | + | ||
| − | + | ||
| − | + | ||
| − | + | ||
| − | + | ||
| − | + | ||
| − | + | ||
| − | + | ||
| − | + | ||
| − | |||
| − | + | [[File:c1.png|400px|center]] | |
| + | <center> '''Figure 1.0''' </center> | ||
| − | [[File: | + | [[File:c2.png|400px|center]] |
| + | <center> '''Figure 1.1''' </center> | ||
| + | 1.'''Search Field''': Through this field, users can search employees on the system by the use of company’s name. | ||
| + | 2.'''Reset''': To reset the history you search. | ||
| + | 3.'''Print''': To print the important information. | ||
| + | 4.'''Add''': Allows you to add company entry. | ||
| + | 5.'''Edit''': To edit the company entry. | ||
| − | + | <center>Once you click '''Add Button''', it will show table company entry. You may see figure 2.0 for your reference.</center> | |
| − | |||
| − | |||
| − | |||
| − | [[File: | + | [[File:c4.png|400px|center]] |
| + | <center> '''Figure 1.2''' </center> | ||
| + | • '''Company Code''' – In this module the user can select the Company code entry to complete the process. | ||
| + | • '''Name''' – In this module the user can select the Name entry to complete the process. | ||
| + | • '''SSS''' – In this module the user can select the SSS Number entry to complete the process. | ||
| + | • '''TIN No''' – In this module the user can select the TIN Number entry to complete the process. | ||
| + | • '''PhilHealth No''' – In this module the user can select the PhilHealth Number entry to complete the process. | ||
| + | • '''HDMF No''' – In this module the user can select the HDMF Number entry to complete the process. | ||
| + | • '''Address''' – In this module the user can select the Address entry to complete the process. | ||
| + | • '''Tel. No''' – In this module the user can select the Tel. number entry to complete the process. | ||
| + | • '''ZIP Code'''– In this module the user can select the ZIP code entry to complete the process. | ||
| + | • '''Company Signatory'''– This module is the signature of Company to complete the process. | ||
| + | • '''Position'''– In this module the user can select the Position entry to complete the process. | ||
| − | + | <center>Before you '''save''', make sure to fill out all the needed fields correctly.</center> | |
| − | |||
| − | |||
| − | |||
| − | + | II.'''PAYROLL PERIOD''' | |
| + | [[File:c3.png|500px|center]] | ||
| + | <center> '''Figure 2.0''' </center> | ||
| − | |||
| − | + | 1.'''Pay Class''': In this module you can select Weekly, Monthly and VIP depends to your Pay class. | |
| + | 2.'''Company''': In this module you can select the company name. | ||
| − | + | <center>Once selecting the module, it will show table pay period. You may see figure 2.1 for your reference.</center> | |
| − | [[File: | + | [[File:c6.png|500px|center]] |
| + | <center> '''Figure 2.1''' </center> | ||
| − | + | 1.'''Search Field''': Through this field, users can search Payroll Period on the system by the use of Pay Class and Company’s name. | |
| + | 2.'''Add''': Allows you to add Payroll Period entry. | ||
| + | 3.'''Edit''': To edit the Payroll Period entry. | ||
| − | |||
| + | [[File:pic6.png|500px|center]] | ||
| + | <center> '''Figure 2.2''' </center> | ||
| − | + | •'''Month''' – In this module the user can select the Month of entry to complete the process. | |
| + | •'''Period''' – In this module the user can select the period entry to complete the process. | ||
| + | •'''No. of days''' – In this module the user can select the number of days to complete the process. | ||
| + | •'''Period From''' – In this module the user can select the start of the pay period. | ||
| + | •'''Period To''' – In this module the user can select the end of the pay period. | ||
| + | •'''Assumed To''' – In this module the user can select the assumed of date of pay period. | ||
| + | •'''Remote Cut Off from''' - This module is the start cut off of the Payroll offsite. | ||
| + | •'''Remote Cut Off to''' - This module is the end of cut off of the Payroll offsite. | ||
| − | |||
| + | 1.Before you '''save''', make sure to fill out all the needed fields correctly. | ||
| + | 2.If you check the '''posted''' below, the Payroll is not allowed to modify and if you want to modify the Payroll uncheck Posted below to '''modify''' your Payroll and press save button. | ||
| − | |||
| − | + | <center>Note: '''You can only modify those Payroll Period which is not posted yet'''.</center> | |
| − | + | [[File:pic7.png|500px|center]] | |
| + | <center> '''Figure 2.3''' </center> | ||
| + | 1.You can only''' modify''' those Payroll Period which is not posted yet. | ||
| + | 2.If you want to '''modify''' the company entries just click '''edit'''. | ||
| − | |||
| − | + | III.'''SDSA''' | |
| + | [[File:c7.png|500px|center]] | ||
| + | <center> '''Figure 3.0''' </center> | ||
| − | + | 1.'''Search Field''': Through this field, users can search employees on the system by the use of company’s name or SDSA | |
| + | 2.'''Reset''': To reset the history you search. | ||
| + | 3.'''Print''': To print the important information. | ||
| + | <center>Once you select company name and SDSA, it will show the information. You may see figure 3.1 for your reference.</center> | ||
| − | [[File: | + | [[File:c8.png|500px|center]] |
| + | <center> '''Figure 3.1''' </center> | ||
| − | + | 1.This form will show the information about the SDSA. | |
| − | + | IV.'''DEPARTMENT''' | |
| − | [[File: | + | [[File:c9.png|500px|center]] |
| + | <center> '''Figure 4.0''' </center> | ||
| − | + | 1.'''Search Field''': Through this field, users can search employees on the system by the use of company’s name or Cost Center. | |
| + | 2.'''Reset''': To reset the history you search. | ||
| + | 3.'''Print''': To print the important information. | ||
| + | <center>Once selecting the company name, it will show table information. You may see figure 4.1 for your reference.</center> | ||
| − | [[File: | + | [[File:c10.png|500px|center]] |
| + | <center> '''Figure 4.1''' </center> | ||
| + | 1.'''Add''': Allows you to add Department Cost Center entry. | ||
| + | 2.'''Edit''': To edit the Department Cost Center entry. | ||
| − | [[File: | + | [[File:c11.png|500px|center]] |
| + | <center> '''Figure 4.2''' </center> | ||
| − | + | •'''Department Cost Cente'''r – In this module the user can select the Dept. Cost Center to complete the process. | |
| + | •'''Name''' – this module the user can select the Name of department to complete the process. | ||
| − | + | <center>Note: After fill up Department, if you check the Active below the department will be active. And if you uncheck the Active below the department will be inactive. And Press the save button.</center> | |
| + | 1.Before you '''save''', make sure to fill out all the needed fields correctly. | ||
| + | 2.If you want to '''modify''' the Department Cost Center entries just click edit. And check the Active button if you want to active this entry. | ||
| − | + | V.'''WORK SCHEDULE''' | |
| − | + | [[File:c12.png|500px|center]] | |
| + | <center> '''Figure 5.0''' </center> | ||
| − | + | 1.'''Search Field''': Through this field, users can search Work Schedule on the system by the use of Work Schedule. | |
| + | 2.'''Reset''': To reset the history you search. | ||
| + | 3.'''Print''': To print the important information. | ||
| + | 4.'''Add''': Allows you to add Work Schedule entry. | ||
| + | 5.'''Edit''': To edit the Work Schedule entry. | ||
| − | |||
| − | + | <center>Once you click Add Button, it will show table Work Schedule entry. You may see figure 5.1 for your reference.</center> | |
| − | [[File: | + | [[File:pic14.png|500px|center]] |
| + | <center> '''Figure 5.1''' </center> | ||
| + | <center>Note * '''In regular schedule''' will be start in 8am to 11am and then in PM in is 12pm to 6pm. | ||
| + | '''Full night schedule''' will be start in 10pm to 2am and then 3am to 6am. | ||
| + | '''AM in schedule fall on Night Shift''' example is when your schedule will fall in night shift. | ||
| + | '''PM out schedule fall on night shift''' example is when your schedule will fall in before night shift. | ||
| + | If you check the checkbox button, example in AM out you will out all day in AM out.</center> | ||
| + | 1.Before you '''save''', make sure to fill out all the needed fields correctly. | ||
| + | 2.If you want to modify the Work Schedule entry just click edit. | ||
| − | |||
| − | + | VI.'''HOLIDAY''' | |
| + | [[File:c13.png|500px|center]] | ||
| + | <center> '''Figure 6.0''' </center> | ||
| − | + | 1.'''Search Field''': Through this field, users can search Holiday Master on the system by the use of Holiday. | |
| + | 2.'''Reset''': To reset the history you search. | ||
| + | 3.'''Print''': To print the important information. | ||
| + | 4.'''Add''': Allows you to add Holiday Master entry. | ||
| + | 5.'''Edit''': To edit the Holiday Master entry. | ||
| − | + | <center>Once you click Add Button, it will show table Holiday Master entry. You may see figure 6.1 for your reference.</center> | |
| − | + | [[File:c14.png|500px|center]] | |
| − | + | <center> '''Figure 6.1''' </center> | |
| − | + | •'''Holi Date''' – In this module the user can select the Holiday Date to complete the process. | |
| + | •'''Type''' – In this module the user can select the type of holiday if Regular holiday, Legal holiday, Special holiday or Area holiday. | ||
| + | •'''Location''' – In this module the user can select the location to complete the process. | ||
| − | |||
| + | 1.Before you '''save''', make sure to fill out all the needed fields correctly. | ||
| + | 2.If you want to modify the Work Schedule entry just click '''edit'''. | ||
| − | + | VII.'''SAP GL Proc Parameters''' | |
| − | + | ||
| − | + | ||
| − | + | ||
| − | [[File: | + | [[File:c15.png|500px|center]] |
| + | <center> '''Figure 7.0''' </center> | ||
| + | 1.Select the Company you want to View. | ||
| − | + | <center>Once you select the Company you want to view, it will show GL Code Breakdown Parameters and SDSA Breakdown Parameters. You may see figure 2.0 for your reference.</center> | |
| + | [[File:pic18.png|500px|center]] | ||
| + | <center> '''Figure 7.1''' </center> | ||
| + | 1.After you choose a company this data will show. If you want to modify the GL Code Breakdown just click in the left side of form and choose. And if you want to modify the SDSA Breakdown just click the add icon in the right side. | ||
| + | 2.After this data press the save button bellow. | ||
| + | [[File:pic19.png|500px|center]] | ||
| + | <center> '''Figure 7.2''' </center> | ||
| − | |||
| − | [[File: | + | VIII.'''BRANCH CODE''' |
| + | <center>Branch Code allows you to add Branch and Modify only</center> | ||
| + | [[File:c16.png|500px|center]] | ||
| + | <center> '''Figure 8.0''' </center> | ||
| + | 1.'''Search Field''': Through this field, users can search Holiday Master on the system by the use of Holiday. | ||
| + | 2.'''Reset''': To reset the history you search. | ||
| + | 3.'''Print''': To print the important information. | ||
| + | 4.'''Add''': Allows you to add Holiday Master entry. | ||
| + | 5.'''Edit''': To edit the Holiday Master entry. | ||
| − | |||
| + | <center>Once you click '''Add Button''', it will show table Holiday Master entry. You may see figure 8.1 for your reference.</center> | ||
| − | |||
| − | |||
| − | ''' | + | [[File:pic21.png|500px|center]] |
| + | <center> '''Figure 8.1''' </center> | ||
| + | •'''Branch Code''' – In this module the user can select the branch code to complete the process. | ||
| + | •'''Branch Name''' – In this module the user can select the branch name to complete the process. | ||
| − | |||
| + | 1.Before you '''save''', make sure to fill out all the needed fields correctly. | ||
| + | 2.If you want to '''modify''' the Branch entry just click edit. | ||
| − | [[File: | + | IX.'''PAYROLL TABLE''' |
| + | <center>In this Payroll Table you can add''' Pag ibig ,SSS''' and '''Tax''' Entries and it’s process is the same. In the Tax table there are two types of Tax , Tax Additional Rate and Annual Tax Table. It is the same Process of Pag Ibig Entry and SSS you can Add, Edit and Search.</center> | ||
| + | [[File:c17.png|500px|center]] | ||
| + | <center> '''Figure 9.0''' </center> | ||
| + | 1.'''Search Field''': Through this field, users can search the Pag ibig ,SSS and Tax on the system by the use of the Pag ibig ,SSS and Tax entries. | ||
| + | 2.'''Reset''': To reset the history you search. | ||
| + | 3.'''Print''': To print the important information. | ||
| + | 4.'''Add''': Allows you to add Pag ibig ,SSS and Tax Entries. | ||
| + | 5.'''Edit''': To edit the Pag ibig ,SSS and Tax Entries. | ||
| − | |||
| − | + | <center>Once you click Add Button, it will show the table. You may see figure 9.1 for your reference.</center> | |
| − | + | <center>This table is example of how to add Pag Ibig entry. In the SSS and Tax entry it is the same process of Pag Ibig entry</center> | |
| − | [[File: | + | [[File:c18.png|500px|center]] |
| − | + | <center> '''Figure 9.1''' </center> | |
| − | ''' | + | |
| − | + | •'''Lower Range''' – This module contains to set the lower range of pag ibig entry. | |
| + | •'''Upper Range''' – This module contains to set the upper range of pag ibig entry. | ||
| + | •'''Employee Percentage''' - This module contains to set the percentage of employee. | ||
| + | •'''Employer Percentage''' – This module contains to set the percentage of employer. | ||
| + | •'''Employee Fixed Contribution''' – This module contains to set the fixed Contribution of employee. | ||
| + | •'''Employer Fixed Contribution''' – This module contains to set the fixed Contribution of employer. | ||
| + | 1.Before you save, make sure to fill out all the needed fields correctly. | ||
| + | 2.If you want to modify the data inputted just click edit. | ||
| − | |||
| − | + | X.'''WAGE ORDER''' | |
| + | <center>In this table you can '''search, add''' and '''edit''' the '''Region, Region Area, Class''' and '''Wage Order''' of employee. And it’s process is the same.</center> | ||
| + | [[File:c19.png|500px|center]] | ||
| + | <center> '''Figure 11.0''' </center> | ||
| − | + | 1.'''Search Field''': Through this field, users can search Region, Region Area, Class and Wage Order. | |
| + | 2.'''Reset''': To reset the history you search. | ||
| + | 3.'''Print''': To print the important information. | ||
| + | 4.'''Add''': Allows you to Region, Region Area, Class and Wage Order entries. | ||
| + | 5.'''Edit''': To edit the Region, Region Area, Class and Wage Order entries. | ||
| + | <center>Once you click Add Button, it will show the example table of Region Entry. You may see figure 11.1 for your reference.</center> | ||
| − | |||
| + | <center>This table is example of how to add Region entry. In the Region Area, Class and Wage Order. It is the same Process of Region entry.</center> | ||
| − | + | [[File:c20.png|500px|center]] | |
| − | [[ | + | <center> '''Figure 11.1''' </center> |
| + | •'''Region Code''' – In this module the user must select the Region Code to complete the process. | ||
| + | •'''Region Name''' – In this module the user must select the Region Name to complete the process. | ||
| − | + | I.Before you save, make sure to fill out all the needed fields correctly. | |
| + | II.If you want to modify the data inputted just click edit. | ||
Latest revision as of 15:02, 18 February 2019
Headline text
Main Page > Application Development Team > System Manual > SPGC EPAYROLL
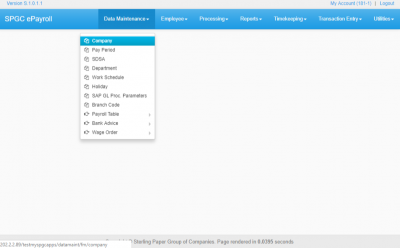
Navigating to Data Maintenance
I.COMPANY
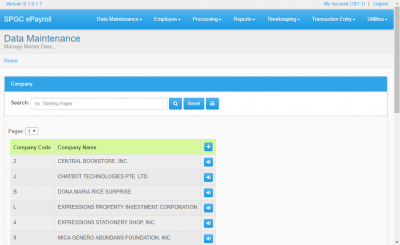
1.Search Field: Through this field, users can search employees on the system by the use of company’s name.
2.Reset: To reset the history you search.
3.Print: To print the important information.
4.Add: Allows you to add company entry.
5.Edit: To edit the company entry.
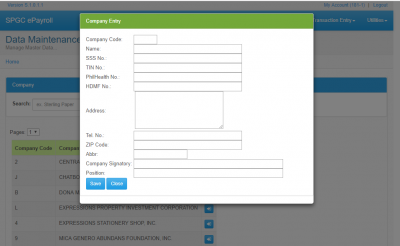
• Company Code – In this module the user can select the Company code entry to complete the process.
• Name – In this module the user can select the Name entry to complete the process.
• SSS – In this module the user can select the SSS Number entry to complete the process.
• TIN No – In this module the user can select the TIN Number entry to complete the process.
• PhilHealth No  – In this module the user can select the PhilHealth Number entry to complete the process.
• HDMF No – In this module the user can select the HDMF Number entry to complete the process.
• Address  – In this module the user can select the Address entry to complete the process.
• Tel. No – In this module the user can select the Tel. number entry to complete the process.
• ZIP Code– In this module the user can select the ZIP code entry to complete the process.
• Company Signatory–  This module is the signature of Company to complete the process.
• Position– In this module the user can select the Position entry to complete the process.
II.PAYROLL PERIOD
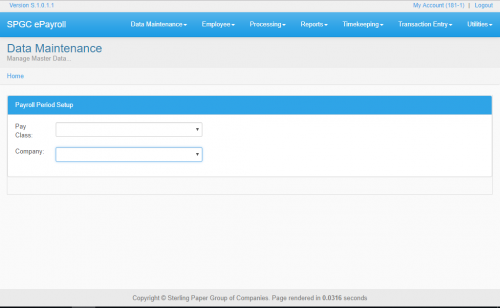
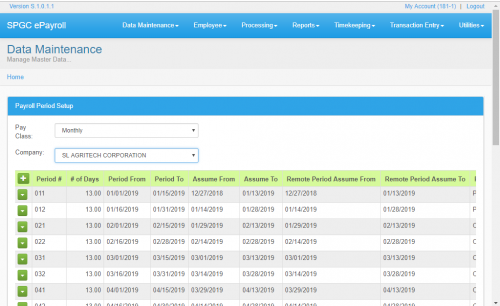
1.Pay Class: In this module you can select Weekly, Monthly and VIP depends to your Pay class.
2.Company: In this module you can select the company name.
1.Search Field: Through this field, users can search Payroll Period on the system by the use of Pay Class and Company’s name.
2.Add: Allows you to add Payroll Period entry.
3.Edit: To edit the Payroll Period entry.
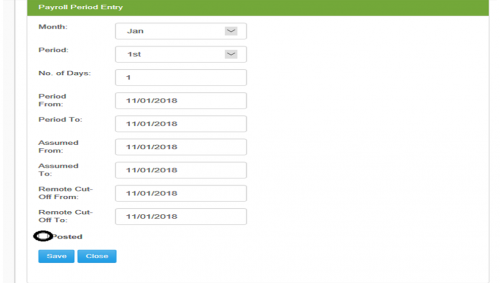
•Month – In this module the user can select the Month of entry to complete the process.
•Period – In this module the user can select the period entry to complete the process.
•No. of days – In this module the user can select the number of days to complete the process.
•Period From – In this module the user can select the start of the pay period.
•Period To – In this module the user can select the end of the pay period.
•Assumed To – In this module the user can select the assumed of date of pay period.
•Remote Cut Off from - This module is the start cut off of the Payroll offsite.
•Remote Cut Off to - This module is the end of cut off of the Payroll offsite.
1.Before you save, make sure to fill out all the needed fields correctly.
2.If you check the posted below, the Payroll is not allowed to modify and if you want to modify the Payroll uncheck Posted below to modify your Payroll and press save button.
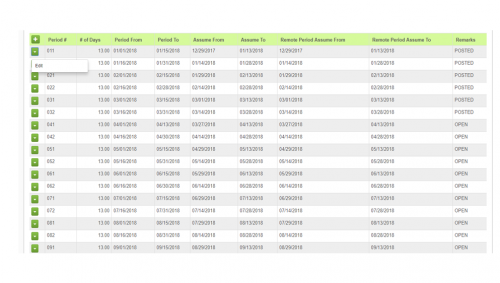
1.You can only modify those Payroll Period which is not posted yet.
2.If you want to modify the company entries just click edit.
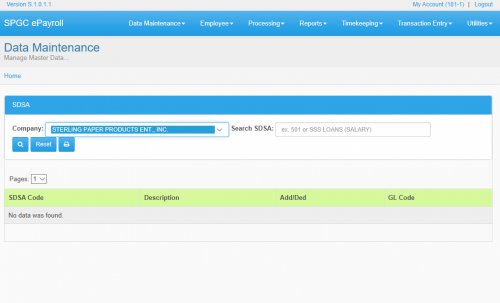
III.SDSA
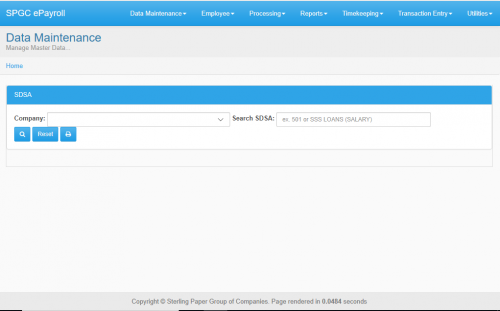
1.Search Field: Through this field, users can search employees on the system by the use of company’s name or SDSA
2.Reset: To reset the history you search.
3.Print: To print the important information.
1.This form will show the information about the SDSA.
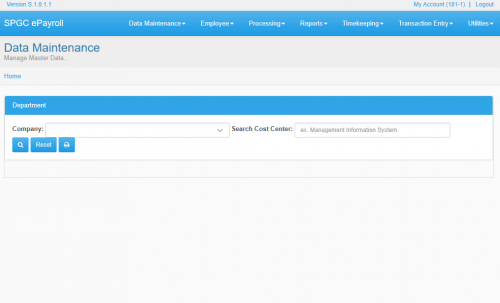
IV.DEPARTMENT
1.Search Field: Through this field, users can search employees on the system by the use of company’s name or Cost Center.
2.Reset: To reset the history you search.
3.Print: To print the important information.
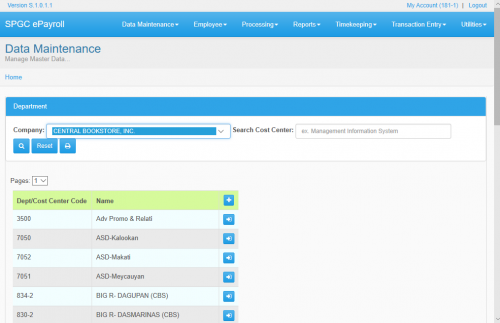
1.Add: Allows you to add Department Cost Center entry.
2.Edit: To edit the Department Cost Center entry.
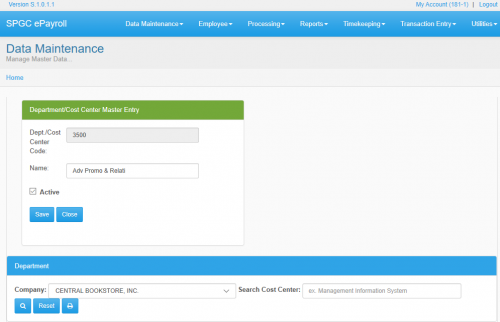
•Department Cost Center – In this module the user can select the Dept. Cost Center to complete the process.
•Name – this module the user can select the Name of  department to complete the process.
1.Before you save, make sure to fill out all the needed fields correctly.
2.If you want to modify the Department Cost Center entries just click edit.  And check the Active button if you want to active this entry.
V.WORK SCHEDULE
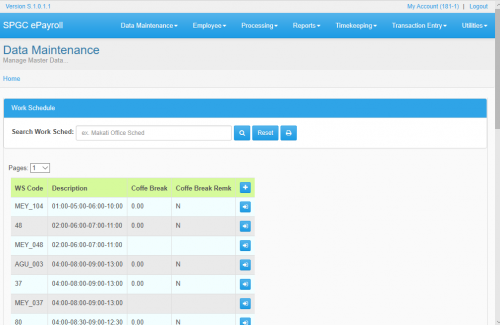
1.Search Field: Through this field, users can search Work Schedule on the system by the use of Work Schedule.
2.Reset: To reset the history you search.
3.Print: To print the important information.
4.Add: Allows you to add Work Schedule entry.
5.Edit: To edit the Work Schedule entry.
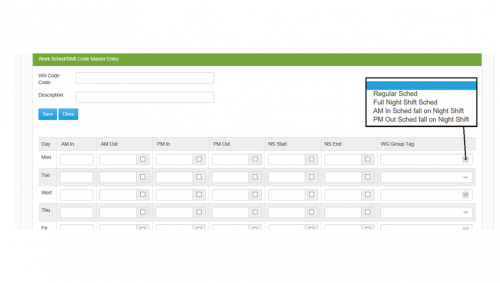
Full night schedule will be start in 10pm to 2am and then 3am to 6am. AM in schedule fall on Night Shift example is when your schedule will fall in night shift. PM out schedule fall on night shift example is when your schedule will fall in before night shift.
If you check the checkbox button, example in AM out you will out all day in AM out.1.Before you save, make sure to fill out all the needed fields correctly. 2.If you want to modify the Work Schedule entry just click edit.
VI.HOLIDAY
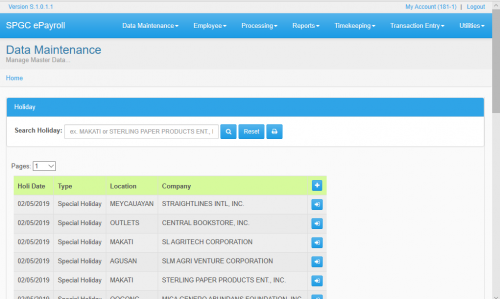
1.Search Field: Through this field, users can search Holiday Master on the system by the use of Holiday. 2.Reset: To reset the history you search. 3.Print: To print the important information. 4.Add: Allows you to add Holiday Master entry. 5.Edit: To edit the Holiday Master entry.
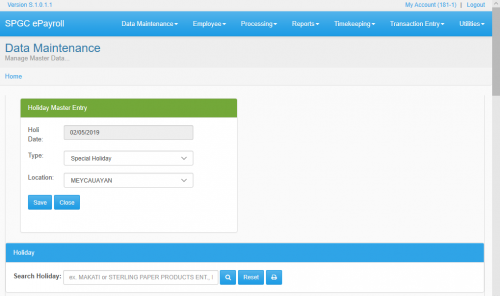
•Holi Date – In this module the user can select the Holiday Date to complete the process. •Type – In this module the user can select the type of holiday if Regular holiday, Legal holiday, Special holiday or Area holiday. •Location – In this module the user can select the location to complete the process.
1.Before you save, make sure to fill out all the needed fields correctly.
2.If you want to modify the Work Schedule entry just click edit.
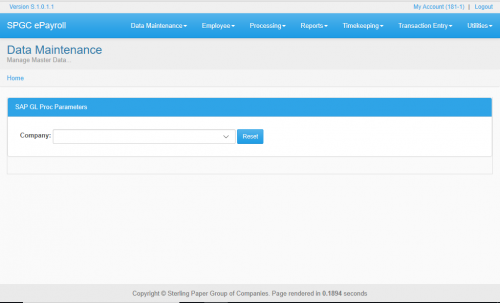
VII.SAP GL Proc Parameters
1.Select the Company you want to View.
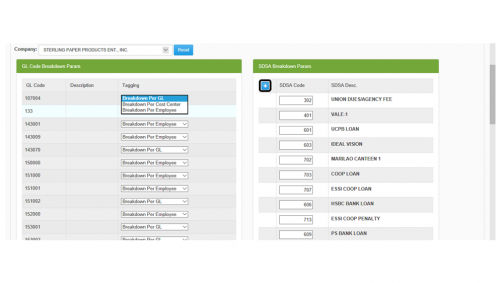
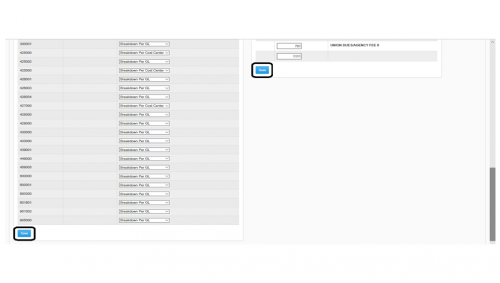
1.After you choose a company this data will show. If you want to modify the GL Code Breakdown just click in the left side of form and choose. And if you want to modify the SDSA Breakdown just click the add icon in the right side. 2.After this data press the save button bellow.
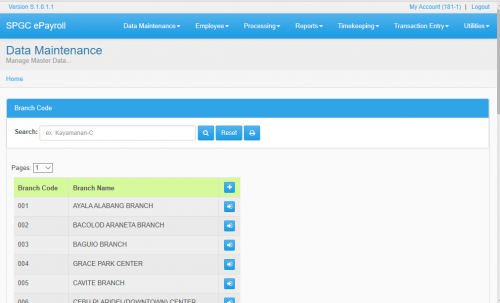
VIII.BRANCH CODE
1.Search Field: Through this field, users can search Holiday Master on the system by the use of Holiday.
2.Reset: To reset the history you search.
3.Print: To print the important information.
4.Add: Allows you to add Holiday Master entry.
5.Edit: To edit the Holiday Master entry.
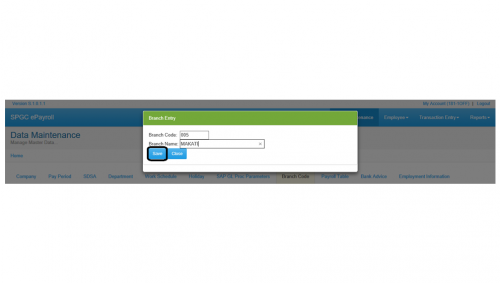
•Branch Code – In this module the user can select the branch code to complete the process.
•Branch Name – In this module the user can select the branch name to complete the process.
1.Before you save, make sure to fill out all the needed fields correctly.
2.If you want to modify the Branch entry just click edit.
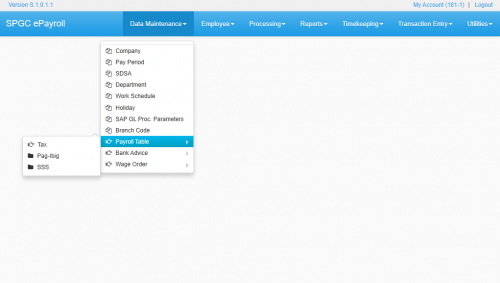
IX.PAYROLL TABLE
1.Search Field: Through this field, users can search the Pag ibig ,SSS and Tax on the system by the use of the Pag ibig ,SSS and Tax entries.
2.Reset: To reset the history you search.
3.Print: To print the important information.
4.Add: Allows you to add Pag ibig ,SSS and Tax Entries.
5.Edit: To edit the Pag ibig ,SSS and Tax Entries.
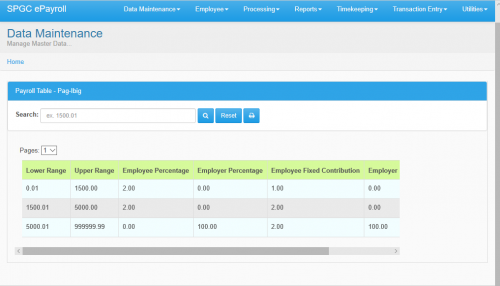
•Lower Range – This module contains to set the lower range of pag ibig entry.
•Upper Range – This module contains to set the upper range of pag ibig entry.
•Employee Percentage - This module contains to set the percentage of employee.
•Employer Percentage – This module contains to set the percentage of employer.
•Employee Fixed Contribution – This module contains to set the fixed Contribution of employee.
•Employer Fixed Contribution – This module contains to set the fixed Contribution of employer.
1.Before you save, make sure to fill out all the needed fields correctly.
2.If you want to modify the data inputted just click edit.
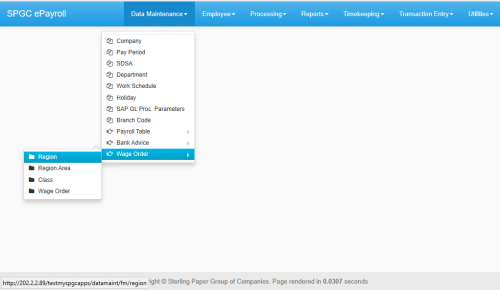
X.WAGE ORDER
1.Search Field: Through this field, users can search Region, Region Area, Class and Wage Order.
2.Reset: To reset the history you search.
3.Print: To print the important information.
4.Add: Allows you to Region, Region Area, Class and Wage Order entries.
5.Edit: To edit the Region, Region Area, Class and Wage Order entries.
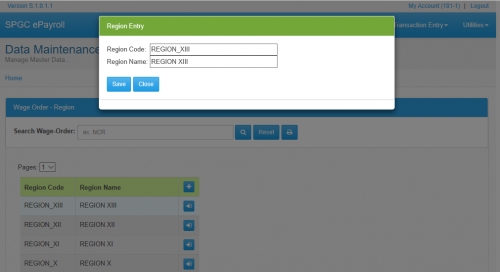
•Region Code – In this module the user must select the Region Code to complete the process.
•Region Name – In this module the user must select the Region Name to complete the process.
I.Before you save, make sure to fill out all the needed fields correctly.
II.If you want to modify the data inputted just click edit.
