Difference between revisions of "IPOSware MANUAL"
From SPGC Document Wiki
(→IPOSWARE USER GUIDE) |
(→IPOSWARE USER GUIDE) |
||
| (34 intermediate revisions by the same user not shown) | |||
| Line 10: | Line 10: | ||
'''Figure 2. Login Screen for Cashiering''' | '''Figure 2. Login Screen for Cashiering''' | ||
| − | {| class="wikitable" style = "text-align:center; margin: 0 auto;" | + | {| class="wikitable" style = "text-align:center; margin: 0 auto; width: 85; " |
| − | | 1 | + | | style = width: 25%;|1 |
| − | | Username Field | + | | style = width: 25%;|Username Field |
| − | | style="text-align:right;" | This fields allows the user enter their username | + | | style="text-align:right; width:60%" | This fields allows the user enter their username |
|- | |- | ||
| 2 | | 2 | ||
| Line 24: | Line 24: | ||
'''Figure 3. Cashiering''' | '''Figure 3. Cashiering''' | ||
| − | {| class="wikitable" style = "text-align:center; margin: 0 auto;" | + | {| class="wikitable" style = "text-align:center; margin: 0 auto; width: 85%;" |
| − | | '''1''' | + | | style = width: 15%;|'''1''' |
| − | | Total | + | | style = text-align: left; width: 15%;|Total |
| − | | style= | + | | style= text-align:left; width: 55%; | Shows the total price of the products. |
|- | |- | ||
| '''2''' | | '''2''' | ||
| Line 53: | Line 53: | ||
| style="text-align:left;" | Shows the Cashier picture. | | style="text-align:left;" | Shows the Cashier picture. | ||
|} | |} | ||
| − | |||
| Line 59: | Line 58: | ||
'''Figure 3.1 Item Lookup''' | '''Figure 3.1 Item Lookup''' | ||
| − | {| class="wikitable" style = "text-align:center; margin: 0 auto;" | + | {| class="wikitable" style = "text-align:center; margin: 0 auto; width: 85%" |
| − | | '''1''' | + | | style = "text-align:center; width: 5%|'''1''' |
| − | | Item Lookup | + | | style = "text-align:left; width: 15%"|Item Lookup |
| − | | style="text-align:left;" | | + | | style="text-align:left; width: 65%" | |
*Shortcut: Ctrl + I. | *Shortcut: Ctrl + I. | ||
*Allows the Cashier to search and select a specific product. | *Allows the Cashier to search and select a specific product. | ||
*There are items that are called '''Open Items'''. These items needs supervisor's approval before buying them. | *There are items that are called '''Open Items'''. These items needs supervisor's approval before buying them. | ||
|} | |} | ||
| − | |||
| − | |||
| − | |||
| Line 75: | Line 71: | ||
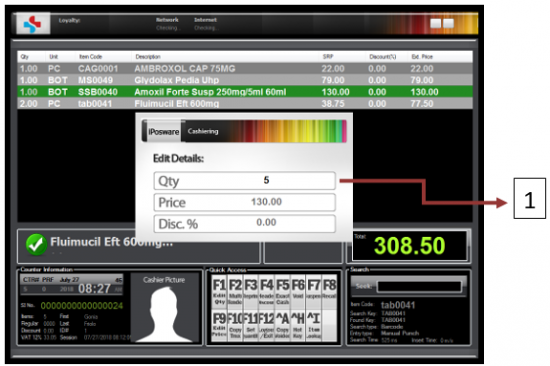
'''Figure 3. Edit Quantity''' | '''Figure 3. Edit Quantity''' | ||
| − | {| class="wikitable" style = "text-align:center; margin: 0 auto;" | + | {| class="wikitable" style = "text-align:center; margin: 0 auto; width:85%;" |
| − | | | + | | style = "text-align:center; width: 5%;|'''1''' |
| − | | Edit Quantity | + | | style = "text-align:center; width: 15%;"|Edit Quantity |
| − | | style="text-align:left;" | | + | | style="text-align:left; width: 65%;" | |
*Quick Access: F1 | *Quick Access: F1 | ||
*Allows cashier can edit the quantity of the product. | *Allows cashier can edit the quantity of the product. | ||
| Line 87: | Line 83: | ||
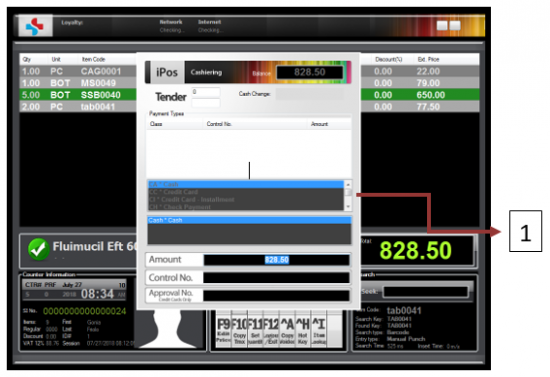
'''Figure 3.3 Multi-Tender''' | '''Figure 3.3 Multi-Tender''' | ||
| − | {| class="wikitable" style = "text-align:center; margin: 0 auto;" | + | {| class="wikitable" style = "text-align:center; margin: 0 auto; width: 85%;" |
| − | |'''1''' | + | |style = "text-align: center; width: 5%;"|'''1''' |
| − | | Multi-Tender | + | |style = "text-align: center; width: 15%;"| Multi-Tender |
| − | | style="text-align:left;" | | + | | style="text-align:left; width: 65%;" | |
*Quick Access: F2 | *Quick Access: F2 | ||
*This field allows the cashier to enter the tendered amount of the customer. | *This field allows the cashier to enter the tendered amount of the customer. | ||
| Line 101: | Line 97: | ||
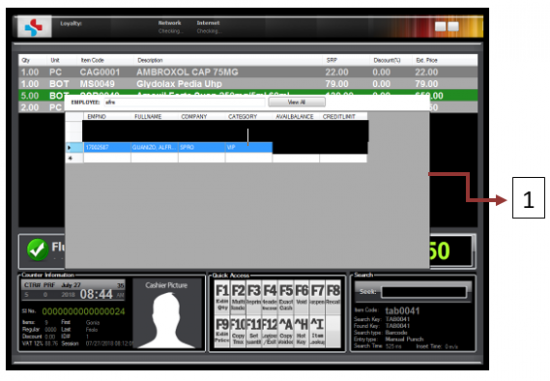
'''Figure 3.3.1 Purchase Order''' | '''Figure 3.3.1 Purchase Order''' | ||
| − | {| class="wikitable" style = "text-align:center; margin: 0 auto;" | + | {| class="wikitable" style = "text-align:center; margin: 0 auto; width: 85%;" |
| − | | '''1''' | + | | style = "text-align:center; width: 5%;"|'''1''' |
| − | | Multi-Tender -> Purchase Order | + | | style = "text-align:center; width: 25%;"|Multi-Tender -> Purchase Order |
| − | | style="text-align:left;" | | + | | style="text-align:left; width: 55%;" | |
*Search and selection of Employee. | *Search and selection of Employee. | ||
|} | |} | ||
| Line 112: | Line 108: | ||
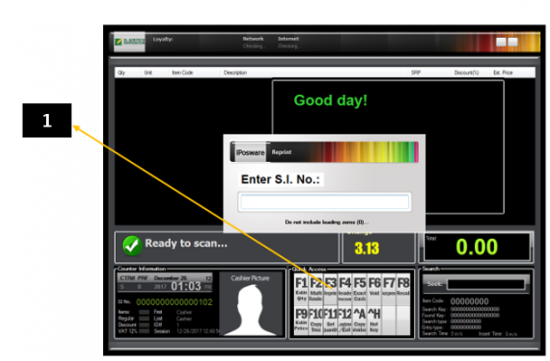
'''Figure 3.4 Reprint''' | '''Figure 3.4 Reprint''' | ||
| − | + | {| class="wikitable" style = "text-align:center; margin: 0 auto; width:85%;" | |
| − | {| class="wikitable" style = "text-align:center; margin: 0 auto;" | + | | style = "text-align: center; width: 5%;"|'''1''' |
| − | | '''1''' | + | | style = "text-align: center; width: 25%;"|Reprint |
| − | | Reprint | + | | style="text-align:left; width: 55%;" | |
| − | | style="text-align:left;" | | + | |
*For easy access of reprint, the cashier must type F3 | *For easy access of reprint, the cashier must type F3 | ||
*To reprint receipt, the cashier must enter the Receipt’s SI. No. | *To reprint receipt, the cashier must enter the Receipt’s SI. No. | ||
| Line 124: | Line 119: | ||
[[File:09.png|550px|center]] | [[File:09.png|550px|center]] | ||
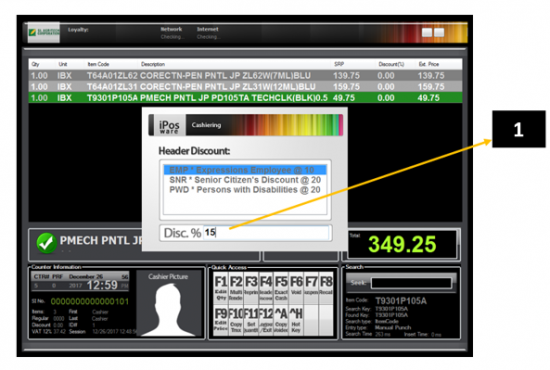
'''Figure 3.5 Header Discount''' | '''Figure 3.5 Header Discount''' | ||
| + | |||
| + | {| class="wikitable" style = "text-align:center; margin: 0 auto; width:85%" | ||
| + | | style ="text-align: center; width: 5%;"|'''1''' | ||
| + | | style ="text-align: center; width: 20%;"|Header Discount | ||
| + | | style="text-align:left; width:60%;" | | ||
| + | *Quick Access: F4 | ||
| + | *This field allows the cashier to put a constant discount to all the products. | ||
| + | *After entering the discount percentage, an approval of the supervisor will appear. | ||
| + | |} | ||
| + | |||
| + | |||
| + | [[File:10.png|550px|center]] | ||
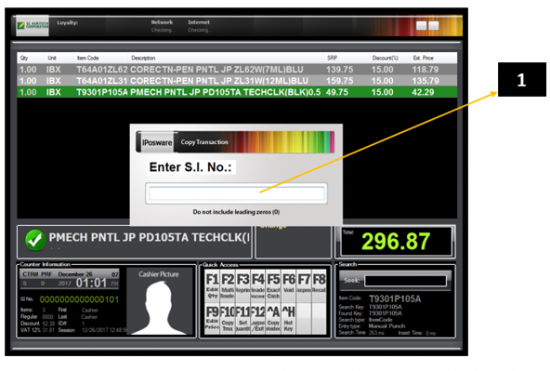
| + | '''Figure 3.6 Void''' | ||
| + | |||
| + | {| class="wikitable" style = "text-align:center; margin: 0 auto; width:85%" | ||
| + | | style ="text-align: center; width: 5%;"|'''1''' | ||
| + | | style ="text-align: center; width: 25%;"|Void | ||
| + | | style="text-align:left; width:55%;" | | ||
| + | *Quick Access: F6 | ||
| + | *The cashier can void the transaction by entering the receipt’s SI No. | ||
| + | *Authorized access needed for supervisor. | ||
| + | *Select reasons and void receipt will print. | ||
| + | |} | ||
| + | |||
| + | |||
| + | [[File:11.png|550px|center]] | ||
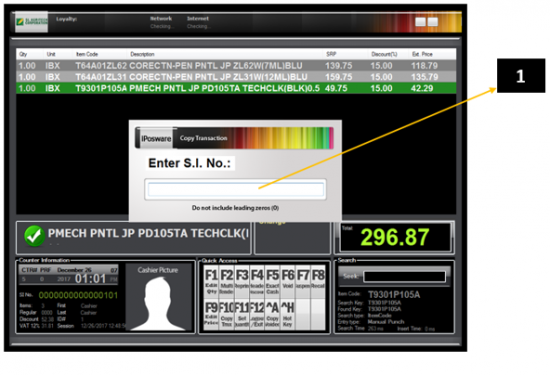
| + | '''Figure 3.6A Return Items''' | ||
| + | |||
| + | [[File:012.jpg|500px|center]] | ||
| + | '''Figure 3.6B Return Notifications''' | ||
| + | |||
| + | [[File:013.jpg|500px|center]] | ||
| + | '''Figure 3.6C Reason for Item Return''' | ||
| + | |||
| + | {| class="wikitable" style = "text-align:center; margin: 0 auto; width:85%" | ||
| + | | style ="text-align: center; width: 5%;"|'''1''' | ||
| + | | style ="text-align: center; width: 25%;"|Return Items | ||
| + | | style="text-align:left; width:55%;" | | ||
| + | *Quick Access: F10 (Copy Transaction) to retrieve items for specific transaction. | ||
| + | *Press F1 (Edit Qty) and change the quantity to negative and notification message will appear (see Figure 3.6.B) | ||
| + | *Press F2 (Multi Tender) to transact return items and authorized access needed for supervisor. Make sure to change negative amount 0 before to hit enter. | ||
| + | *Reason for item return will appear. It requires SI No., Date of Original Transaction and Counter. (see Figure 3.6.C) | ||
| + | *Copy of Return Reciept will print. | ||
| + | |} | ||
| + | |||
| + | |||
| + | [[File:014.png|550px|center]] | ||
| + | '''Figure 3.7 Edit Price''' | ||
| + | |||
| + | {| class="wikitable" style = "text-align:center; margin: 0 auto; width:85%" | ||
| + | | style ="text-align: center; width: 5%;"|'''1''' | ||
| + | | style ="text-align: center; width: 25%;"|Edit Price | ||
| + | | style="text-align:left; width:55%;" | | ||
| + | *Quick Access: F9 | ||
| + | *Allows the cashier to edit the product price and discount. | ||
| + | |} | ||
| + | |||
| + | |||
| + | [[File:015.jpg|500px|center]] | ||
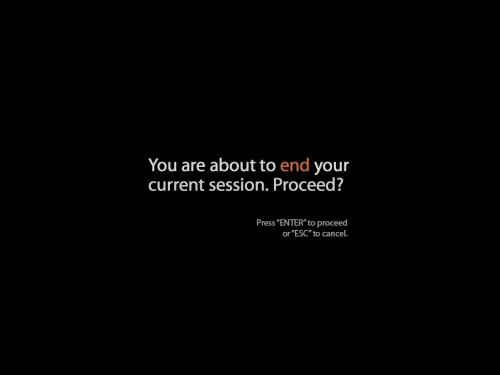
| + | '''Figure 4. Exit''' | ||
| + | -To exit the Cashiering category, the cashier must select F12, and verification will appear to confirm the request. | ||
| + | |||
| + | |||
| + | [[File:016.png|500px|center]] | ||
| + | '''Figure 5. Login Screen for Options''' | ||
| + | |||
| + | {| class="wikitable" style = "text-align:center; margin: 0 auto; width:85%" | ||
| + | | style ="text-align: center; width: 5%;"|'''1''' | ||
| + | | style ="text-align: center; width: 25%;"|Username Field | ||
| + | | style="text-align:left; width:55%;" | | ||
| + | *This fields allows the user enter their username | ||
| + | |- | ||
| + | |style ="text-align: center; width: 5%;"|'''2''' | ||
| + | |style ="text-align: center; width: 25%;"|Password Field | ||
| + | |style="text-align:left; width:55%;" | | ||
| + | *This field allows the user to enter their password | ||
| + | |} | ||
| + | |||
| + | |||
| + | |||
| + | -A welcome screen will appear after the Supervisor logged in. | ||
| + | |||
| + | [[File:017.png|500px|center]] | ||
| + | '''Figure 6. Welcome Screen for Supervisor''' | ||
| + | Figure 6 shows the screen that appears once the Supervisor log in the Cashiering category of the iPosware System. | ||
| + | |||
| + | |||
| + | [[File:018.png|500px|center]] | ||
| + | '''Figure 7. Options''' | ||
| + | Figure 7 shows the screen for Options Module | ||
| + | |||
| + | |||
| + | [[File:019.png|500px|center]] | ||
| + | '''Figure 8. Day-end Reports''' | ||
| + | |||
| + | {| class="wikitable" style = "text-align:center; margin: 0 auto; width:85%" | ||
| + | | style ="text-align: center; width: 5%;"|'''1''' | ||
| + | | style ="text-align: center; width: 25%;"|X Terminal Reading | ||
| + | | style="text-align:left; width:55%;" | Partial reports | ||
| + | |- | ||
| + | | style ="text-align: center; width: 5%;"|'''2''' | ||
| + | | style ="text-align: center; width: 25%;"|Z Terminal Reading | ||
| + | | style="text-align:left; width:55%;" | Whole day reports | ||
| + | |- | ||
| + | | style ="text-align: center; width: 5%;"|'''3''' | ||
| + | | style ="text-align: center; width: 25%;"|Initialize | ||
| + | | style="text-align:left; width:55%;" | Current date reports. | ||
| + | |} | ||
| + | |||
| + | |||
| + | [[File:20.png|500px|center]] | ||
| + | '''Figure 9. Printer''' | ||
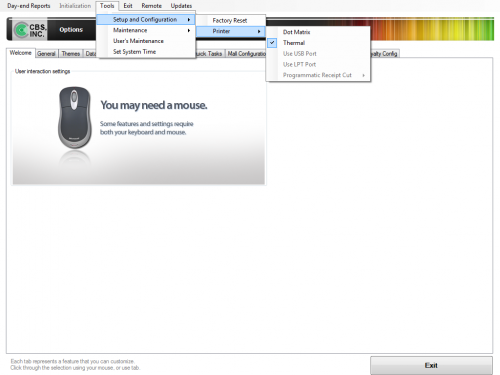
| + | Enables the supervisor to modify the format of receipts. | ||
| + | |||
| + | |||
| + | [[File:21.png|500px|center]] | ||
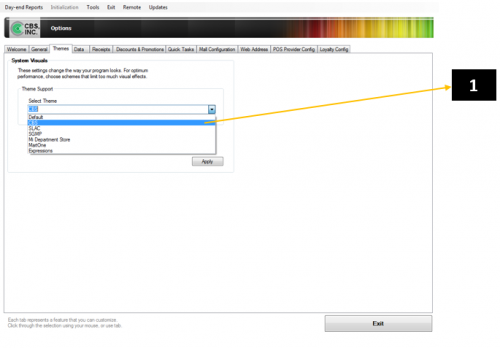
| + | '''Figure 10. Themes Tab''' | ||
| + | {| class="wikitable" style = "text-align:center; margin: 0 auto; width:85%" | ||
| + | | style ="text-align: center; width: 5%;"|'''1''' | ||
| + | | style ="text-align: center; width: 25%;"|Theme | ||
| + | | style="text-align:left; width:55%;" | The supervisor can choose different kinds of theme. | ||
| + | |} | ||
| + | |||
| + | |||
| + | [[File:22.png|500px|center]] | ||
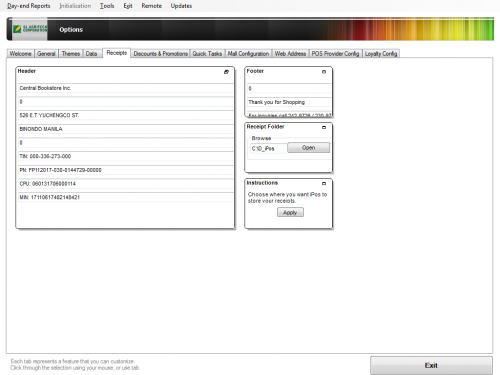
| + | '''Figure 11. Receipts Tab''' | ||
| + | Figure 11. represents the Receipt Tab, the supervisor can manually edit the receipt header. | ||
| + | |||
| + | |||
| + | [[File:23.png|500px|center]] | ||
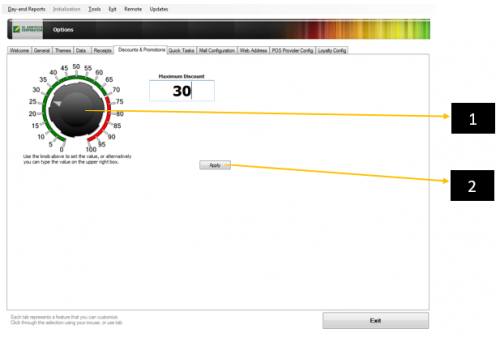
| + | '''Figure 12. Discount and Promotions''' | ||
| + | |||
| + | {| class="wikitable" style = "text-align:center; margin: 0 auto; width:85%" | ||
| + | | style ="text-align: center; width: 5%;"|'''1''' | ||
| + | | style ="text-align: center; width: 25%;"|Maximum Discount | ||
| + | | style="text-align:left; width:55%;" | Allows the user to modify Maximum Discount. | ||
| + | |- | ||
| + | | style ="text-align: center; width: 5%;"|'''2''' | ||
| + | | style ="text-align: center; width: 25%;"|Apply Button | ||
| + | | style="text-align:left; width:55%;" | Applies the modified Maximum Discount. | ||
| + | |} | ||
| + | |||
| + | |||
| + | [[File:24.png|300px|center]] | ||
| + | '''Figure 12.1 Discounts''' | ||
| + | Figure 12.1 shows the dialog box that appears to confirm newly set Maximum Discount. | ||
| + | |||
| + | |||
| + | [[File:25.png|500px|center]] | ||
| + | '''Figure 13.Quick Task''' | ||
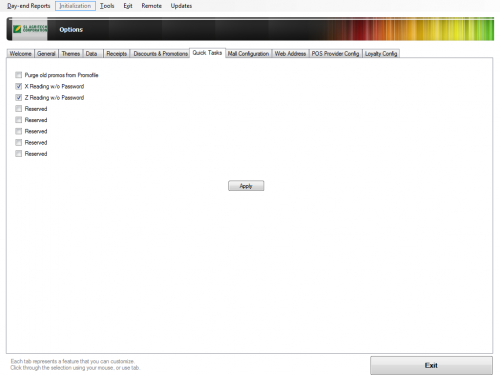
| + | Figure 13 represents the Quick Tasks Tab, the supervisor can add options on initialization. | ||
| + | |||
| + | |||
| + | [[File:026.png|500px|center]] | ||
| + | '''Figure 14. POS Provider Config''' | ||
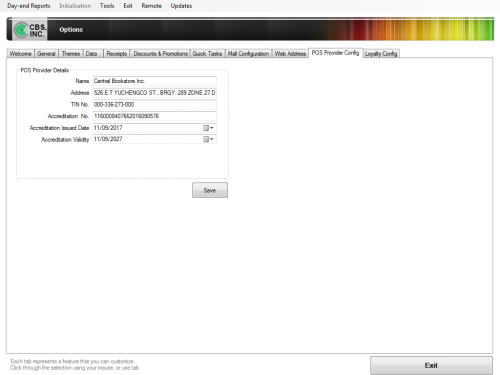
| + | In POS Provider Config, the supervisor can edit manually the POS Provider Details | ||
| + | |||
| + | |||
| + | [[File:027.png|500px|center]] | ||
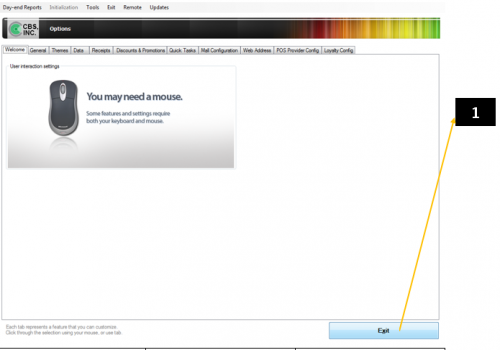
| + | '''Figure 15. Exit''' | ||
| + | |||
| + | {| class="wikitable" style = "text-align:center; margin: 0 auto; width:85%" | ||
| + | | style ="text-align: center; width: 5%;"|'''1''' | ||
| + | | style ="text-align: center; width: 25%;"|Exit | ||
| + | | style="text-align:left; width:55%;" | Allows the supervisor to exit the Options category. | ||
| + | |} | ||
Latest revision as of 12:53, 30 January 2020
Main Page > Application Development Team > System Manual
IPOSWARE USER GUIDE
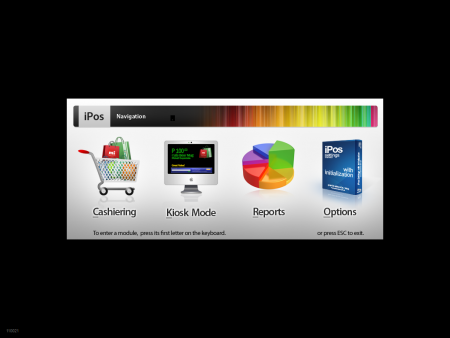
Figure 1. Main Screen
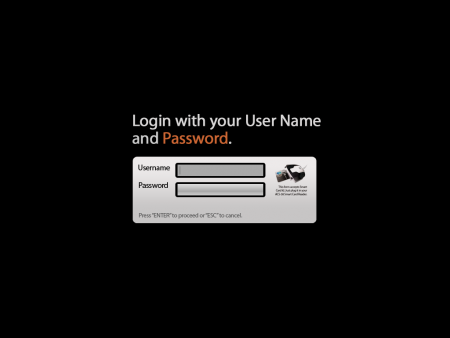
Figure 2. Login Screen for Cashiering
| 1 | Username Field | This fields allows the user enter their username |
| 2 | Password Field | This field allows the user to enter their password |
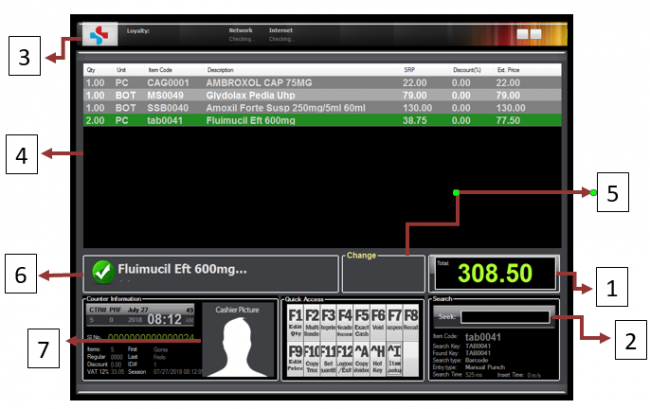
Figure 3. Cashiering
| 1 | Total | Shows the total price of the products. |
| 2 | Search | This text field allows the cashier to enter the product manually. |
| 3 | Company Logo | Shows the company logo. |
| 4 | Product List | Shows the product list. |
| 5 | Change | Shows the Customer’s change. |
| 6 | Product Name | Shows the product name. |
| 7 | Cashier Picture | Shows the Cashier picture. |
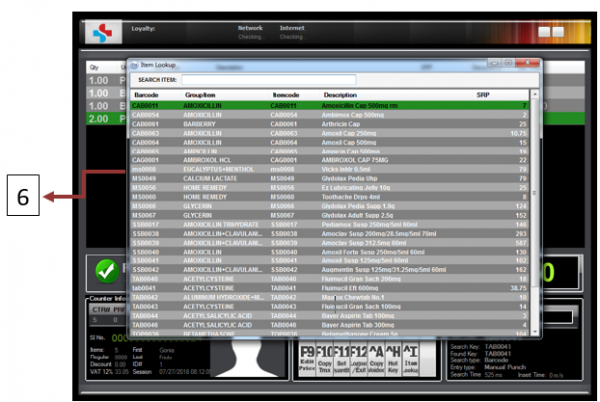
Figure 3.1 Item Lookup
| 1 | Item Lookup |
|
Figure 3. Edit Quantity
| 1 | Edit Quantity |
|
Figure 3.3 Multi-Tender
| 1 | Multi-Tender |
|
Figure 3.3.1 Purchase Order
| 1 | Multi-Tender -> Purchase Order |
|
Figure 3.4 Reprint
| 1 | Reprint |
|
Figure 3.5 Header Discount
| 1 | Header Discount |
|
Figure 3.6 Void
| 1 | Void |
|
Figure 3.6A Return Items
Figure 3.6B Return Notifications
Figure 3.6C Reason for Item Return
| 1 | Return Items |
|
Figure 3.7 Edit Price
| 1 | Edit Price |
|
                                                          Figure 4. Exit
                -To exit the Cashiering category, the cashier must select F12, and verification will appear to confirm the request.
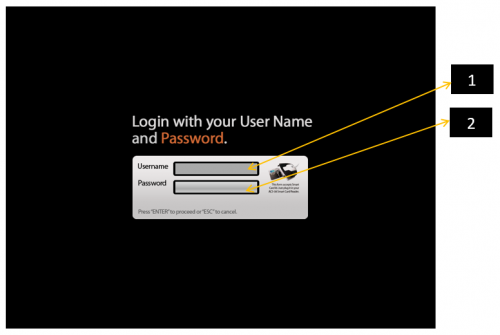
Figure 5. Login Screen for Options
| 1 | Username Field |
|
| 2 | Password Field |
|
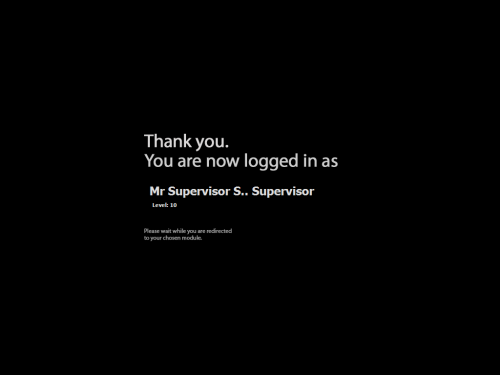
-A welcome screen will appear after the Supervisor logged in.
                                                       Figure 6. Welcome Screen for Supervisor
                        Figure 6 shows the screen that appears once the Supervisor log in the Cashiering category of the iPosware System.
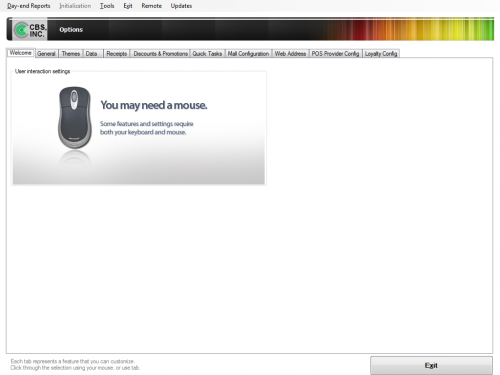
                                                       Figure 7. Options
                                            Figure 7 shows the screen for Options Module
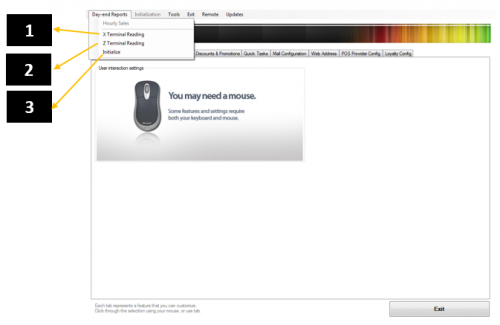
Figure 8. Day-end Reports
| 1 | X Terminal Reading | Partial reports |
| 2 | Z Terminal Reading | Whole day reports |
| 3 | Initialize | Current date reports. |
                                                       Figure 9. Printer
                                        Enables the supervisor to modify the format of receipts.
Figure 10. Themes Tab
| 1 | Theme | The supervisor can choose different kinds of theme. |
                                                       Figure 11. Receipts Tab
                                Figure 11. represents the Receipt Tab, the supervisor can manually edit the receipt header.
Figure 12. Discount and Promotions
| 1 | Maximum Discount | Allows the user to modify Maximum Discount. |
| 2 | Apply Button | Applies the modified Maximum Discount. |
                                                       Figure 12.1 Discounts
                                  Figure 12.1 shows the dialog box that appears to confirm newly set Maximum Discount.
                                                       Figure 13.Quick Task
                               Figure 13 represents the Quick Tasks Tab, the supervisor can add options on initialization.
                                                       Figure 14. POS Provider Config
                              In POS Provider Config, the supervisor can edit manually the POS Provider Details
Figure 15. Exit
| 1 | Exit | Allows the supervisor to exit the Options category. |
