Difference between revisions of "DTR USER'S MANUAL"
From SPGC Document Wiki
| (27 intermediate revisions by 3 users not shown) | |||
| Line 1: | Line 1: | ||
| − | + | [[Main_Page | Main Page]] > [[Application_Development_Team | Application Development Team]] > [[System_Manual | System Manual]] > [[SPGC_EPAYROLL | SPGC EPAYROLL]] >[[TIMEKEEPING_SYSTEM | TIMEKEEPING SYSTEM]] | |
| + | |||
HR is responsible in importing the information of the employee, and then ID number will be the basis in recording the daily time record of an employee in the biometrics, and in every cut off HR is the one who responsible in exporting attlogs. To import attlogs in he swiper user must follow the direction below. | HR is responsible in importing the information of the employee, and then ID number will be the basis in recording the daily time record of an employee in the biometrics, and in every cut off HR is the one who responsible in exporting attlogs. To import attlogs in he swiper user must follow the direction below. | ||
1. First to execute the system user must open the DOS prompt. Just click start button or window icon in the taskbar then search for Run then in the Run module input '''cmd''' to display the command prompt. When DOS prompt was displayed. Input '''cd\swiper''' then press ENTER. | 1. First to execute the system user must open the DOS prompt. Just click start button or window icon in the taskbar then search for Run then in the Run module input '''cmd''' to display the command prompt. When DOS prompt was displayed. Input '''cd\swiper''' then press ENTER. | ||
| + | [[File:aa3.JPG|400px|center]] | ||
2. At the moment input '''dtr''' next presses again enter the DTR opening screen will display on the screen asking for the username and password. | 2. At the moment input '''dtr''' next presses again enter the DTR opening screen will display on the screen asking for the username and password. | ||
| + | [[File:bb3.JPG|400px|center]] | ||
| + | |||
| + | |||
| + | |||
| + | [[File:cc3.JPG|400px|center]] | ||
3. The screen above allows the user to enter his/her username and password . As soon as the user entered the correct password and username the main menu will display. '''''For the creation of new account just call 214 and look for Mr. Oliver or Mr. Jem of MIS. | 3. The screen above allows the user to enter his/her username and password . As soon as the user entered the correct password and username the main menu will display. '''''For the creation of new account just call 214 and look for Mr. Oliver or Mr. Jem of MIS. | ||
''' | ''' | ||
| + | [[File:dd3.JPG|400px|center]] | ||
| + | |||
4. Main menu is consist of seven (7)options: | 4. Main menu is consist of seven (7)options: | ||
| Line 15: | Line 24: | ||
4. '''Compute Man Hour''' - Module for computation of timekeeping data. | 4. '''Compute Man Hour''' - Module for computation of timekeeping data. | ||
5. '''Reports''' - Available reports for the system. | 5. '''Reports''' - Available reports for the system. | ||
| − | 6. '''Utilities''' - Different module for index creation and | + | 6. '''Utilities''' - Different module for index creation and fileupdates. To see the process look for '''4.6''' |
7. '''Quit''' - Return to DOS Prompt and logout the account. | 7. '''Quit''' - Return to DOS Prompt and logout the account. | ||
'''4.6.1'''. In choosing/clicking utilities three (3) sub-menus will display. These sub-menus are '''Weekly''', '''Monthly,''' '''Conces.''' In selecting one(1) in the sub-menu is the basis to distinguish what type of payment an employee has. | '''4.6.1'''. In choosing/clicking utilities three (3) sub-menus will display. These sub-menus are '''Weekly''', '''Monthly,''' '''Conces.''' In selecting one(1) in the sub-menu is the basis to distinguish what type of payment an employee has. | ||
| + | [[File:ee5.JPG|400px|center]] | ||
'''4.6.2.''' After selecting what type of payment an employee has the 13 sub-menus will display. To select one in the sub-menus mark an option using arrow keys and press ENTER key. | '''4.6.2.''' After selecting what type of payment an employee has the 13 sub-menus will display. To select one in the sub-menus mark an option using arrow keys and press ENTER key. | ||
| + | [[File:ff6.JPG|400px|center]] | ||
'''4.6.3'''. Choose Employee Creation sub-menu to view the view the list of employee. In manipulate the information of an employee. In manipulating the employee's information user must press the designated command key which is started below: | '''4.6.3'''. Choose Employee Creation sub-menu to view the view the list of employee. In manipulate the information of an employee. In manipulating the employee's information user must press the designated command key which is started below: | ||
| Line 29: | Line 40: | ||
DELETE EMPLOYEE'S INFORMATION - '''PRESS F7''' | DELETE EMPLOYEE'S INFORMATION - '''PRESS F7''' | ||
EXIT - '''PRESS ESC''' | EXIT - '''PRESS ESC''' | ||
| + | [[File:gg6.JPG|400px|center]] | ||
| − | + | '''ADDING''' | |
| − | + | ||
'''4.6.4.''' In pressing F2 which is a command button for adding new employee, a form to get the employee's information will display. All information is needed/ required. Chrnolog number is the basis for each employee's information that will be stored in the swiper. | '''4.6.4.''' In pressing F2 which is a command button for adding new employee, a form to get the employee's information will display. All information is needed/ required. Chrnolog number is the basis for each employee's information that will be stored in the swiper. | ||
| + | [[File:hh6.JPG|400px|center]] | ||
'''4.6.5.''' After filling up all the information needed, to save the record press ENTER then a message box will display then click YES. | '''4.6.5.''' After filling up all the information needed, to save the record press ENTER then a message box will display then click YES. | ||
| + | [[File:ii6.JPG|400px|center]] | ||
'''4.6.6'''. After clicking YES button a confirmation box will display stating that the employee's record was saved. | '''4.6.6'''. After clicking YES button a confirmation box will display stating that the employee's record was saved. | ||
| + | [[File:nn6.JPG|400px|center]] | ||
'''4.6.7.''' After pressing any key the table list of the employee's table will display and see if the added employee is stored. | '''4.6.7.''' After pressing any key the table list of the employee's table will display and see if the added employee is stored. | ||
| + | [[File:kk6.JPG|400px|center]] | ||
'''Note:''' ''If user encountered FIX MANNING issue just coordinate to HR Makati. | '''Note:''' ''If user encountered FIX MANNING issue just coordinate to HR Makati. | ||
| Line 45: | Line 60: | ||
In this case HR Makati will send a file (example is the file below) to the user then user will download the file and place the file to the upload folder to replace the existing file. | In this case HR Makati will send a file (example is the file below) to the user then user will download the file and place the file to the upload folder to replace the existing file. | ||
| − | + | '''EDITTING''' | |
| − | ''' | + | |
'''4.6.4.''' When pressing '''F3''' which is command button for updating employee's information, module for editing employee's record will display including the information of an employee. | '''4.6.4.''' When pressing '''F3''' which is command button for updating employee's information, module for editing employee's record will display including the information of an employee. | ||
| + | [[File:ll6.JPG|400px|center]] | ||
'''4.6.5'''. After updating the record of an employee press ENTER and a message box will display then click YES button for the confirmation in updating the record. | '''4.6.5'''. After updating the record of an employee press ENTER and a message box will display then click YES button for the confirmation in updating the record. | ||
| + | [[File:mm6.JPG|400px|center]] | ||
| + | |||
| + | == '''Reference''' == | ||
| + | [[Media:DTR_Manual_.pdf|DTR USER’S MANUAL document]] | ||
| + | |||
| + | [[Main_Page | Main Page]] > [[Application_Development_Team | Application Development Team]] > [[System_Manual | System Manual]] > [[SPGC_EPAYROLL | SPGC EPAYROLL]] >[[TIMEKEEPING_SYSTEM | TIMEKEEPING SYSTEM]] | ||
Latest revision as of 09:51, 1 September 2016
Main Page > Application Development Team > System Manual > SPGC EPAYROLL > TIMEKEEPING SYSTEM
HR is responsible in importing the information of the employee, and then ID number will be the basis in recording the daily time record of an employee in the biometrics, and in every cut off HR is the one who responsible in exporting attlogs. To import attlogs in he swiper user must follow the direction below.
1. First to execute the system user must open the DOS prompt. Just click start button or window icon in the taskbar then search for Run then in the Run module input cmd to display the command prompt. When DOS prompt was displayed. Input cd\swiper then press ENTER.
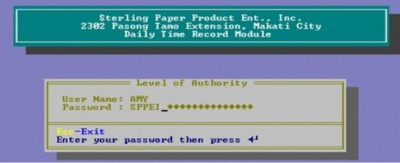
2. At the moment input dtr next presses again enter the DTR opening screen will display on the screen asking for the username and password.
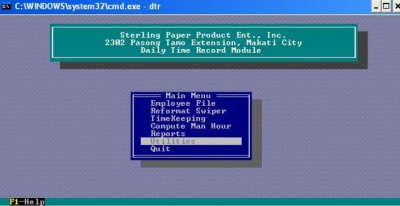
3. The screen above allows the user to enter his/her username and password . As soon as the user entered the correct password and username the main menu will display. For the creation of new account just call 214 and look for Mr. Oliver or Mr. Jem of MIS.
4. Main menu is consist of seven (7)options:
          1. Employee File - Module for update and deletion of employee from master file.
          2. Reformat Swiper - Uploading of Timekeeping data (In/Out) from the swiper machine.
          3. Timekeeping - Module for encoding of timekeeping documents.
          4. Compute Man Hour - Module for computation of timekeeping data.
          5. Reports - Available reports for the system.
          6. Utilities - Different module for index creation and fileupdates.                 To see the process look for 4.6
          7. Quit - Return to DOS Prompt and logout the account.
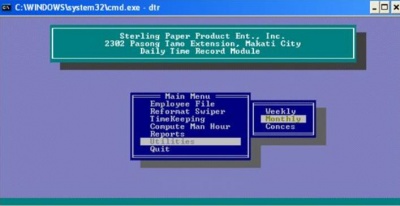
4.6.1. In choosing/clicking utilities three (3) sub-menus will display. These sub-menus are Weekly, Monthly, Conces. In selecting one(1) in the sub-menu is the basis to distinguish what type of payment an employee has.
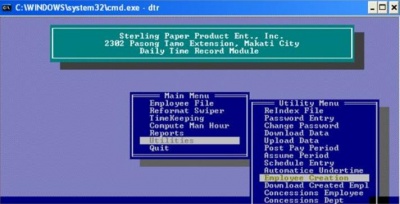
4.6.2. After selecting what type of payment an employee has the 13 sub-menus will display. To select one in the sub-menus mark an option using arrow keys and press ENTER key.
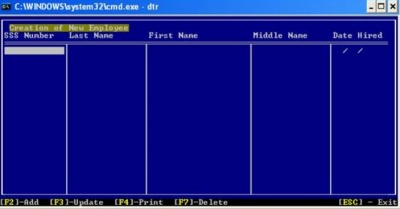
4.6.3. Choose Employee Creation sub-menu to view the view the list of employee. In manipulate the information of an employee. In manipulating the employee's information user must press the designated command key which is started below:
    ADDING NEW EMPLOYEE - PRESS F2
    UPDATING EMPLOYEE'S INFORMATION - PRESS F3
    PRINT EMPLOYEE'S INFORMATION - PRESS F4
    DELETE EMPLOYEE'S INFORMATION - PRESS F7
    EXIT - PRESS ESC
ADDING
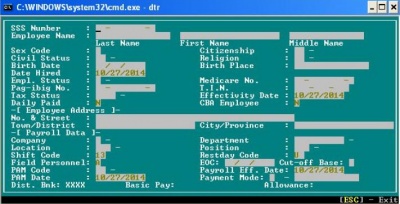
4.6.4. In pressing F2 which is a command button for adding new employee, a form to get the employee's information will display. All information is needed/ required. Chrnolog number is the basis for each employee's information that will be stored in the swiper.
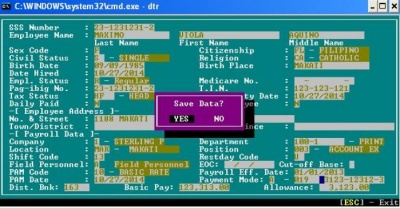
4.6.5. After filling up all the information needed, to save the record press ENTER then a message box will display then click YES.
4.6.6. After clicking YES button a confirmation box will display stating that the employee's record was saved.
4.6.7. After pressing any key the table list of the employee's table will display and see if the added employee is stored.
Note: If user encountered FIX MANNING issue just coordinate to HR Makati.
In this case HR Makati will send a file (example is the file below) to the user then user will download the file and place the file to the upload folder to replace the existing file.
EDITTING
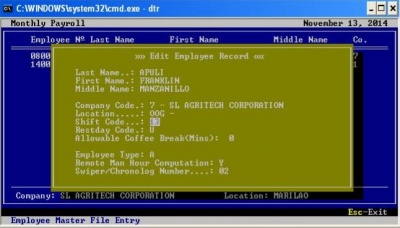
4.6.4. When pressing F3 which is command button for updating employee's information, module for editing employee's record will display including the information of an employee.
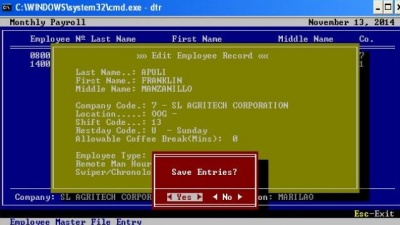
4.6.5. After updating the record of an employee press ENTER and a message box will display then click YES button for the confirmation in updating the record.
Reference
Main Page > Application Development Team > System Manual > SPGC EPAYROLL > TIMEKEEPING SYSTEM


