Difference between revisions of "QUOTA"
From SPGC Document Wiki
| (103 intermediate revisions by 2 users not shown) | |||
| Line 1: | Line 1: | ||
[[Main_Page | Main Page]] > [[Application_Development_Team | Application Development Team]] > [[System_Manual | System Manual]] | [[Main_Page | Main Page]] > [[Application_Development_Team | Application Development Team]] > [[System_Manual | System Manual]] | ||
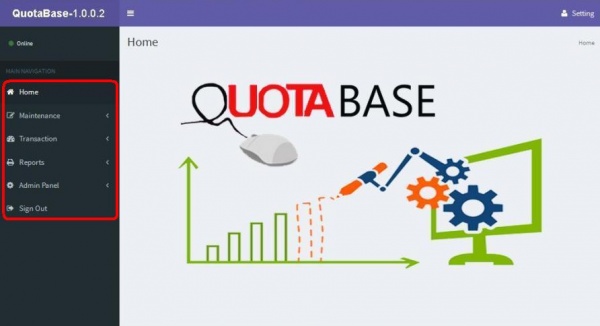
| − | * This '''QuotaBase System''' has a six '''navigation''',located at the left side of the system. These are the '''Home, Maintenance, Transaction, Reports, Admin Panel''' and '''Sign Out'''. | + | * This '''QuotaBase System''' has a six '''navigation''',located at the left side of the system. These are the '''Home, Maintenance, Transaction, Reports, Admin Panel''' and '''Sign Out'''. |
| − | + | ||
| − | + | [[File:Homenavigation.JPG|600px|center|]] | |
| − | |||
| − | * | + | * This is the '''Home page''' of the '''QuotaBase System'''. |
| − | + | ||
| − | + | ||
| − | + | ||
| − | + | ||
| − | + | ||
| − | + | ||
| − | + | [[File:Home.JPG|600px|center|]] | |
| − | + | ||
| − | + | ||
| − | + | ||
| − | + | ||
| − | + | ||
| − | * | + | |
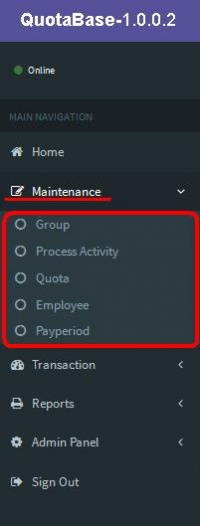
| − | * | + | * '''Maintenance''' has five '''sub navigation''' including '''Group, Process Activity, Quota, Employee''' and '''Payperiod'''. |
| − | * | + | |
| + | [[File:Maintenance.JPG|200px|center|]] | ||
| + | |||
| + | |||
| + | * Clicking the '''Group sub navigation''' of the user will viewed the '''Group Maintenance Module'''. | ||
| + | |||
| + | [[File:Example.jpg|600px|center]] | ||
| + | |||
| + | |||
| + | * The user can use the '''Add Group''' button to add a new entry, just input data on their each textbox. | ||
| + | |||
| + | [[File:Group_Maintenance.JPG|600px|center|]] | ||
| + | |||
| + | |||
| + | * After the user inputted the data, the user can now click the '''save''' button and the confirmation will appear | ||
| + | |||
| + | [[File:Savebutton.JPG|600px|center|]] | ||
| + | |||
| + | |||
| + | * Then,when the user click the '''Save''' and go back to list button the data will stored and automatically back to the list. | ||
| + | |||
| + | [[File:Outputdata.JPG|600px|center|]] | ||
| + | |||
| + | |||
| + | * The user can use the '''Search''' button to easily find the data. Depending on '''Search all''', '''Group Code''' and '''Group Description'''. | ||
| + | |||
| + | [[File:Search_textbox.JPG|600px|center|]] | ||
| + | |||
| + | |||
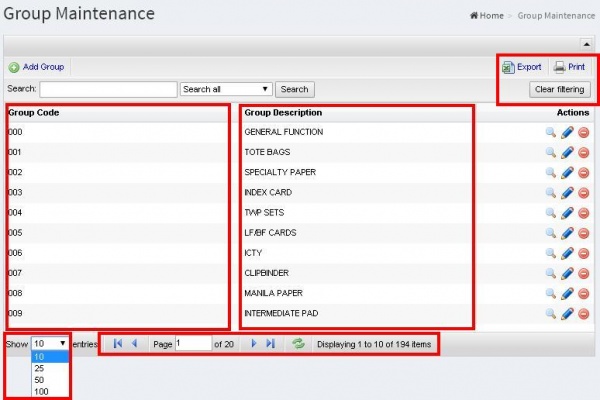
| + | * The '''Group Maintenance''' is divided in two division, The '''Group Code''' which is the code of the item and the '''Group Description''' which is the item name. Then below it there is a combo box to show number of item per page and the user can select from it. | ||
| + | |||
| + | * It also includes the '''back''' button and '''next''' button for the page. The user can use the '''search box''' to search page. The user can also user the '''refres'''h button to reload the page. It will shows also the '''displaying item''' besides the refresh button. The at the right side is the '''export''' which is the downloading of a file, then the '''print''' which is the printing of file and the '''clear Filtering''' which is also a refresh to reload page. | ||
| + | |||
| + | [[File:GroupCode_Description.JPG|600px|center|]] | ||
| + | |||
| + | |||
| + | * In the '''Action division''', the first action is the '''View Group''' which display the Record Group depends on the selected record including the '''Group Code''' and The '''Group Description''' then the user can now click the back to list. | ||
| + | |||
| + | [[File:Viewgroup.JPG|600px|center|]] | ||
| + | |||
| + | |||
| + | [[File:Viewgroup2.JPG|600px|center|]] | ||
| + | |||
| + | |||
| + | * In the '''Action division''', the second action is the '''Edit Group''' to edit the record in the '''Group Code''' and '''Group Description''' then after that the user can now click the '''update changes''' which is to save the record but it will now go back to the list but when the user click the u'''pdate and go back to lis'''t it automatically go back to the list and the user can also click the '''cancel''' button. | ||
| + | |||
| + | [[File:Editgroup.JPG|600px|center|]] | ||
| + | |||
| + | |||
| + | [[File:Editgroup2.JPG|600px|center|]] | ||
| + | |||
| + | * In the '''action division''' the last action is the '''Delete Group''' which the user can delete group and it will pop up a confirmation, '''OK''' for delete and '''cancel''' for not. | ||
| + | |||
| + | |||
| + | [[File:Deletegroup.JPG|600px|center|]] | ||
| + | |||
| + | |||
| + | * Clicking the P'''rocess Activity''' sub navigation of the user will viewed the '''Process/Activity Module'''. | ||
| + | |||
| + | [[File:processactivity.JPG|600px|center|]] | ||
| + | |||
| + | |||
| + | * The user can use the '''Add Process/Activity''' button to add a new entry, just input data on their each text box. | ||
| + | |||
| + | [[File:Addprocessactivity.JPG|600px|center|]] | ||
| + | |||
| + | |||
| + | [[File:Processactivitysave1.JPG|600px|center|]] | ||
| + | |||
| + | |||
| + | [[File:Confirmationbox.JPG|600px|center|]] | ||
| + | |||
| + | * Then,when the user click the '''Save''' and go back to list button the data will stored and automatically back to the list. | ||
| + | |||
| + | [[File:Processactivitysave2.JPG|600px|center|]] | ||
| + | |||
| + | |||
| + | * The user can use the '''Search Button''' to easily find the data. Depending on Search all. | ||
| + | |||
| + | [[File:Search_textbox.JPG|600px|center|]] | ||
| + | |||
| + | * The '''Process/Activity''' is divided in 4 division, including the '''Process Code''' which is the code of the record, '''Process Description''' which is the name of the record, next is the '''Process Group''' which is the Group number of the record and the '''Process Abbr''' which is the short name of the '''process description'''. | ||
| + | |||
| + | |||
| + | * It also includes the '''back''' button and '''next''' button for the page. The user can use the '''search box''' to search page. The user can also user the '''refresh''' button to reload the page. It will shows also the '''displaying item''' besides the refresh button. The at the right side is the '''export''' which is the downloading of a file, then the ''print'' which is the printing of file and the '''clear Filtering''' which is also a refresh to reload page. | ||
| + | |||
| + | [[File:Processcode_description.JPG|600px|center|]] | ||
| + | |||
| + | |||
| + | |||
| + | * In the '''Action division''', the first action is the '''View Process/Activity''' which display the '''Record Process/Activity''' depends on the selected record including the '''Process Code, Process Description, Process Group and Process Abbr'''. then the user can now click the back to list. | ||
| + | |||
| + | |||
| + | [[File:Viewprocess_acitivity.JPG|600px|center|]] | ||
| + | |||
| + | |||
| + | [[File:Viewprocess_acitivity2.JPG|600px|center|]] | ||
| + | |||
| + | |||
| + | * In the Action '''division''', the second action is the ''Edit Process/Activity'' to edit the record in the '''Process Code, Process Description, Process Group''' and the '''Process Abbr''' then after that the user can now click the update changes which is to save the record but it will now go back to the list but when the user click the update and go back to list it automatically go back to the list and the user can also click the cancel button. | ||
| + | |||
| + | [[File:Editprocess_activity.JPG|600px|center|]] | ||
| + | |||
| + | |||
| + | [[File:Editprocess_activity2.JPG|600px|center|]] | ||
| + | |||
| + | |||
| + | * In the '''action division''' the last action is the '''Delete Process/Activity''' which the user can delete Records in the Process/Activity and it will '''pop up''' a confirmation, '''OK''' for delete and '''cancel''' for not. | ||
| + | |||
| + | [[File:Deleteprocess_activity.JPG|600px|center|]] | ||
| + | |||
| + | |||
| + | [[File:Deletegroupconfirm.JPG|600px|center|]] | ||
| + | |||
| + | |||
| + | * Clicking the '''Quota''' sub navigation of the user will viewed the '''Quota Maintenance Module'''. | ||
| + | |||
| + | [[File:Quotamainpage.JPG|600px|center|]] | ||
| + | |||
| + | |||
| + | * The user can use the Add '''Quota button''' to add a new entry, just input data on their each text | ||
| + | box. | ||
| + | |||
| + | [[File:AddQuota.JPG|600px|center|]] | ||
| + | |||
| + | |||
| + | * After the user inputted the data, the user can now click the '''save''' button and the confirmation will appear. | ||
| + | |||
| + | [[File:Quotasave1.JPG|600px|center|]] | ||
| + | |||
| + | |||
| + | * Then,when the user click the '''Save''' and go back to list button the data will stored and automatically back to the list. | ||
| + | |||
| + | [[File:Quotasave2.JPG|600px|center|]] | ||
| + | |||
| + | |||
| + | '''Bold text''' * The user can use the '''Search''' Button to easily find the data. Depending on Search all. | ||
| + | |||
| + | [[File:Search_textbox.JPG|600px|center|]] | ||
| + | |||
| + | |||
| + | * The '''Process/Activity''' is divided in 6 division, the '''Quota Code, Effective Date, Regular Quota, Rate Per Quota, Rate Per Place, OT QUOTA.''' | ||
| + | |||
| + | * It also includes the '''back''' button and '''next''' button for the page. The user can use the '''search box''' to search page. The user can also user the '''refresh''' button to reload the page. It will shows also the '''displaying item''' besides the refresh button. The at the right side is the '''export''' which is the downloading of a file, then the print which is the printing of file and the '''clear Filtering''' which is also a refresh to reload page. | ||
| + | |||
| + | [[File:Quotacode_effectivedate.JPG|600px|center|]] | ||
| + | |||
| + | |||
| + | * In the '''Action division''', the first action is the '''View Quota''' which display the '''Record of Quota''' depends on the selected record including the '''Quota Code, effective Date, Regular Quota, Rate Per Quota, Rate Per Piece and OT QUOTA''' then the user can now click the '''back to list'''. | ||
| + | |||
| + | [[File:ViewQuota.JPG|600px|center|]] | ||
| + | |||
| + | |||
| + | [[File:ViewQuota2.JPG|600px|center|]] | ||
| + | |||
| + | |||
| + | * In the '''Action division''', the second action is the '''Edit Quota''' which includes the '''Quota Code,Effective Date, Regular Quota, Rate Per Quota, Rate Per Pieces OT QUOTA''', then after that the user can now click the '''update changes''' which is to save the record but it will now go back to the list but when the user click the '''update and go back to list''' it automatically go back to the list and the user can also click the '''cancel''' button. | ||
| + | |||
| + | [[File:EditQuota.JPG|600px|center|]] | ||
| + | |||
| + | |||
| + | [[File:Editquota2.JPG|600px|center|]] | ||
| + | |||
| + | |||
| + | * In the '''action division''' the last action is the '''Delete Quota''' which the user can delete Records in the and it will pop up a confirmation, '''OK''' for delete and '''cancel''' for not. | ||
| + | |||
| + | |||
| + | [[File:Deletequota.JPG|600px|center|]] | ||
| + | |||
| + | |||
| + | [[File:Deletegroupconfirm.JPG|600px|center|]] | ||
| + | |||
| + | |||
| + | * Clicking the '''Employee''' sub navigation of the user will viewed the '''Employee Module'''. | ||
| + | |||
| + | [[File:Employeemain.JPG|600px|center|]] | ||
| + | |||
| + | |||
| + | * The user can use the '''Search''' Button to easily find the data. Depending on Search all | ||
| + | |||
| + | [[File:Search_textbox.JPG|600px|center|]] | ||
| + | |||
| + | |||
| + | * In '''Employee''', It is divided in 5 division which is the '''Employee No.''' which is the ID number of the employee, including the '''Last Name, First Name, Middle Name and Status'''. | ||
| + | |||
| + | * It also includes the '''back''' button and '''next''' button for the page. The user can use the '''search box''' to search page. The user can also user the '''refresh''' button to reload the page. It will shows also the '''displaying item''' besides the refresh button. The at the right side is the '''export''' which is the downloading of a file, then the '''print''' which is the printing of file and the '''clear Filtering''' which is also a refresh to reload page | ||
| + | |||
| + | [[File:Employeeno_lastname.JPG|600px|center|]] | ||
| + | |||
| + | |||
| + | * In '''Action Division''' it include the '''View Employee'''. When the user click it, The record of the employee will display including the information about the '''employee''' and the '''company background''', then after the user view it, the user can now click the '''back to list''' button. | ||
| + | |||
| + | [[File:Viewemployee1.JPG|600px|center|]] | ||
| + | |||
| + | |||
| + | [[File:Viewemployee2.JPG]][[File:Viewemployee3.JPG]] | ||
| + | |||
| + | |||
| + | * Clicking the '''Pay period''' sub navigation of the user will viewed the '''Pay Period Module'''. | ||
| + | |||
| + | [[File:Payperiodmain.JPG|600px|center|]] | ||
| + | |||
| + | |||
| + | * The user can use the '''Add Pay Period''' button to add a new entry, just input data on their each textbox | ||
| + | |||
| + | [[File:AddPayperiod.JPG|600px|center|]] | ||
| + | |||
| + | |||
| + | * After the user inputted the data, the user can now click the '''save''' button and the confirmation will appear. | ||
| + | |||
| + | [[File:Payperiodsave.JPG|600px|center|]] | ||
| + | |||
| + | |||
| + | [[File:Confirmationbox.JPG|600px|center|]] | ||
| + | |||
| + | |||
| + | [[File:Payperiodsave2.JPG|600px|center|]] | ||
| + | |||
| + | |||
| + | * The user can use the '''Search''' Button to easily find the data. Depending on Search all. | ||
| + | |||
| + | [[File:Search_textbox.JPG|600px|center|]] | ||
| + | |||
| + | |||
| + | * The '''Pay Period''', has 5 division including the '''Period No, From Date, To Date, Assume From Date, Assume To Date''' | ||
| + | |||
| + | * It also includes the '''back''' button and '''next''' button for the page. The user can use the '''search box''' to search page. The user can also user the '''refresh''' button to reload the page. It will shows also the '''displaying item''' besides the refresh button. The at the right side is the '''export''' which is the downloading of a file, then the '''print''' which is the printing of file and the '''clear Filtering''' which is also a refresh to reload page. | ||
| + | |||
| + | [[File:Period_No_fromdate.JPG|600px|center|]] | ||
| + | |||
| + | |||
| + | * In the '''Action division''', the first action is the '''View Pay Period''' which display the Record Pay Period depends on the selected record including the '''Period No. From Date, To Date Assume From Date and Assume To Date'''. Then the user can now click the '''back to list'''. | ||
| + | |||
| + | [[File:Viewpayperiod.JPG|600px|center|]] | ||
| + | |||
| + | |||
| + | [[File:Viewpayperiod2.JPG|400px|center|]] | ||
| + | |||
| + | |||
| + | * In the '''Action division''', the second action is the '''Edit Pay Period''' to edit the record in the '''Period No. From Date, To Date, Assume from Date, and Assume to Date'''. Then after that the user can now click the '''update changes''' which is to save the record but it will now go back to the list but when the user click the '''update and go back to list''' it automatically go back to the list and the user can also click the '''cancel''' button. | ||
| + | |||
| + | [[File:Editpayperiod.JPG|600px|center|]] | ||
| + | |||
| + | |||
| + | [[File:Editpayperiod2.JPG|400px|center|]] | ||
| + | |||
| + | |||
| + | * In the '''action division''' the last action is the '''Delete Pay Period''' which the user can delete Pay Period and it will pop up a confirmation, '''OK''' for delete and '''cancel''' for not. | ||
| + | |||
| + | [[File:Deletepayperiod.JPG|600px|center|]] | ||
| + | |||
| + | |||
| + | [[File:Deletegroupconfirm.JPG|600px|center|]] | ||
| + | |||
| + | |||
| + | * In the '''Transaction''' sub division, The '''Quota Entry''' is included. Which display the '''Employee Master List'''. | ||
| + | |||
| + | [[File:Employeemasterlist.jpg|600px|center|]] | ||
| + | |||
| + | |||
| + | * The user can use the '''Search''' Button to easily find the data. Depending on Search all. | ||
| + | |||
| + | [[File:Search_textbox.JPG|600px|center|]] | ||
| + | |||
| + | |||
| + | * In the '''Employee Master List''', It classify as '''Employee No.''' Which is the ID number of the employee, '''Last Name, First Name And the Middle Name.''' | ||
| + | It also includes the '''back''' button and '''next''' button for the page. The user can use the '''search box''' to search page. The user can also user the '''refresh''' button to reload the page. It will shows also the '''displaying item''' besides the refresh button. The at the right side is the '''clear Filtering''' which is also a refresh to reload page. | ||
| + | |||
| + | [[File:Employeeno_lastname.JPG|600px|center|]] | ||
| + | |||
| + | |||
| + | * When the user click the '''Reg Quota''' it will display the Employee number of the employee and the full name of the employee. Which include the '''Date, Day Code, Quota Code and the Actual Quota'''. The user can input data from it and after that the user must click the '''submit''' button. | ||
| + | |||
| + | [[File:Reg.quota.jpg|600px|center|]] | ||
| + | |||
| + | |||
| + | [[File:Submit.jpg|600px|center|]] | ||
| + | |||
| + | |||
| + | * When the user click the '''OT Quota''' then the employee number of the employee and full name of the employee will display. Including the '''Date, Day Code, Quota Code and the Actual OT'''. The user can input data from it and after that the user must click the '''submit''' button. | ||
| + | |||
| + | |||
| + | [[File:OT quota2.JPG|600px|center|]] | ||
| + | |||
| + | |||
| + | [[File:Submit1.jpg|600px|center|]] | ||
| + | |||
| + | |||
| + | * Under the '''Transaction''' sub division, the '''Post Payroll''' is included, which display then '''post payroll''' then the '''payroll period'''. Then after the user select from it, the user can now click the '''post''' button. | ||
| + | |||
| + | [[File:Online.jpg|600px|center|]] | ||
| + | |||
| + | |||
| + | * Under The '''Report Division''', the '''Payroll Journal''' is included. Which display the '''Reports Generation''' and the user must input '''Year, Location''' and '''Pay period'''. Then after inputted the user can now click the submit button. | ||
| + | |||
| + | [[File:Payroll Journal.JPG|600px|center|]] | ||
| + | |||
| + | |||
| + | *Under the '''Admin Panel''', it include the '''Admin users'''. When the user click on it the '''Admin Panel- Admin Users''' page will display. | ||
| + | |||
| + | [[File:adminuser.JPG|250px|center]] | ||
| + | |||
| + | |||
| + | [[File:adminpage.JPG|500px|center]] | ||
| + | |||
| + | *The user can use the '''Search''' Button to easily find the data. Depending on Search all. | ||
| + | |||
| + | [[File:searchbutton.JPG|500px|center]] | ||
| + | |||
| + | *The '''Admin User''' divided into six division, it includes the '''Groups, User name, First name, Last name, Active''' and the '''location'''. | ||
| + | |||
| + | *It also includes the '''back''' button and '''next''' button for the page. The user can use the '''search box''' to search page. The user can also user the '''refresh''' button to reload the page. It will shows also the '''displaying item''' besides the refresh button. The at the right side is the '''export''' which is the downloading of a file, then the '''print''' which is the printing of file and the '''clear Filtering''' which is also a refresh to reload page. | ||
| + | |||
| + | [[File:Groups_username.JPG|500px|center]] | ||
| + | |||
| + | *When the user click the '''reset password''' button it will display the Reset Admin User Password. Then the user should input '''New Passwo'''r and the '''Retype Password''' on the text box. | ||
| + | |||
| + | [[File:reset password.JPG|500px|center]] | ||
| + | |||
| + | |||
| + | [[File:reset password2.JPG|300px|center]] | ||
| + | |||
| + | *When the user click the '''view''' button, it will display the '''Record Admin User''', including the '''User name, Email, Active, First name, Last name, Themes, Menu, Hmenu and the location'''. After the user view it, the user can now click the back to list button. | ||
| + | |||
| + | [[File:viewadmin.JPG|500px|center]] | ||
| + | |||
| + | |||
| + | [[File:viewadmin2.JPG|300px|center]] | ||
| + | |||
| + | *When the user click the '''edit''' button, the '''Edit Admin User''' will display, After the user edit some entry in the '''admin users''', the user now can click the '''update''' button to update the record and the '''update and go back to list''' button it will update the record and it will proceed to the main page of admin users. | ||
| + | |||
| + | [[File:editadmin.JPG|500px|center]] | ||
| + | |||
| + | |||
| + | [[File:editadmin2.JPG|300px|center]] | ||
| + | |||
| + | *When the user click the '''delete''' button to '''Delete Admin User''', the confirmation message will display, '''OK''' button to delete, and Cancel to not. | ||
| + | |||
| + | [[File:deleteadmin.JPG|500px|center]] | ||
| + | |||
| + | |||
| + | [[File:deleteadmin2.JPG|500px|center]] | ||
| + | |||
| + | |||
| + | *Under the '''Admin Panel''', it includes the '''Create Admin User'''. It will display the entry for the User Info, including the Entry for '''User name''', '''First Name''', '''Last Name''', '''Password''', '''Retype Password''', '''location''' and the '''group''' that can be selected as '''admin,''' '''manager''' and '''staff''' then after the user create '''new Admin User''', then click the '''submit''' button to save the data. | ||
| + | |||
| + | [[File:create admin.JPG|250px|center]] | ||
| + | |||
| + | |||
| + | [[File:create adminpage.JPG|300px|center]] | ||
| + | |||
| + | *Under the '''Admin Panel''' is the '''Admin User Group''', it display the Admin Panel- Admin User Groups main page | ||
| + | |||
| + | [[File:adminusergrp1.JPG|250px|center]] | ||
| + | |||
| + | |||
| + | [[File:adminusergrppage.JPG|500px|center]] | ||
| + | |||
| + | *The user can also use the '''search''' button to search data and description and it depends on the search all. | ||
| + | |||
| + | [[File:searchbutton.JPG|500px|center]] | ||
| + | |||
| + | *When the user click the '''Add Admin Group''' button, it will display the entry for '''new Admin Group.''' It includes the '''Name''' and the '''description'''. Then the user can now click the '''save''' and '''save and go back to list''' and '''cancel''' button. | ||
| + | |||
| + | [[File:add admingrp.JPG|500px|center]] | ||
| + | |||
| + | *In the '''Admin User Group''' it divided into two division including the '''Name''' and '''Description'''. | ||
| + | |||
| + | *It also includes the '''back''' button and '''next''' button for the page. The user can use the '''search box''' to search page. The user can also user the '''refresh''' button to reload the page. It will shows also the '''displaying item''' besides the refresh button. The at the right side is the '''Export''' which is the downloading of a file, then the Print which is the printing of file and the Clear '''Filtering''' which is also a refresh to reload page. | ||
| + | |||
| + | [[File:name_description.JPG|500px|center]] | ||
| + | |||
| + | *When the user click the '''view''' button, it will display the '''Record Admin Group'''. Which includes the '''Name''' and '''Description'''. Then the user can now click the '''Back to list''' button. | ||
| + | |||
| + | [[File:viewadmingrp.JPG|500px|center]] | ||
| + | |||
| + | |||
| + | [[File:viewadmingrp2.JPG|500px|center]] | ||
| + | |||
| + | *When the user click the '''Edit''' button, it will display the '''Edit Admin Button'''. Then the user are able to edit the entry including the '''Name''' and '''Description'''. After the user edit the entry, the user can now click the '''update changes''' button, '''update and go back to list''' button and the '''cancel''' button. | ||
| + | |||
| + | [[File:editadmin1.JPG|500px|center]] | ||
| + | |||
| + | |||
| + | [[File:editadmin2.JPG.JPG|500px|center]] | ||
| + | |||
| + | *When the user click the '''delete''' button to '''Delete Admin Group''' the '''confirmation message''' will appear, '''OK''' to delete and '''Cancel''' to not. | ||
| + | |||
| + | [[File:deleteadmingrp.JPG|500px|center]] | ||
| + | |||
| + | |||
| + | [[File:deleteadmingrp2.JPG|500px|center]] | ||
| + | |||
| + | |||
| + | *Under the '''Admin Panel''', it includes the '''Account Setting'''. Which includes the '''Account Info, for First Name, Last Name''' and the '''Change Password''' for '''Old Password, New Password and Retype Password''' entry. Then after the user input data on the entry, the user now can click the '''update''' and the '''submit''' button to save the account. | ||
| + | |||
| + | [[File:accountsetting1.JPG|250px|center]] | ||
| + | |||
| + | [[File:accountsettingpage.JPG|600px|center]] | ||
| + | |||
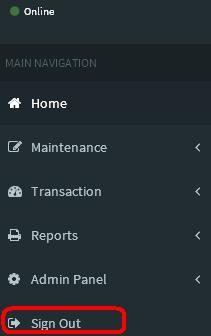
| + | *The last sub navigation is the '''Sign Out'''. When the user click it, the Page will automatically go back to '''Quota Base log in Main Page'''. | ||
| + | |||
| + | [[File:sign out.JPG|250px|center]] | ||
| + | |||
| + | |||
| + | == '''Reference''' == | ||
| + | [[Media:quota_base.doc|quota_base document]] | ||
Latest revision as of 13:47, 31 August 2016
Main Page > Application Development Team > System Manual
* This QuotaBase System has a six navigation,located at the left side of the system. These are the Home, Maintenance, Transaction, Reports, Admin Panel and Sign Out.
* This is the Home page of the QuotaBase System.
* Maintenance has five sub navigation including Group, Process Activity, Quota, Employee and Payperiod.
* Clicking the Group sub navigation of the user will viewed the Group Maintenance Module.
* The user can use the Add Group button to add a new entry, just input data on their each textbox.
* After the user inputted the data, the user can now click the save button and the confirmation will appear
* Then,when the user click the Save and go back to list button the data will stored and automatically back to the list.
* The user can use the Search button to easily find the data. Depending on Search all, Group Code and Group Description.
* The Group Maintenance is divided in two division, The Group Code which is the code of the item and the Group Description which is the item name. Then below it there is a combo box to show number of item per page and the user can select from it.
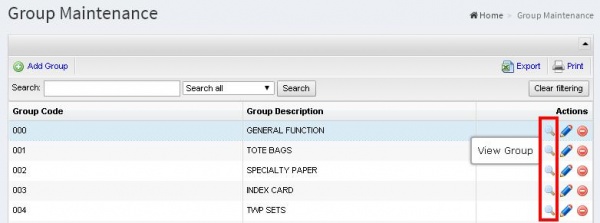
* It also includes the back button and next button for the page. The user can use the search box to search page. The user can also user the refresh button to reload the page. It will shows also the displaying item besides the refresh button. The at the right side is the export which is the downloading of a file, then the print which is the printing of file and the clear Filtering which is also a refresh to reload page.
* In the Action division, the first action is the View Group which display the Record Group depends on the selected record including the Group Code and The Group Description then the user can now click the back to list.
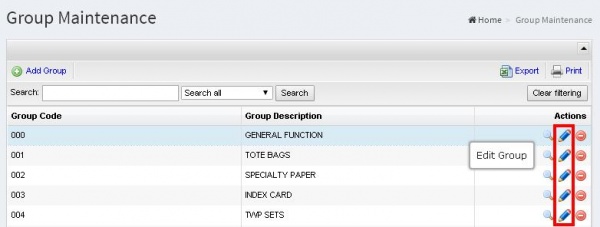
* In the Action division, the second action is the Edit Group to edit the record in the Group Code and Group Description then after that the user can now click the update changes which is to save the record but it will now go back to the list but when the user click the update and go back to list it automatically go back to the list and the user can also click the cancel button.
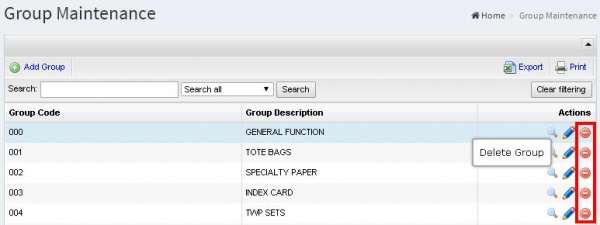
* In the action division the last action is the Delete Group which the user can delete group and it will pop up a confirmation, OK for delete and cancel for not.
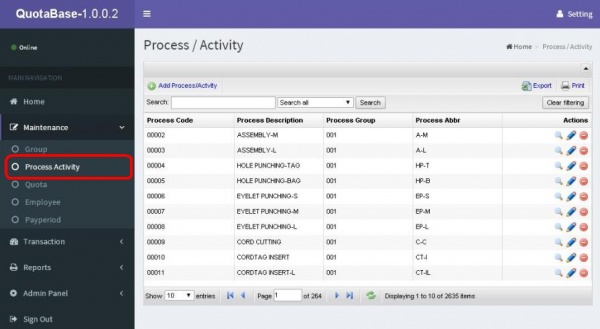
* Clicking the Process Activity sub navigation of the user will viewed the Process/Activity Module.
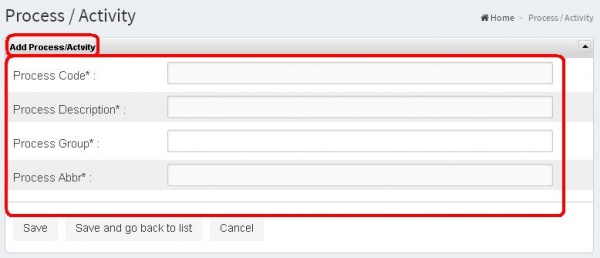
* The user can use the Add Process/Activity button to add a new entry, just input data on their each text box.
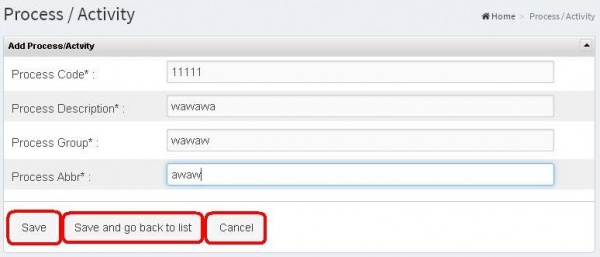
* Then,when the user click the Save and go back to list button the data will stored and automatically back to the list.
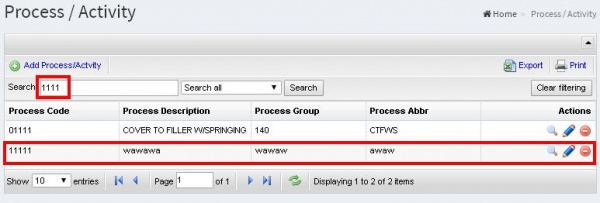
* The user can use the Search Button to easily find the data. Depending on Search all.
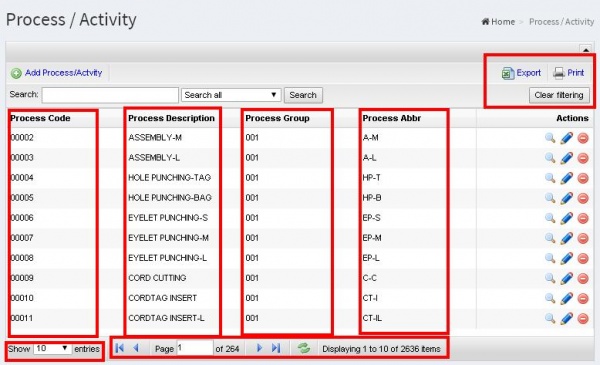
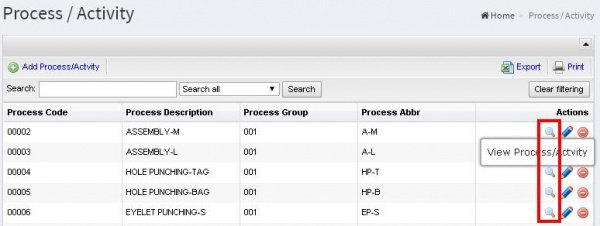
* The Process/Activity is divided in 4 division, including the Process Code which is the code of the record, Process Description which is the name of the record, next is the Process Group which is the Group number of the record and the Process Abbr which is the short name of the process description.
* It also includes the back button and next button for the page. The user can use the search box to search page. The user can also user the refresh button to reload the page. It will shows also the displaying item besides the refresh button. The at the right side is the export which is the downloading of a file, then the print which is the printing of file and the clear Filtering which is also a refresh to reload page.
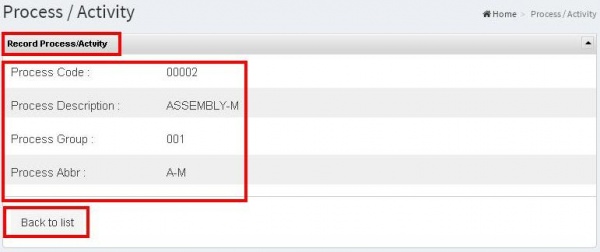
* In the Action division, the first action is the View Process/Activity which display the Record Process/Activity depends on the selected record including the Process Code, Process Description, Process Group and Process Abbr. then the user can now click the back to list.
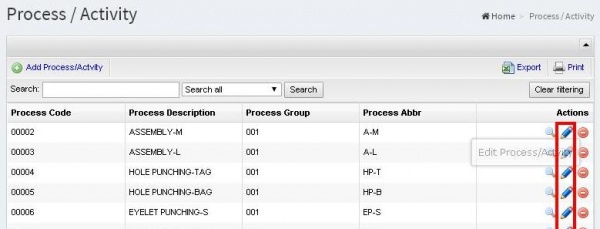
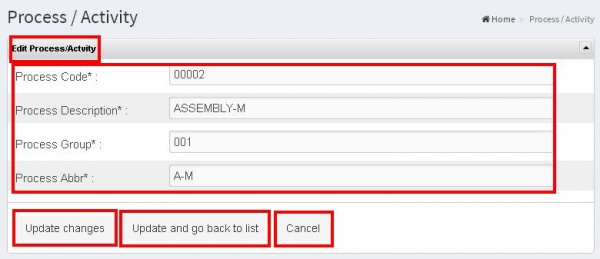
* In the Action division, the second action is the Edit Process/Activity to edit the record in the Process Code, Process Description, Process Group and the Process Abbr then after that the user can now click the update changes which is to save the record but it will now go back to the list but when the user click the update and go back to list it automatically go back to the list and the user can also click the cancel button.
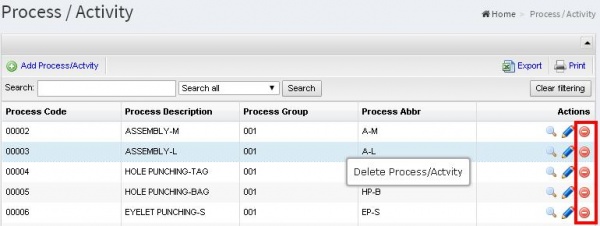
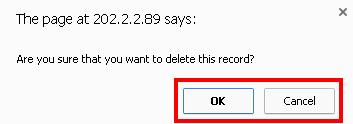
* In the action division the last action is the Delete Process/Activity which the user can delete Records in the Process/Activity and it will pop up a confirmation, OK for delete and cancel for not.
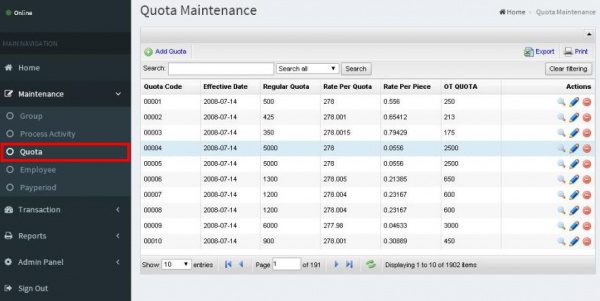
* Clicking the Quota sub navigation of the user will viewed the Quota Maintenance Module.
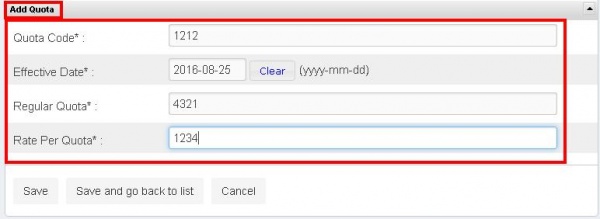
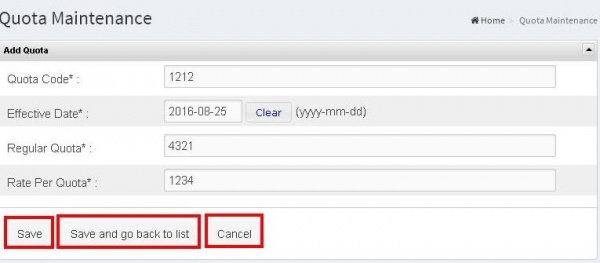
* The user can use the Add Quota button to add a new entry, just input data on their each text
box.
* After the user inputted the data, the user can now click the save button and the confirmation will appear.
* Then,when the user click the Save and go back to list button the data will stored and automatically back to the list.
Bold text * The user can use the Search Button to easily find the data. Depending on Search all.
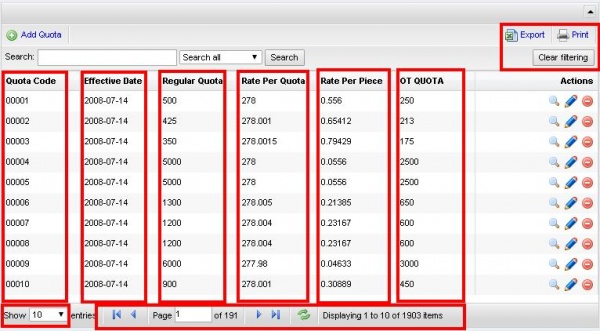
* The Process/Activity is divided in 6 division, the Quota Code, Effective Date, Regular Quota, Rate Per Quota, Rate Per Place, OT QUOTA.
* It also includes the back button and next button for the page. The user can use the search box to search page. The user can also user the refresh button to reload the page. It will shows also the displaying item besides the refresh button. The at the right side is the export which is the downloading of a file, then the print which is the printing of file and the clear Filtering which is also a refresh to reload page.
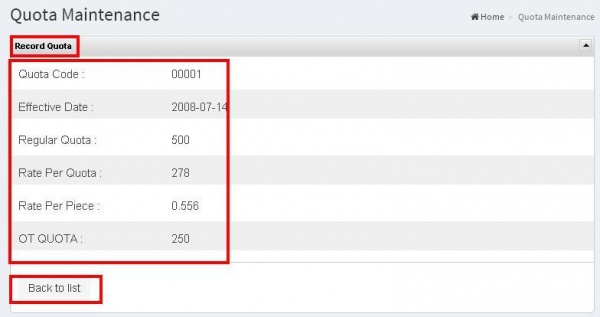
* In the Action division, the first action is the View Quota which display the Record of Quota depends on the selected record including the Quota Code, effective Date, Regular Quota, Rate Per Quota, Rate Per Piece and OT QUOTA then the user can now click the back to list.
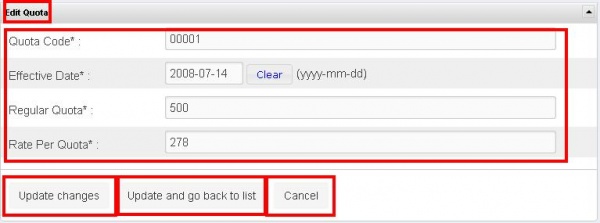
* In the Action division, the second action is the Edit Quota which includes the Quota Code,Effective Date, Regular Quota, Rate Per Quota, Rate Per Pieces OT QUOTA, then after that the user can now click the update changes which is to save the record but it will now go back to the list but when the user click the update and go back to list it automatically go back to the list and the user can also click the cancel button.
* In the action division the last action is the Delete Quota which the user can delete Records in the and it will pop up a confirmation, OK for delete and cancel for not.
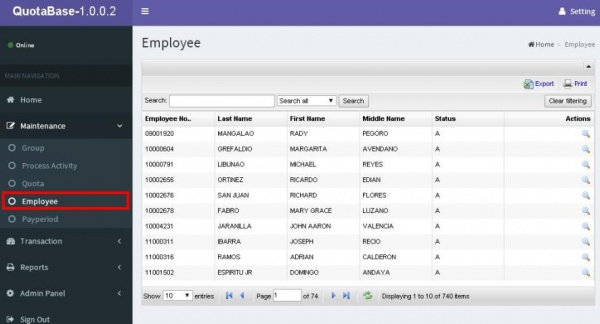
* Clicking the Employee sub navigation of the user will viewed the Employee Module.
* The user can use the Search Button to easily find the data. Depending on Search all
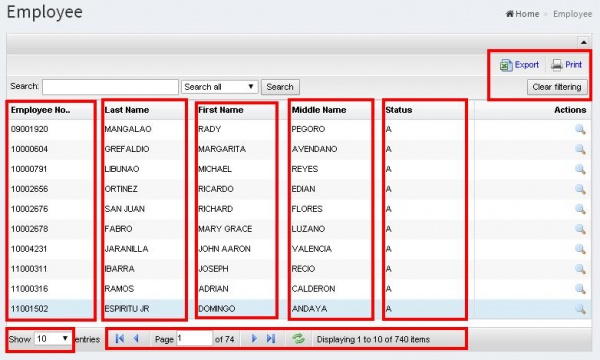
* In Employee, It is divided in 5 division which is the Employee No. which is the ID number of the employee, including the Last Name, First Name, Middle Name and Status.
* It also includes the back button and next button for the page. The user can use the search box to search page. The user can also user the refresh button to reload the page. It will shows also the displaying item besides the refresh button. The at the right side is the export which is the downloading of a file, then the print which is the printing of file and the clear Filtering which is also a refresh to reload page
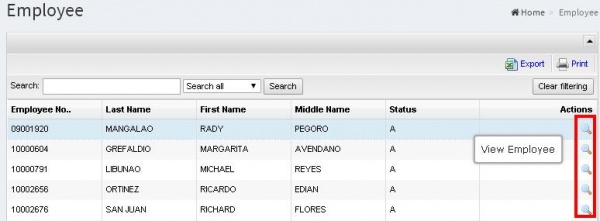
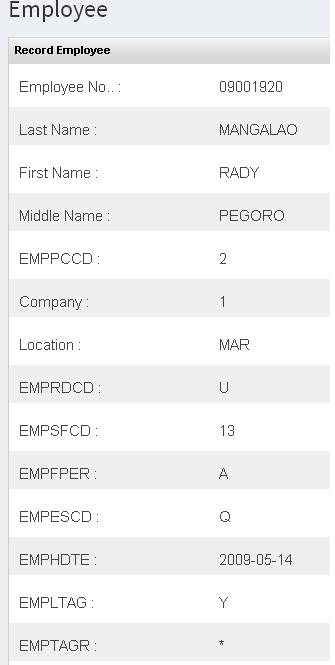
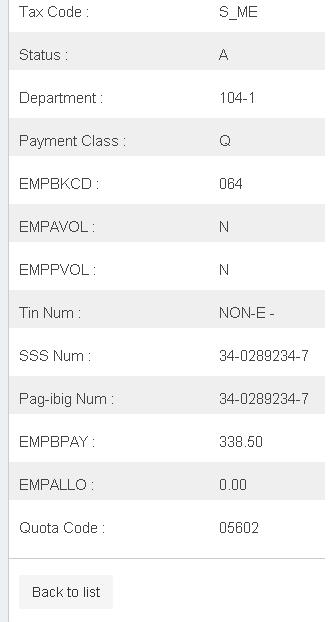
* In Action Division it include the View Employee. When the user click it, The record of the employee will display including the information about the employee and the company background, then after the user view it, the user can now click the back to list button.
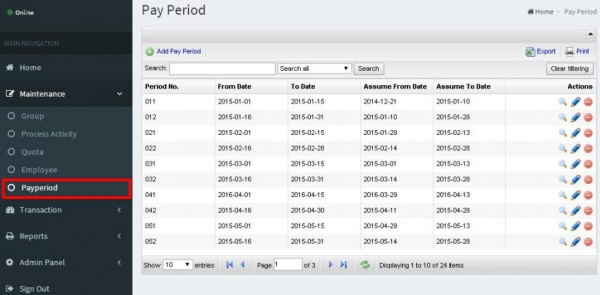
* Clicking the Pay period sub navigation of the user will viewed the Pay Period Module.
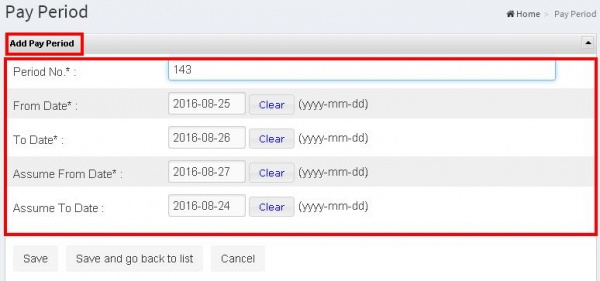
* The user can use the Add Pay Period button to add a new entry, just input data on their each textbox
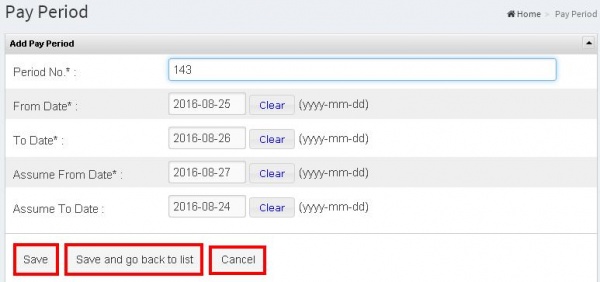
* After the user inputted the data, the user can now click the save button and the confirmation will appear.
* The user can use the Search Button to easily find the data. Depending on Search all.
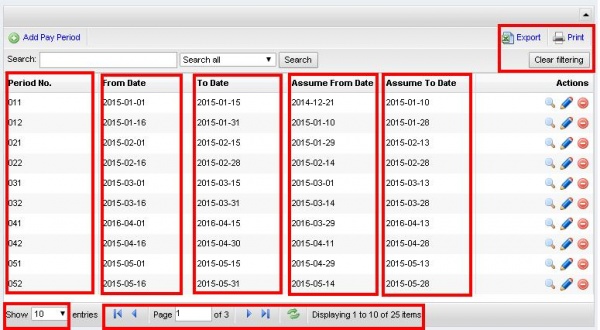
* The Pay Period, has 5 division including the Period No, From Date, To Date, Assume From Date, Assume To Date
* It also includes the back button and next button for the page. The user can use the search box to search page. The user can also user the refresh button to reload the page. It will shows also the displaying item besides the refresh button. The at the right side is the export which is the downloading of a file, then the print which is the printing of file and the clear Filtering which is also a refresh to reload page.
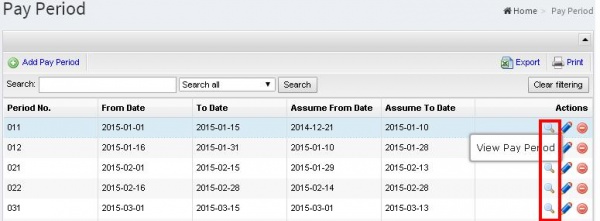
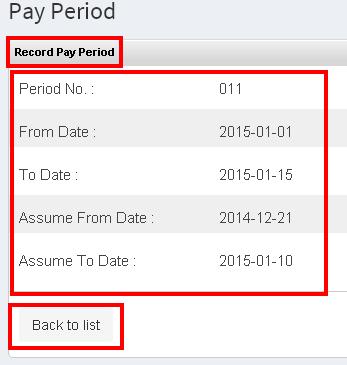
* In the Action division, the first action is the View Pay Period which display the Record Pay Period depends on the selected record including the Period No. From Date, To Date Assume From Date and Assume To Date. Then the user can now click the back to list.
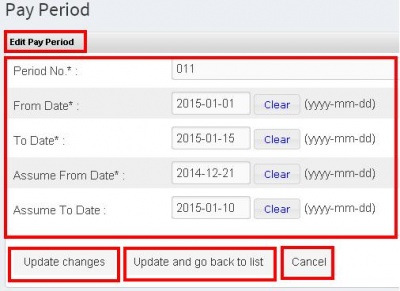
* In the Action division, the second action is the Edit Pay Period to edit the record in the Period No. From Date, To Date, Assume from Date, and Assume to Date. Then after that the user can now click the update changes which is to save the record but it will now go back to the list but when the user click the update and go back to list it automatically go back to the list and the user can also click the cancel button.
* In the action division the last action is the Delete Pay Period which the user can delete Pay Period and it will pop up a confirmation, OK for delete and cancel for not.
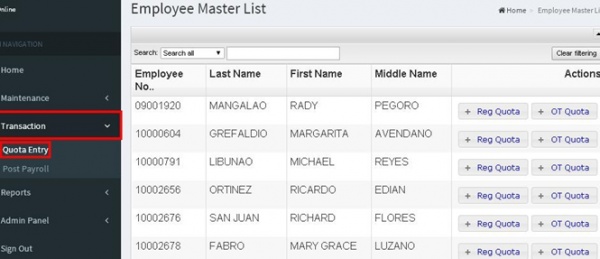
* In the Transaction sub division, The Quota Entry is included. Which display the Employee Master List.
* The user can use the Search Button to easily find the data. Depending on Search all.
* In the Employee Master List, It classify as Employee No. Which is the ID number of the employee, Last Name, First Name And the Middle Name.
It also includes the back button and next button for the page. The user can use the search box to search page. The user can also user the refresh button to reload the page. It will shows also the displaying item besides the refresh button. The at the right side is the clear Filtering which is also a refresh to reload page.
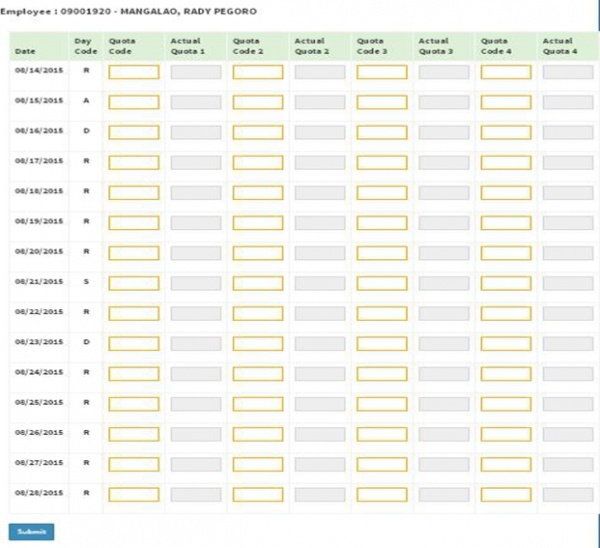
* When the user click the Reg Quota it will display the Employee number of the employee and the full name of the employee. Which include the Date, Day Code, Quota Code and the Actual Quota. The user can input data from it and after that the user must click the submit button.
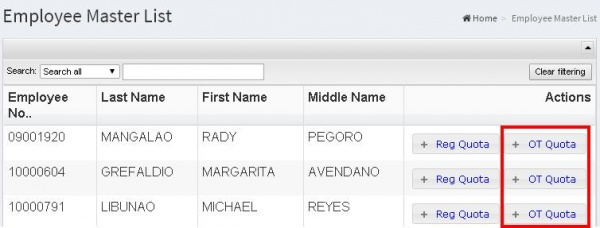
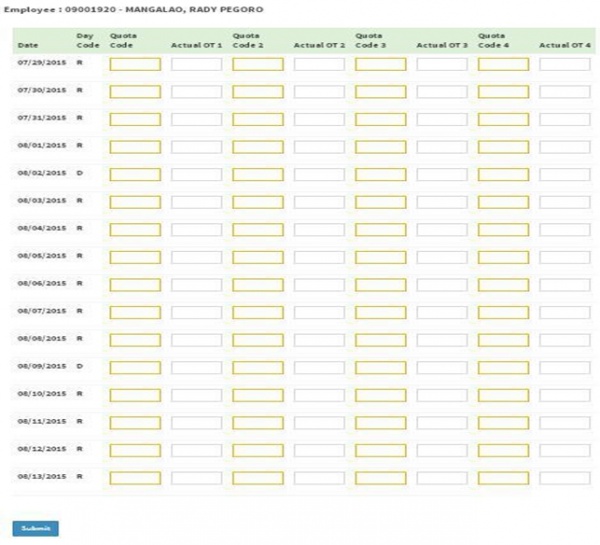
* When the user click the OT Quota then the employee number of the employee and full name of the employee will display. Including the Date, Day Code, Quota Code and the Actual OT. The user can input data from it and after that the user must click the submit button.
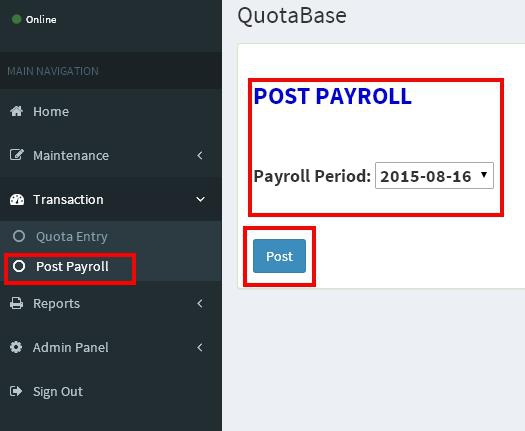
* Under the Transaction sub division, the Post Payroll is included, which display then post payroll then the payroll period. Then after the user select from it, the user can now click the post button.
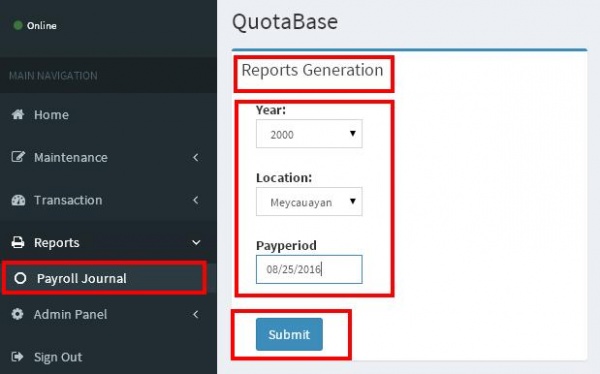
* Under The Report Division, the Payroll Journal is included. Which display the Reports Generation and the user must input Year, Location and Pay period. Then after inputted the user can now click the submit button.
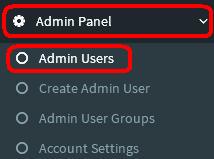
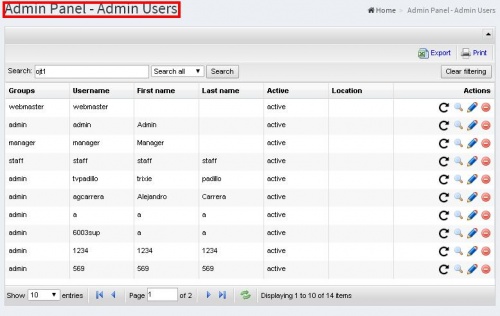
*Under the Admin Panel, it include the Admin users. When the user click on it the Admin Panel- Admin Users page will display.
*The user can use the Search Button to easily find the data. Depending on Search all.
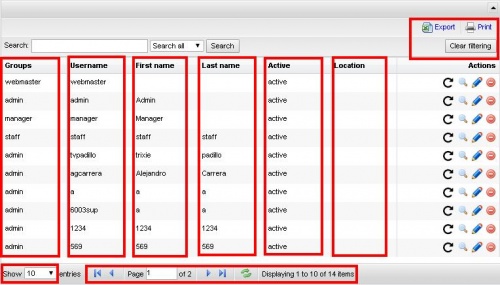
*The Admin User divided into six division, it includes the Groups, User name, First name, Last name, Active and the location.
*It also includes the back button and next button for the page. The user can use the search box to search page. The user can also user the refresh button to reload the page. It will shows also the displaying item besides the refresh button. The at the right side is the export which is the downloading of a file, then the print which is the printing of file and the clear Filtering which is also a refresh to reload page.
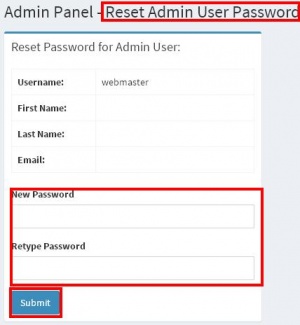
*When the user click the reset password button it will display the Reset Admin User Password. Then the user should input New Passwor and the Retype Password on the text box.
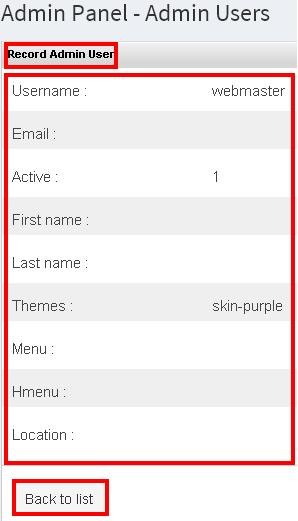
*When the user click the view button, it will display the Record Admin User, including the User name, Email, Active, First name, Last name, Themes, Menu, Hmenu and the location. After the user view it, the user can now click the back to list button.
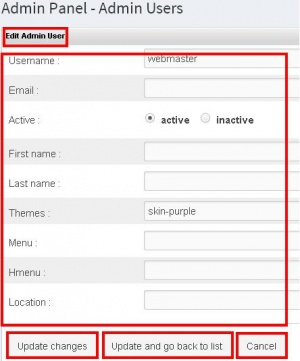
*When the user click the edit button, the Edit Admin User will display, After the user edit some entry in the admin users, the user now can click the update button to update the record and the update and go back to list button it will update the record and it will proceed to the main page of admin users.
*When the user click the delete button to Delete Admin User, the confirmation message will display, OK button to delete, and Cancel to not.
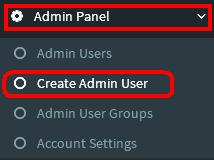
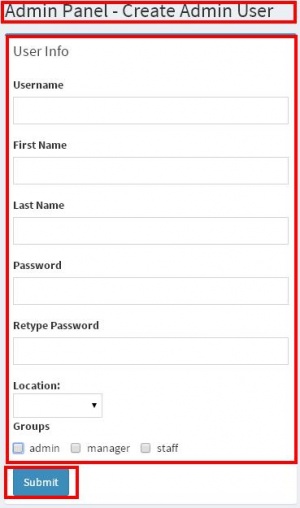
*Under the Admin Panel, it includes the Create Admin User. It will display the entry for the User Info, including the Entry for User name, First Name, Last Name, Password, Retype Password, location and the group that can be selected as admin, manager and staff then after the user create new Admin User, then click the submit button to save the data.
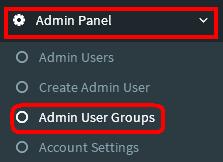
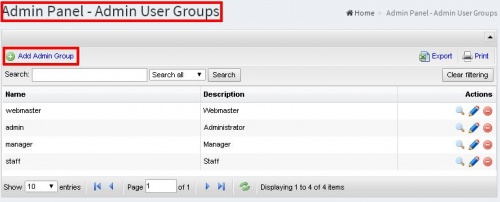
*Under the Admin Panel is the Admin User Group, it display the Admin Panel- Admin User Groups main page
*The user can also use the search button to search data and description and it depends on the search all.
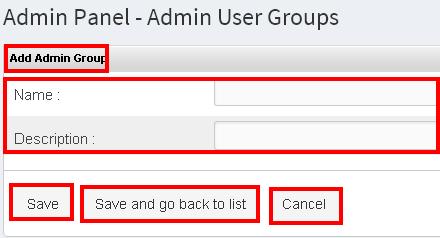
*When the user click the Add Admin Group button, it will display the entry for new Admin Group. It includes the Name and the description. Then the user can now click the save and save and go back to list and cancel button.
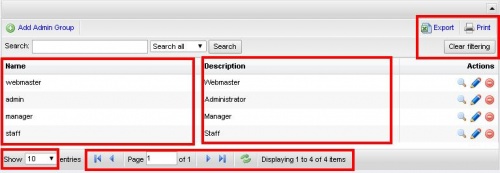
*In the Admin User Group it divided into two division including the Name and Description.
*It also includes the back button and next button for the page. The user can use the search box to search page. The user can also user the refresh button to reload the page. It will shows also the displaying item besides the refresh button. The at the right side is the Export which is the downloading of a file, then the Print which is the printing of file and the Clear Filtering which is also a refresh to reload page.
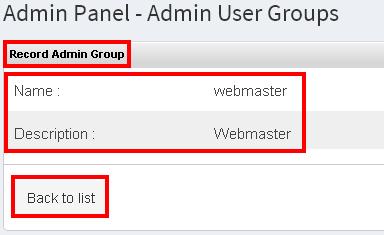
*When the user click the view button, it will display the Record Admin Group. Which includes the Name and Description. Then the user can now click the Back to list button.
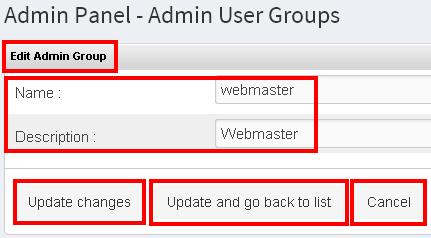
*When the user click the Edit button, it will display the Edit Admin Button. Then the user are able to edit the entry including the Name and Description. After the user edit the entry, the user can now click the update changes button, update and go back to list button and the cancel button.
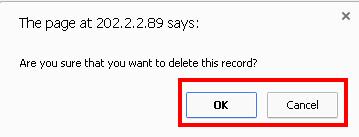
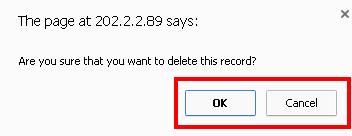
*When the user click the delete button to Delete Admin Group the confirmation message will appear, OK to delete and Cancel to not.
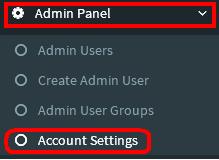
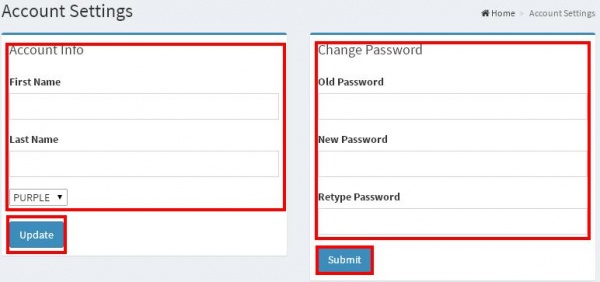
*Under the Admin Panel, it includes the Account Setting. Which includes the Account Info, for First Name, Last Name and the Change Password for Old Password, New Password and Retype Password entry. Then after the user input data on the entry, the user now can click the update and the submit button to save the account.
*The last sub navigation is the Sign Out. When the user click it, the Page will automatically go back to Quota Base log in Main Page.
